Hamburger_menu.svg

Vue.js interview questions and answers in 2024

If you want to work as a successful Vue.js developer for a top Silicon Valley firm or build a team of talented Vue.js developers, you've come to the right spot. We've carefully compiled a list of Vue.js developer interview questions for your Vue.js interview to give you an idea of the kind of Vue.js interview questions you can ask or be asked.

Last updated on Apr 25, 2024

Vue.js has emerged as a powerhouse in the JavaScript framework landscape. Vue.js, with its simplicity, flexibility, and impressive performance, has gained immense popularity among both developers and organizations looking to craft cutting-edge web experiences.

As Vue.js continues to gain momentum, so does the demand for skilled Vue.js developers. Whether you're a hiring manager searching for the perfect candidate to join your team or a developer looking to brush up on your Vue.js knowledge for an upcoming Vue.js developer job, this blog is your comprehensive guide to acing Vue.js interviews. This curated list covers the entire Vue.js spectrum, from the basics to advanced topics, ensuring that it serves as the ultimate companion for anyone navigating the dynamic world of Vue.js interviews.

Basic Vue.js interview questions and answers

1.

What is Vue.js, and what are its key features?

Vue.js, often referred to as Vue, is a popular open-source JavaScript framework used for building user interfaces and web applications. Created by Evan You and first released in 2014, Vue.js has gained significant traction in the web development community due to its simplicity, flexibility, and impressive performance. Here are some key features and characteristics of Vue.js:

Progressive Framework: One of Vue.js's standout features is its progressive nature. It allows developers to use as much or as little of the framework as they need. You can gradually introduce Vue.js into an existing project, making it versatile and easy to adopt.

Declarative Rendering: Vue.js uses a declarative approach to building UIs. Developers describe the desired outcome of the user interface, and Vue.js takes care of the underlying logic and updates the DOM (Document Object Model) accordingly. This makes the code more intuitive and easier to understand.

Component-Based Architecture: Vue.js is built around a component-based architecture. Components are self-contained, reusable building blocks that can be composed to create complex user interfaces. This promotes code reusability and maintainability.

Virtual DOM: Vue.js employs a Virtual DOM (Virtual Document Object Model) to optimize DOM manipulation. Instead of directly updating the real DOM, Vue.js makes changes to a virtual representation first and then efficiently updates the actual DOM only where necessary, reducing unnecessary re-rendering and enhancing performance.

Two-Way Data Binding: Vue.js provides two-way data binding out of the box. This means that changes to the model (data) are automatically reflected in the view (UI), and vice versa. This simplifies data synchronization between components.

2.

How do you create a new Vue instance?

To create a new Vue instance, you need to use the Vue constructor function. Here's an example:

const app = new Vue({ // Options and configuration go here });

3.

Explain the Vue instance lifecycle hooks.

Vue instance lifecycle hooks are specific methods that allow you to perform actions at different stages of a component's lifecycle. The main lifecycle hooks are beforeCreate, created, beforeMount, mounted,beforeUpdate, updated, beforeDestroy, and destroyed.

They enable you to interact with data, perform computations, or manipulate the DOM at various points during the component's existence.

4.

What is data binding in Vue.js?

Data binding in Vue.js is the automatic synchronization of data between the model and the view. It allows changes to the application state to be reflected in the UI and vice versa, without manual intervention.

Vue supports one-way data binding (v-bind or : ) and two-way data binding (v-model) to streamline the process of updating the data and the UI.

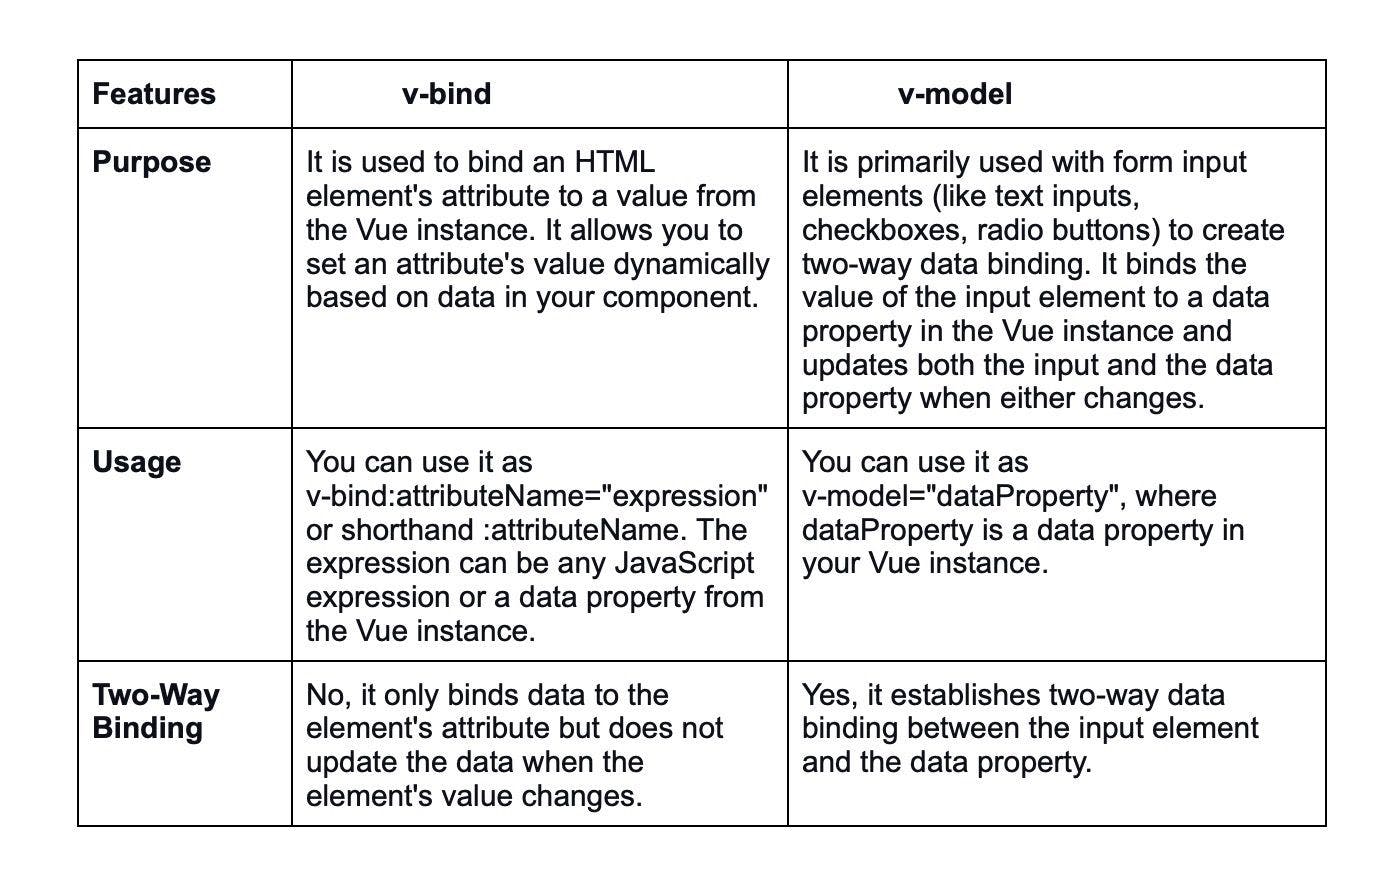
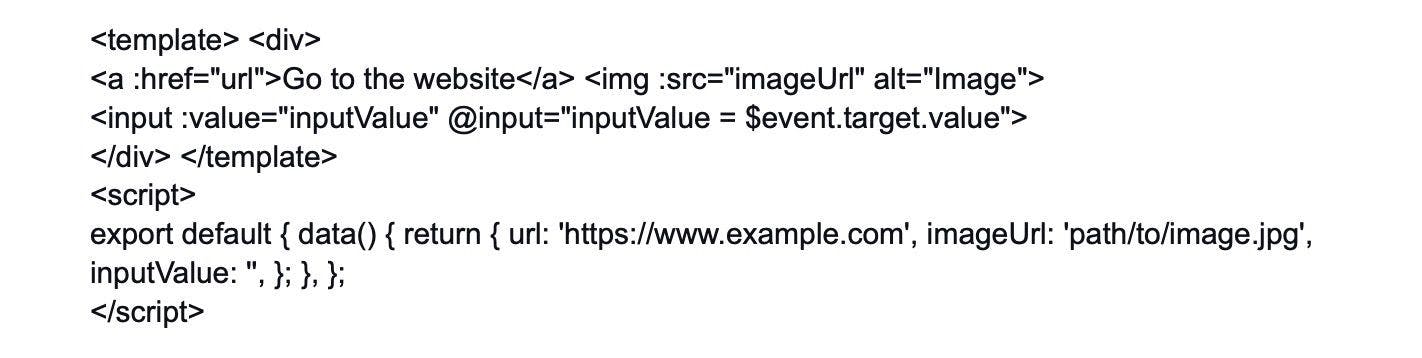
5.

What is the difference between v-bind and v-model directives?

v-bind and v-model are both directives in Vue.js used to interact with data and update elements in the DOM, but they serve different purposes:

v-bind and v-model.webp

6.

How do you handle user input and events in Vue.js?

To handle user input and events in Vue.js, you can use the v-on directive (or @ shorthand). By binding event listeners to methods, you can respond to user interactions, such as button clicks, input changes, or keyboard events.

7.

What is the purpose of computed properties in Vue.js?

Computed properties in Vue.js are used to calculate and cache derived data from the component's reactive data. They help avoid unnecessary recalculations by updating only when their dependencies change. Computed properties are often used for complex calculations or data transformations.

8.

How can you conditionally render elements in Vue.js?

You can conditionally render elements in Vue.js using the v-if, v-else, and v-else-if directives. These directives allow you to control the rendering of elements based on certain conditions or expressions.

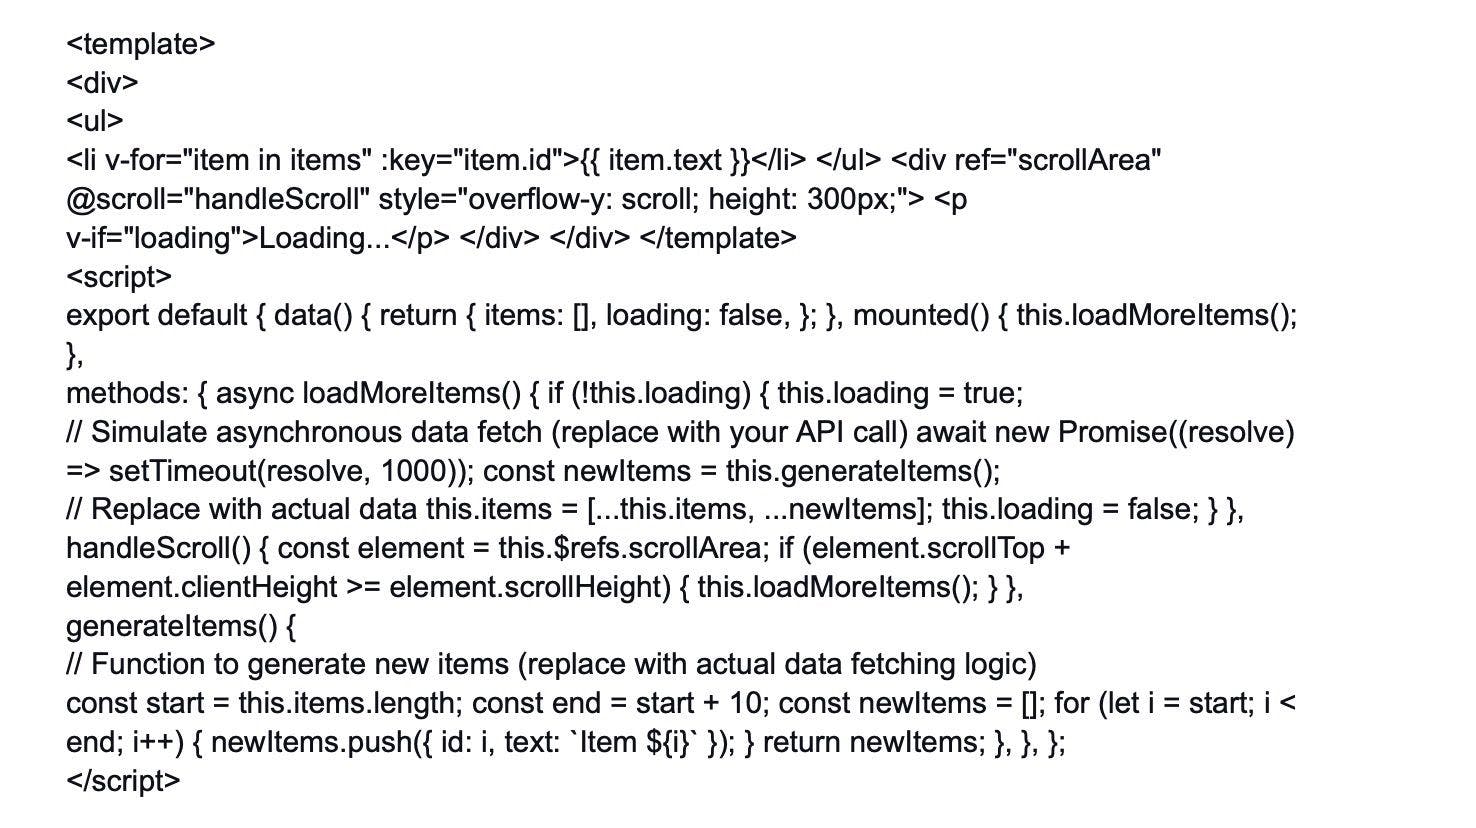
9.

How do you loop through an array in Vue.js using v-for?

To loop through an array in Vue.js, you can use the v-for directive. It allows you to iterate over an array and render elements for each item in the array.

Here's an example:

loop array vue js.webp

10.

What is the significance of the "key" attribute when using v-for?

The "key" attribute in v-for is essential for efficient list rendering and helps Vue identify each rendered item uniquely. It aids in maintaining the component's state and reusing elements instead of recreating them when the list changes, improving performance.

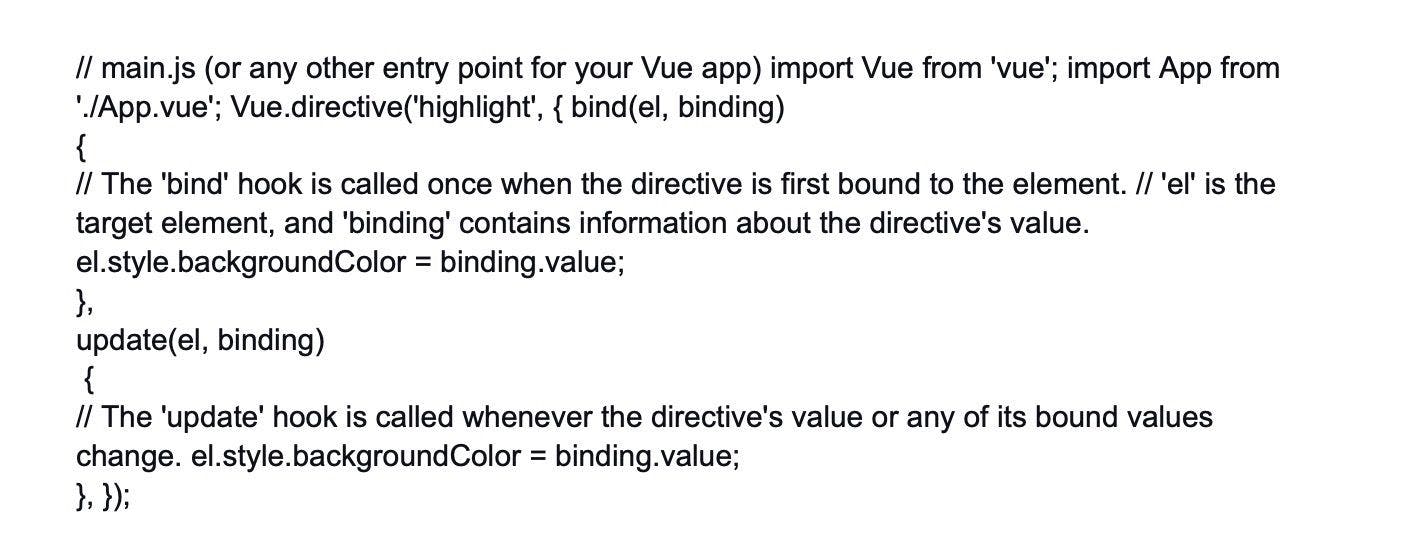
11.

Explain directives in Vue.js.

This is an important Vue.js interview question. The directive is a piece of markup that tells the library what to do with a certain DOM element. Vue.js comes with a number of built-in directives, such as v-bind and v-model. You can also make your own directions.

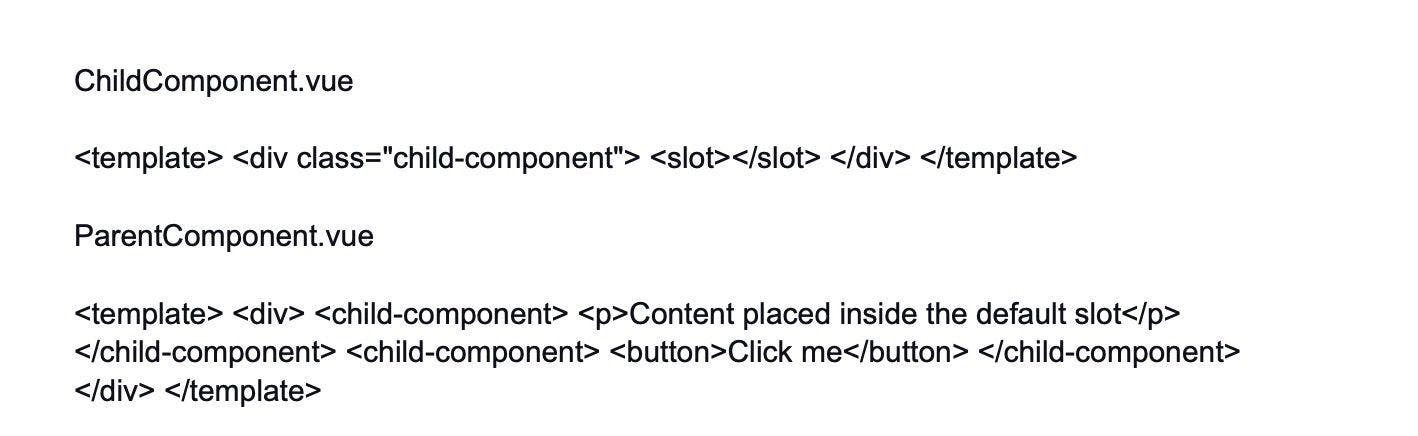
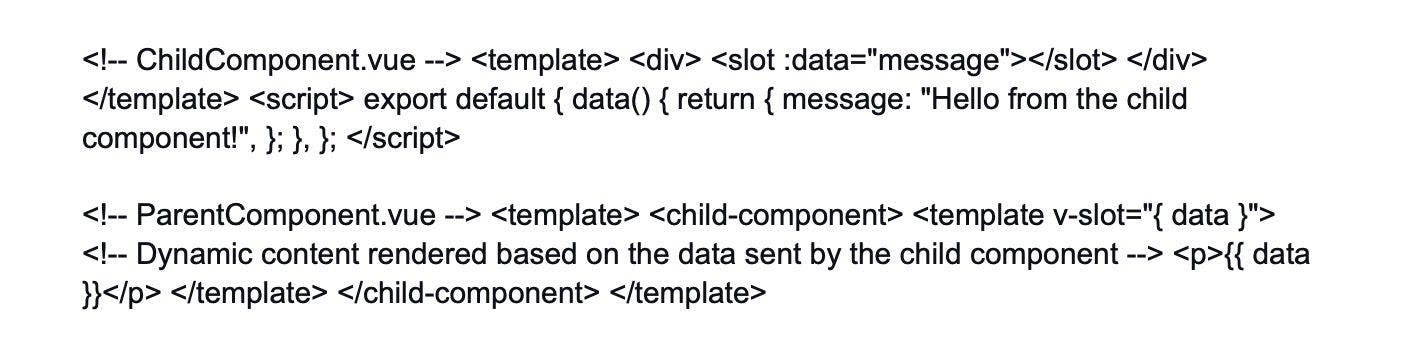
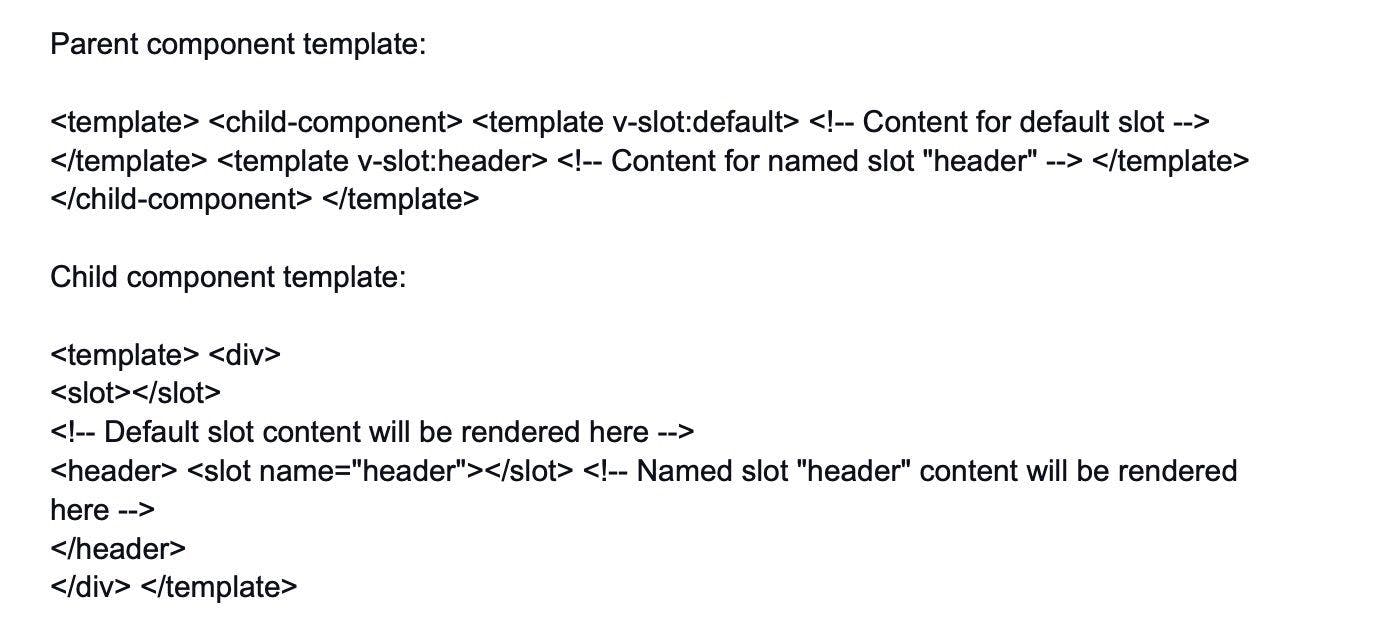
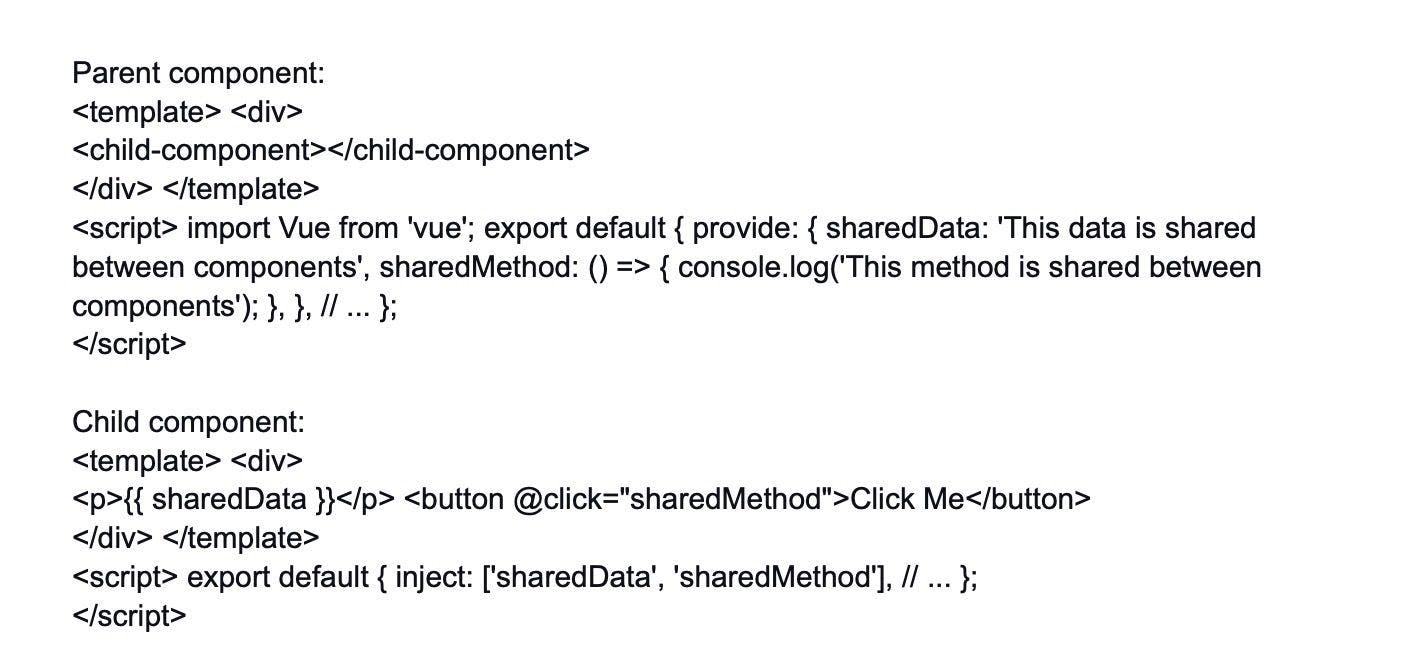
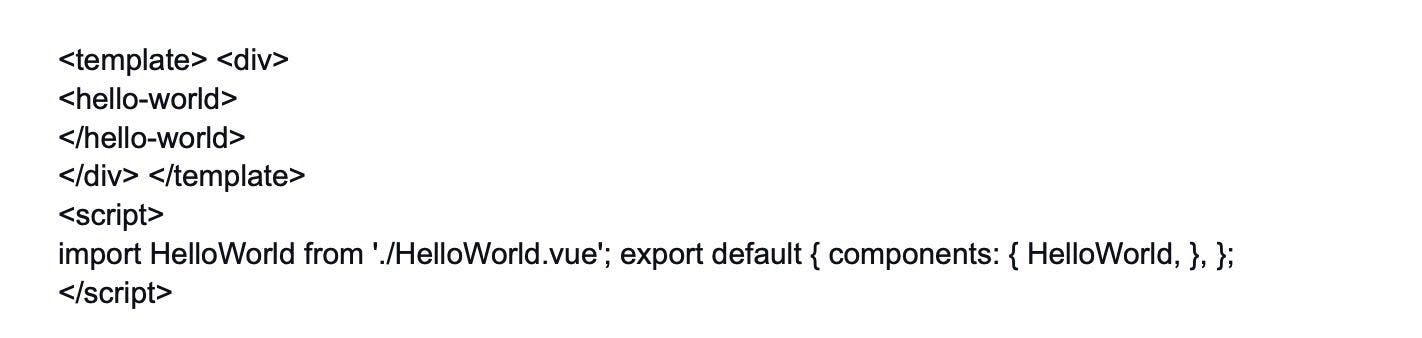
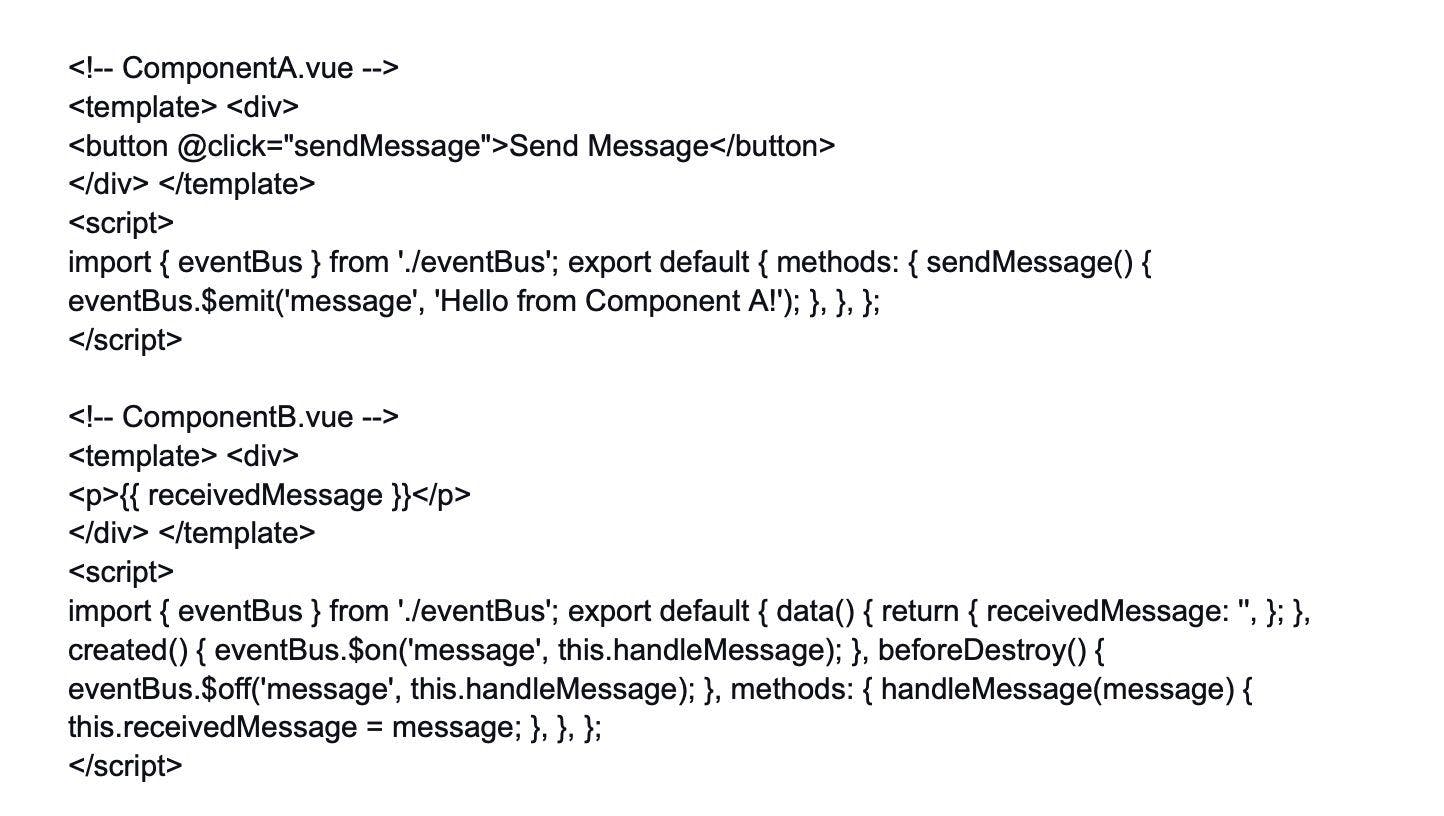
12.

How can you share the data between components in Vue.js application?

Data flow is important for transferring information between components.

Parent Component to Child - 'Props' is used to send data from a parent component to a child component. Props are custom attributes that you may register on a component, and when a value is supplied to those props attributes, that component instance becomes a property. As a result, all modifications made by the parent component are reflected in the prop attribute of the child component.

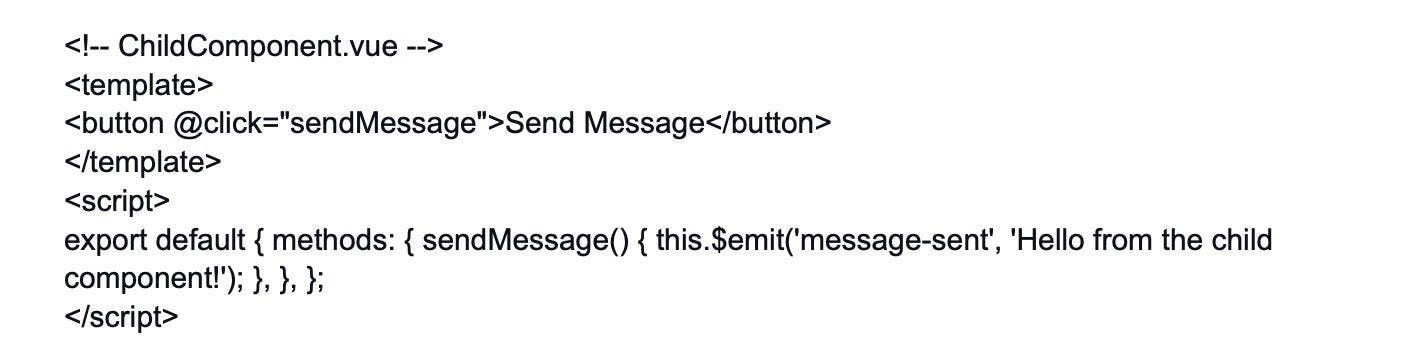
To handle this problem, Vue instances provide the notion of events. Child Component to Parent - Some scenarios may necessitate communication back to the parent component, hence Vue instances provide the concept of events to solve this case.

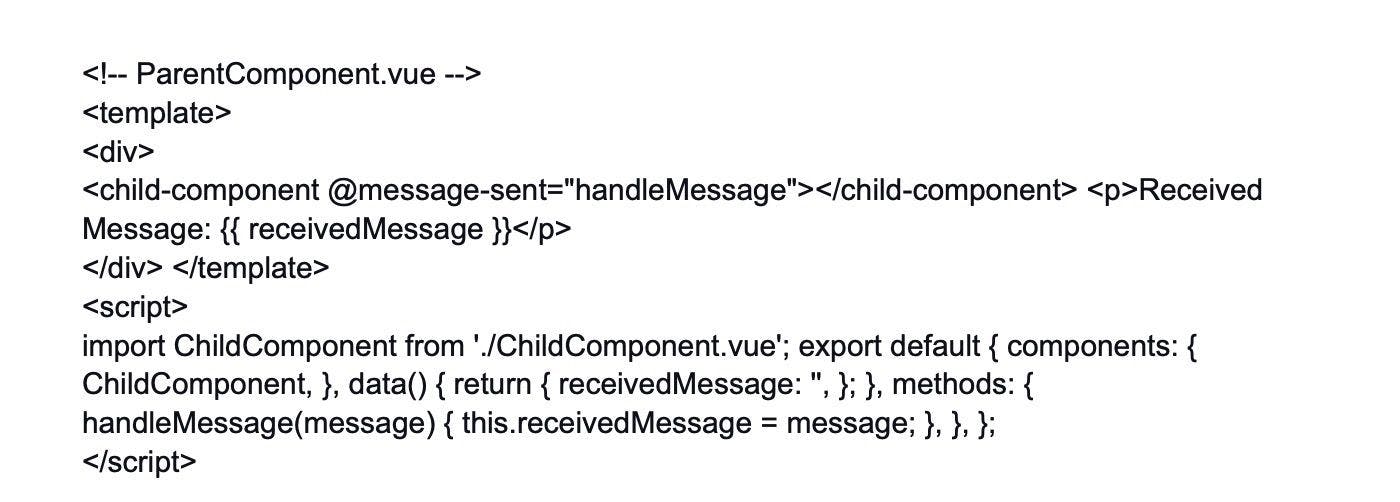
The parent component can use 'v-on' to listen to any event on the child component, and the child component can use the $emit method to emit any event.

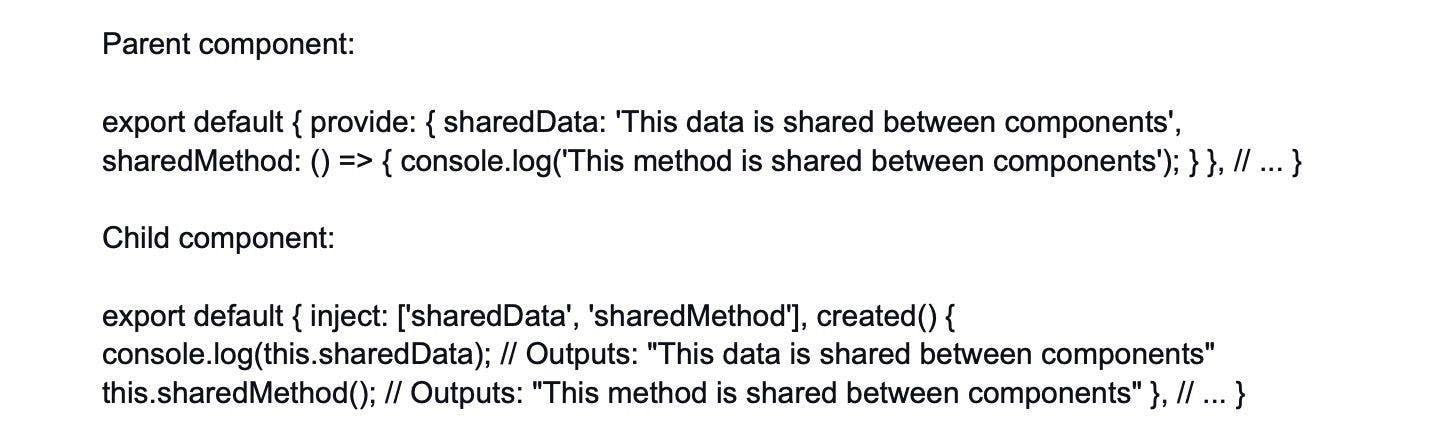
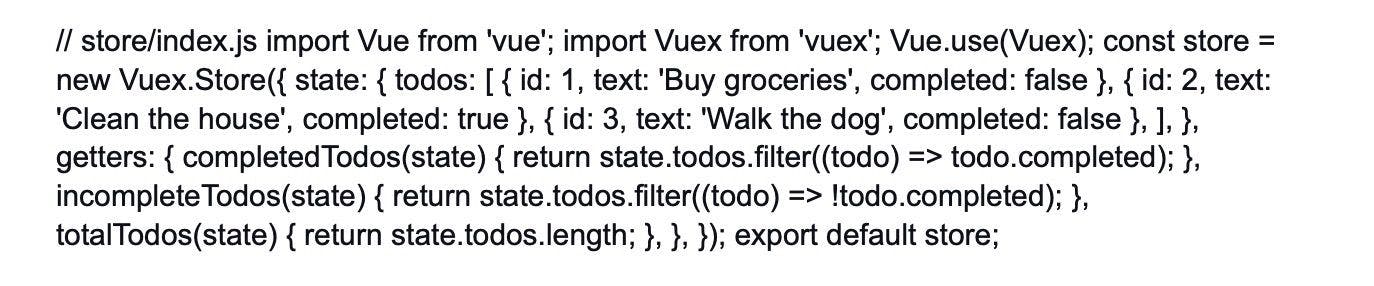
Data Sharing Across Components - In some cases, data sharing across all components may be essential. Vuex overcomes this challenge by establishing a centralized data store that is accessible to all components.

13.

How do you handle conditional rendering using the "v-if" and "v-else" directives?

You can use the v-if and v-else directives to handle conditional rendering in Vue.js. When the condition specified in v-if evaluates to true, the associated element is rendered; otherwise, if the condition is false, the element associated with v-else is rendered.

14.

What are the Jest and Mocha in Vue CLI?

This is a rather popular Vue.js interview question. Jest and Mocha are built-in unit testing tools in the Vue CLI. Jest is a Facebook-developed test runner. It provides a unit-testing solution that is battery-powered. To run Jest tests, use the Vue CLI plugin 'cli-plugin-unit-jest'.

Mocha is a JavaScript-based test framework for asynchronous testing that works on Node.js and in browsers. It includes a built-in webpack precompiler.

15.

What is the usage of $parent?

In the child component, $parent is used to retrieve the parent component instance. It's more difficult to test and debug the program, and you can't figure out where the mutation comes from. Vue also has a $child function that returns a child component instance, similar to $parent.

16.

What is a Key?

This is one of the most asked Vue.js interview questions. In Vue, the key attribute is used as a clue for the virtual DOM technique to distinguish VNodes when creating a new node list from an existing one.

If the 'key' attribute is not utilized, Vue utilizes an algorithm that tries to reuse elements of the same type and reduces element movement. The elements with the 'key' property, on the other hand, will be reordered and the elements without it will be eliminated. It's similar to AngularJS's $index. It's most commonly used in conjunction with the 'v-for' directive.

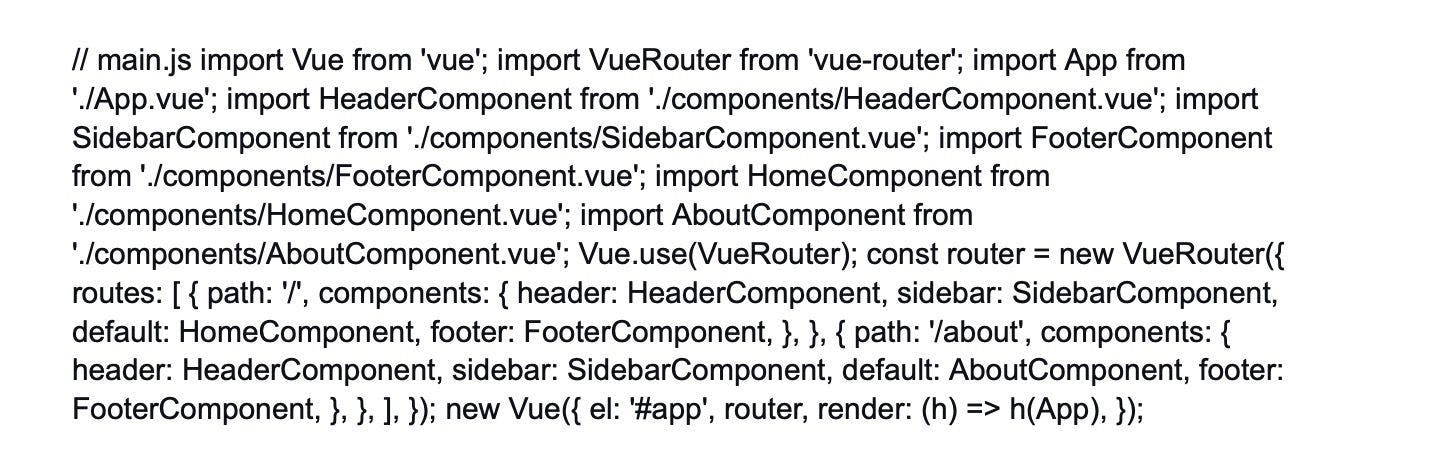
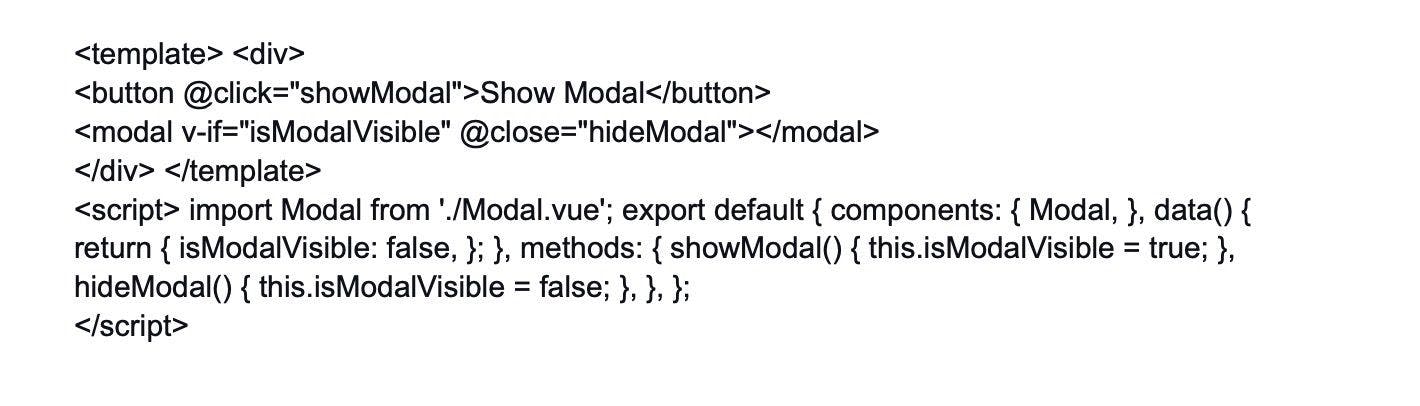
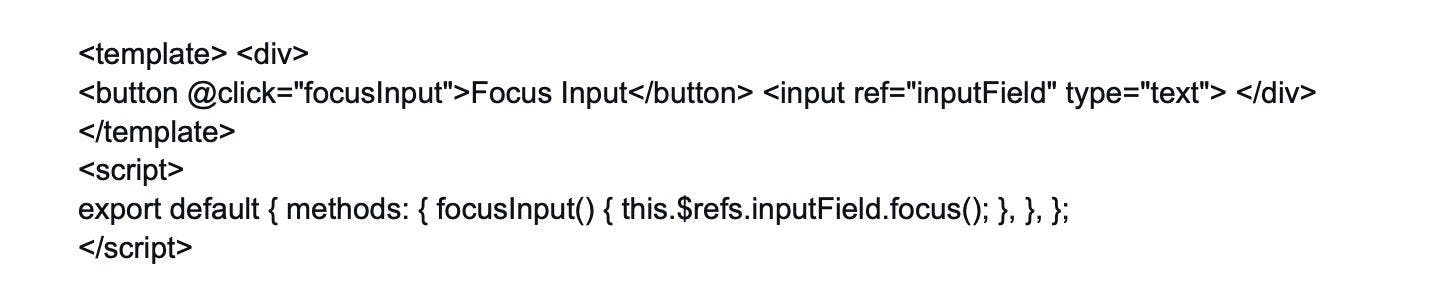
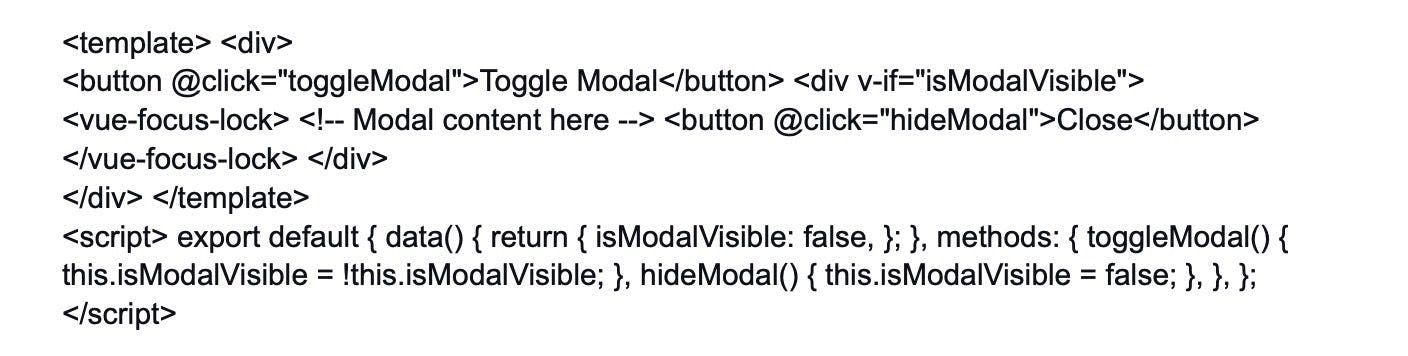
17.

Explain the significance of the "ref" attribute in Vue.js and when to use it.

The "ref" attribute in Vue.js is used to give components or HTML elements a unique reference, allowing you to access them directly from the parent component using this.$refs. It is often used when you need to interact with child components or access specific elements in the DOM directly.

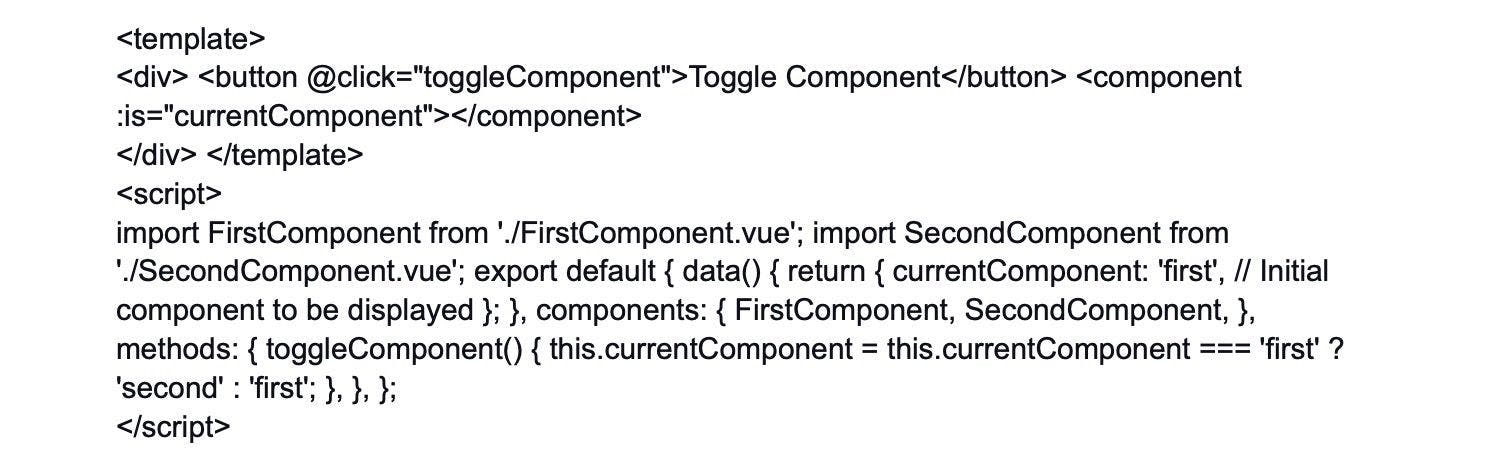
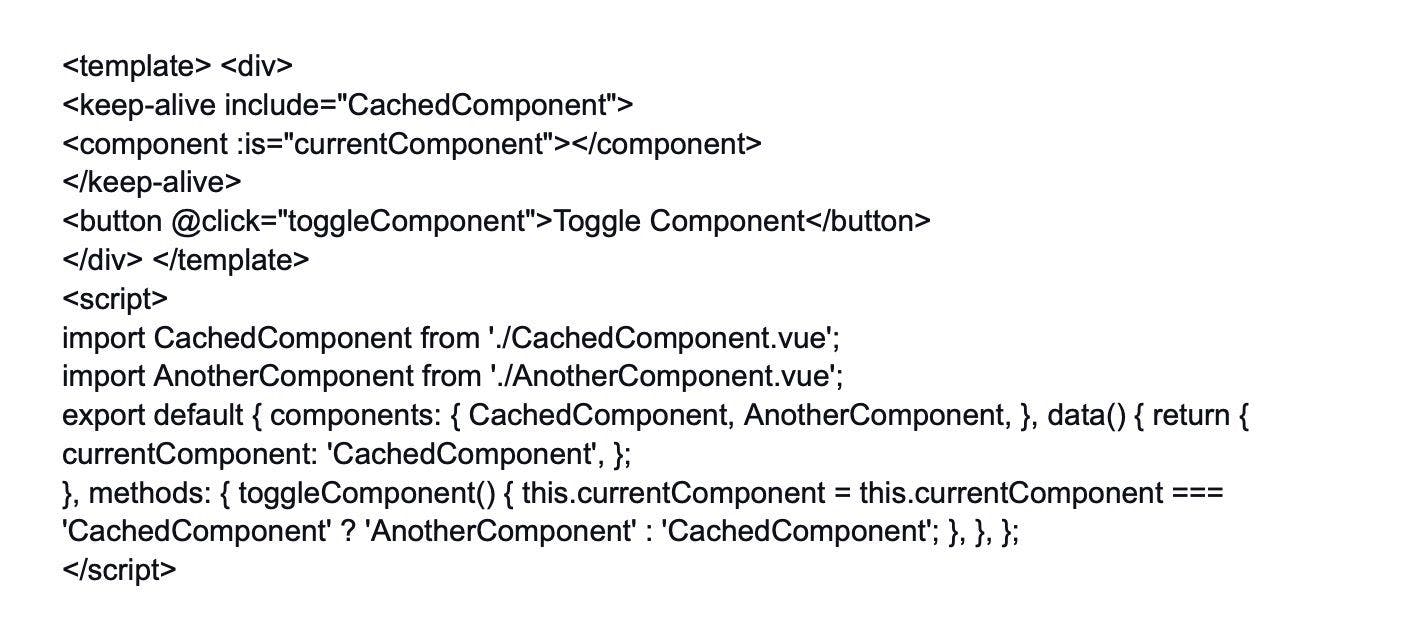
18.

What is the "v-once" directive, and how does it differ from other directives?

The "v-once" directive is used to render an element or component only once, and it prevents it from being updated even if its data changes. Unlike other directives, which re-render elements when data changes, "v-once" is useful when you have static content that doesn't need to be re-evaluated.

19.

How do you handle two-way data binding in Vue.js using the "v-model" directive?

The "v-model" directive provides two-way data binding in Vue.js. It allows you to bind form inputs (like text fields, checkboxes, or radio buttons) to a data property. Changes in the input elements update the data property, and changes in the data property are reflected in the input elements.

20.

Explain the component Prop.

Data is passed from the parent component to the child component using Component Prop. A component can have as many props as it wants. The prop is a custom attribute that becomes a property on the component instance when a value is supplied to it.

From parent to child component, a component Prop forms a one-way down binding. When the parent property changes, it affects the child, but not the other way around. As a result, when the Parent component is modified, all child components are updated as well. As a result, you won't have to worry about mutating the prop in the child component.

21.

What is the One-Way Data Flow in Vue.js?

This is a popular Vue.js interview question. All Props work in one direction, which means data flows from parent to kid. When a modification is made to a parent property, the child property is automatically updated, but not the other way around. It prohibits a child from changing the state of the parent property, which can make your application's data flow more difficult to comprehend.

22.

Explain the concept of event modifiers in Vue.js and provide some examples.

Event modifiers in Vue.js are special postfixes denoted by a dot that allows you to modify the behavior of event handlers. For example, .stop prevents event propagation, .prevent prevents the default behavior of the event, and .once ensures that the event listener will be triggered only once.

Example:

event-modifiers.webp

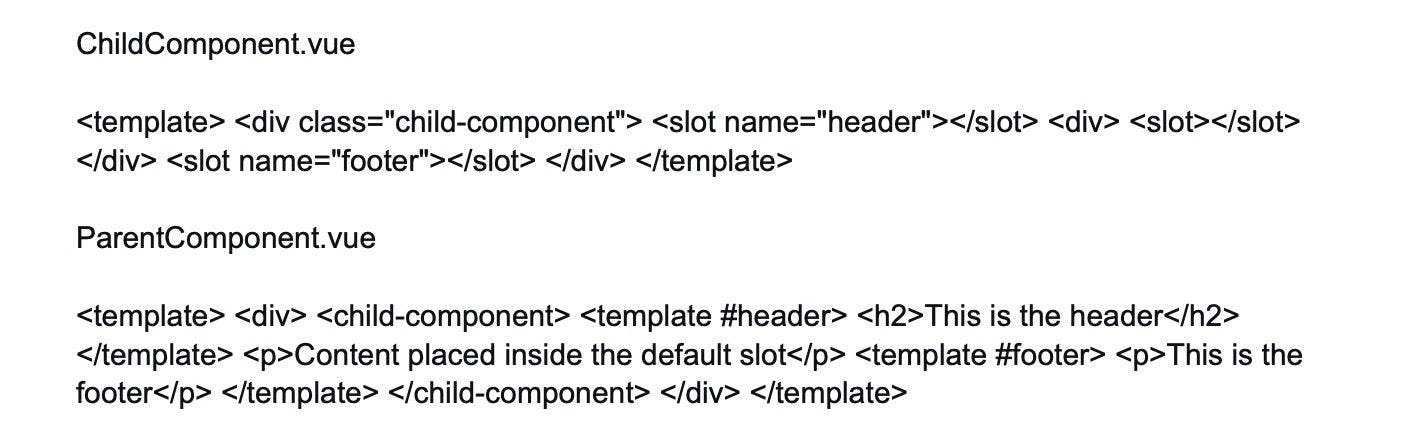
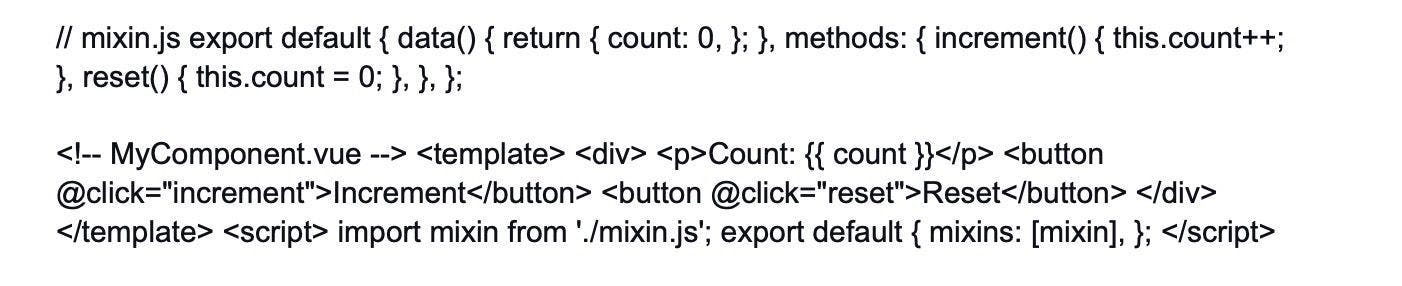
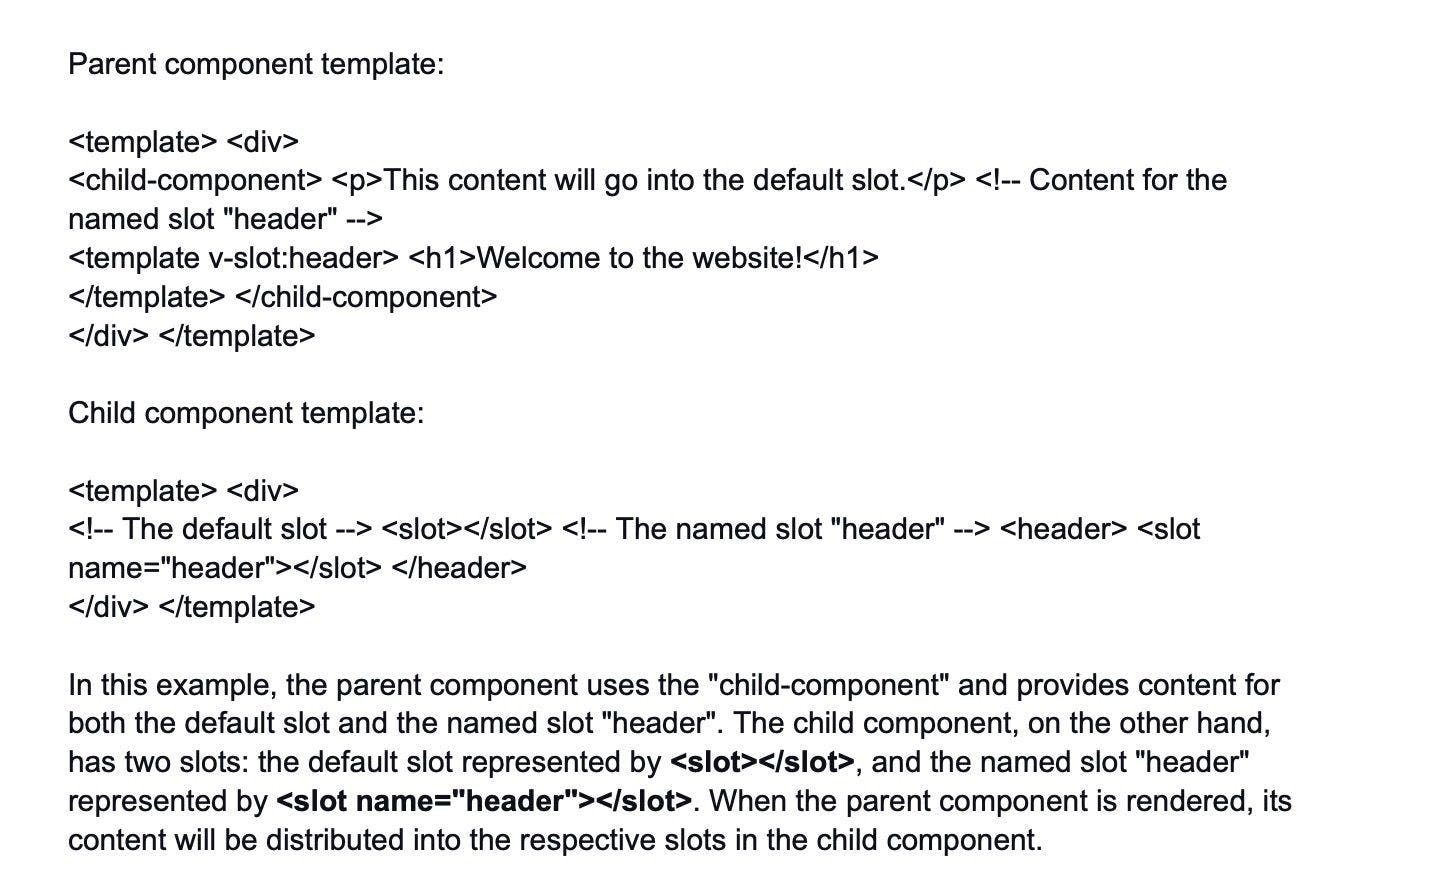
23.

What is the single file component?

SFCs, or single file components, are similar to other components in that they are self-contained in their own files. The following are some of the benefits of SFCs.

  • Global Definitions - This refers to the fact that all SFCs are registered globally and given unique names.
  • Strong Templates - Instead of using a single template property like other components, you can easily create template code in SFCs.
  • CSS Support – SFCs allow you to apply CSS to the component itself.
  • Support for preprocessors – preprocessors like babel, SAAS, and others can be simply used in SFCs.

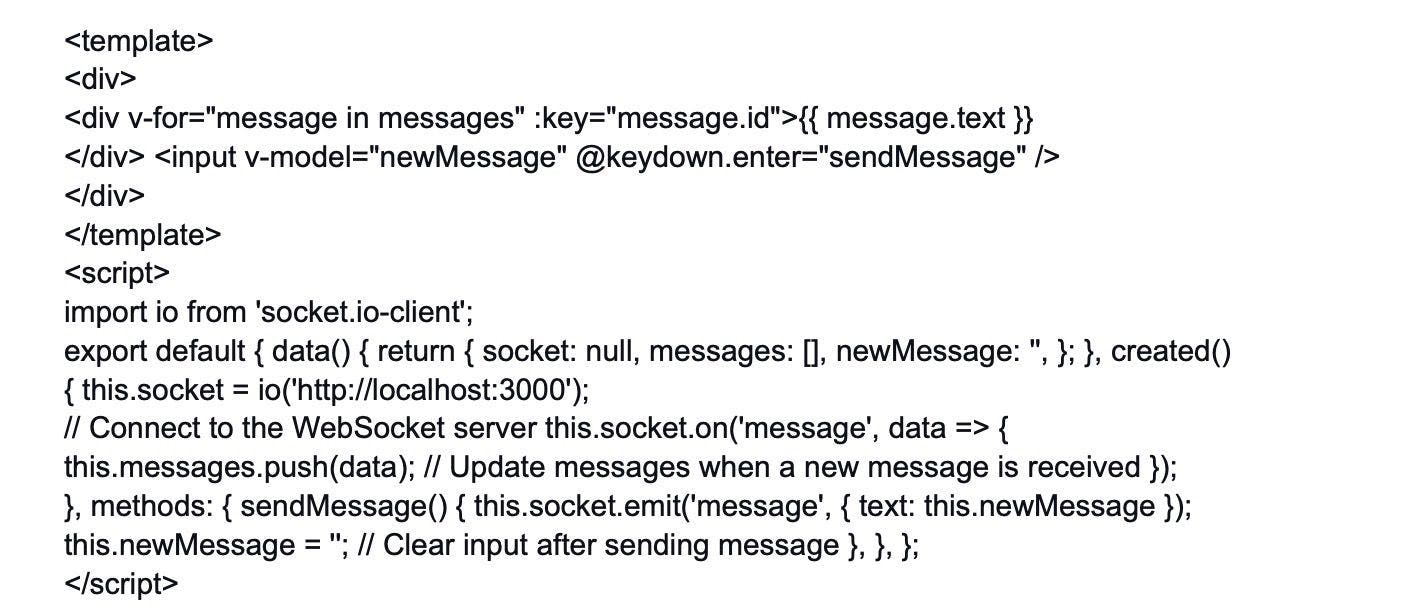
24.

How can you handle keyboard events in Vue.js applications?

You can handle keyboard events in Vue.js by using the v-on directive with appropriate event names, such as @keydown, @keyup, or @keypress. You can then call a method in response to these events to handle user keyboard input.

25.

What is the purpose of the "v-html" directive, and what are its potential security risks?

The "v-html" directive allows you to render HTML content dynamically from your data. However, it comes with potential security risks, as it can lead to code injection attacks if the HTML content is not properly sanitized. It is recommended to use it only with trusted content or combined with proper sanitization methods.

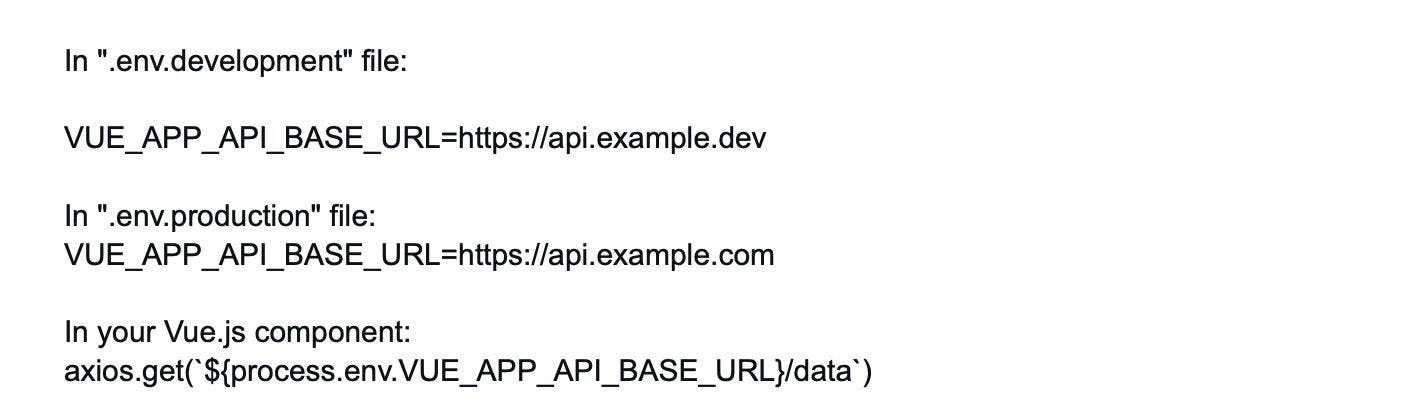
26.

What is the Vue CLI, and why is it useful for Vue.js development?

The Vue CLI is a command-line tool used to scaffold Vue.js projects quickly and efficiently. Being one of the popularly used Vue tools, it provides a set of preset configurations and project templates, allowing developers to start their projects with best practices and modern development tools, such as Webpack and Babel, pre-configured.

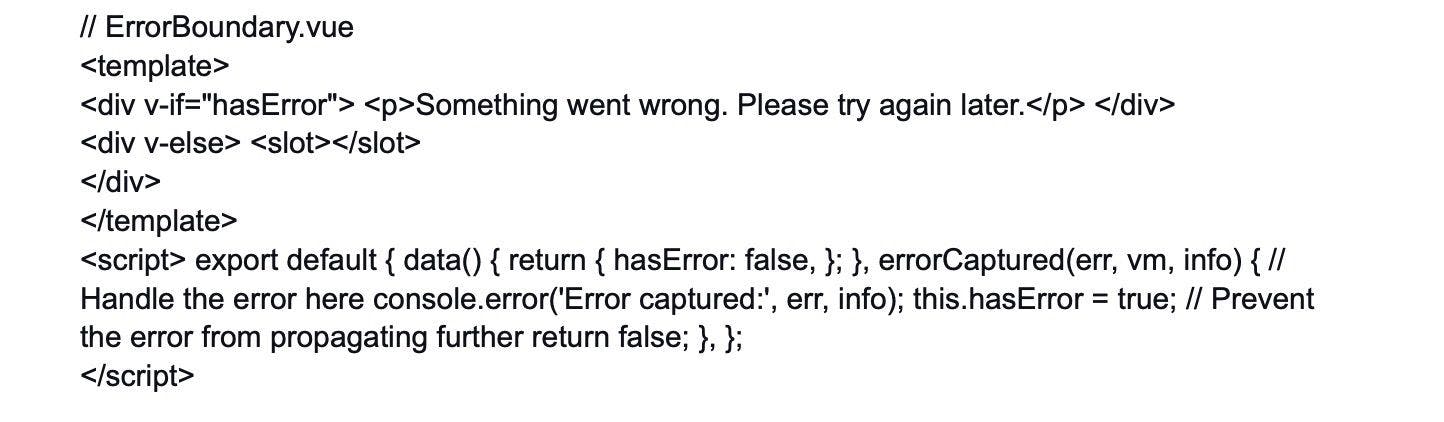
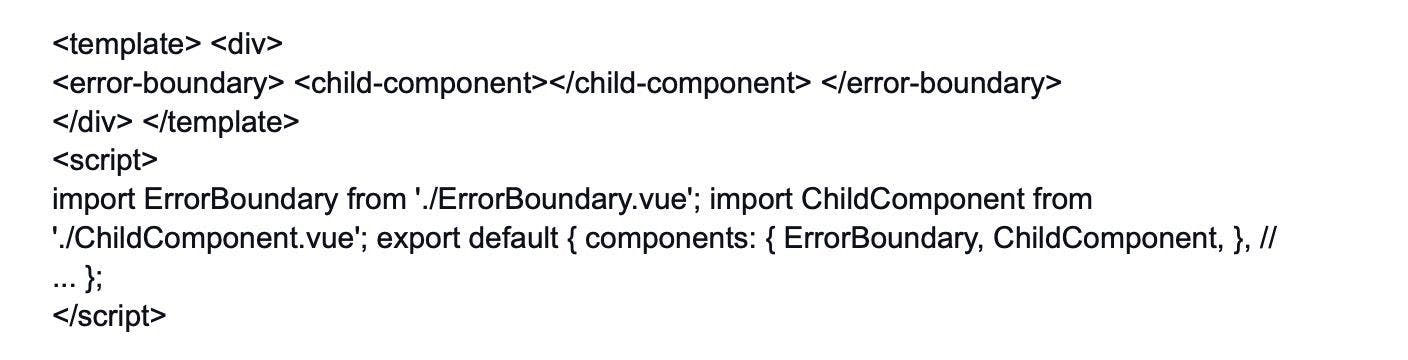
27.

How do you handle errors and exceptions in Vue.js applications?

In Vue.js, you can use the errorCaptured lifecycle hook at the component level to handle errors that occur within a component and its children. Additionally, you can use global error handlers, like Vue.config.errorHandler, to handle errors across the entire application.

28.

Explain the concept of watchers in Vue.js and when to use them.

Watchers in Vue.js allow you to react to changes in data properties and perform specific actions when these properties change. Watchers are particularly useful when you need to perform asynchronous operations or complex logic based on data changes.

29.

How can you render raw HTML in Vue.js templates?

To render raw HTML in Vue.js templates, you can use the "v-html" directive. However, be cautious when using this directive with user-generated or untrusted content to prevent security vulnerabilities.

30.

How do you bind CSS styles dynamically in Vue.js using the "v-bind" directive?

To bind CSS styles dynamically in Vue.js, you can use the "v-bind" directive (or : ) with the style attribute. For example:

bind css styles.webp

In this example, textColor and fontSize are data properties that can be changed dynamically.

31.

Explain the use of filters in Vue.js. Are filters recommended in modern Vue.js applications?

Filters in Vue.js are used to format and transform text when displaying it in the template. However, filters have been deprecated in Vue 2.x and are not recommended for use in modern Vue.js applications. Instead, it's recommended to use computed properties or methods to achieve similar functionality.

32.

What is the purpose of the "v-pre" directive in Vue.js templates?

The "v-pre" directive tells Vue to skip compilation for a specific element and its children. It is useful when you have complex templates with a lot of data bindings, and you want to improve performance by skipping unnecessary compilation for certain parts of the template.

33.

How can you handle and manage the local component state in Vue.js?

You can handle the local component state in Vue.js by defining a "data" function within your component and returning an object with the desired properties. These properties can then be accessed and modified within the component's methods, computed properties, and template.

34.

What is the Vue.js Devtools, and how can it assist in debugging Vue.js applications?

The Vue.js Devtools is a browser extension that allows developers to inspect and debug Vue.js applications. It provides a detailed view of the component hierarchy, current state, props, data, and events. It also allows you to time-travel and inspect changes to the application's state.

35.

How can you handle conditional classes in Vue.js using the "v-bind" directive?

You can handle conditional classes in Vue.js using the "v-bind" directive (or :) with an object syntax. By binding an object of class names and their corresponding conditions, you can dynamically apply or remove classes based on specific conditions.

36.

Explain the use of the "v-once" directive and its implications for rendering.

The "v-once" directive is used to render an element or component only once, and it prevents it from being updated even if its data changes. It can be useful for static content that doesn't change, as it optimizes rendering and improves performance. However, any dynamic content inside the "v-once" block will not update when the underlying data changes.

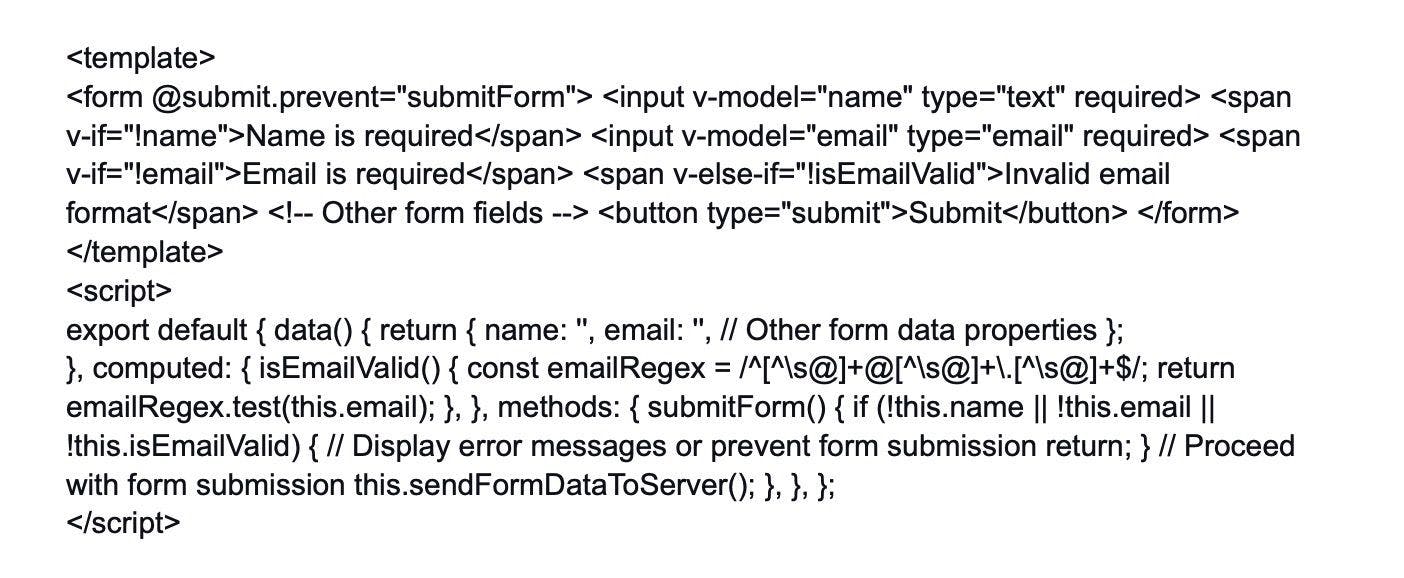
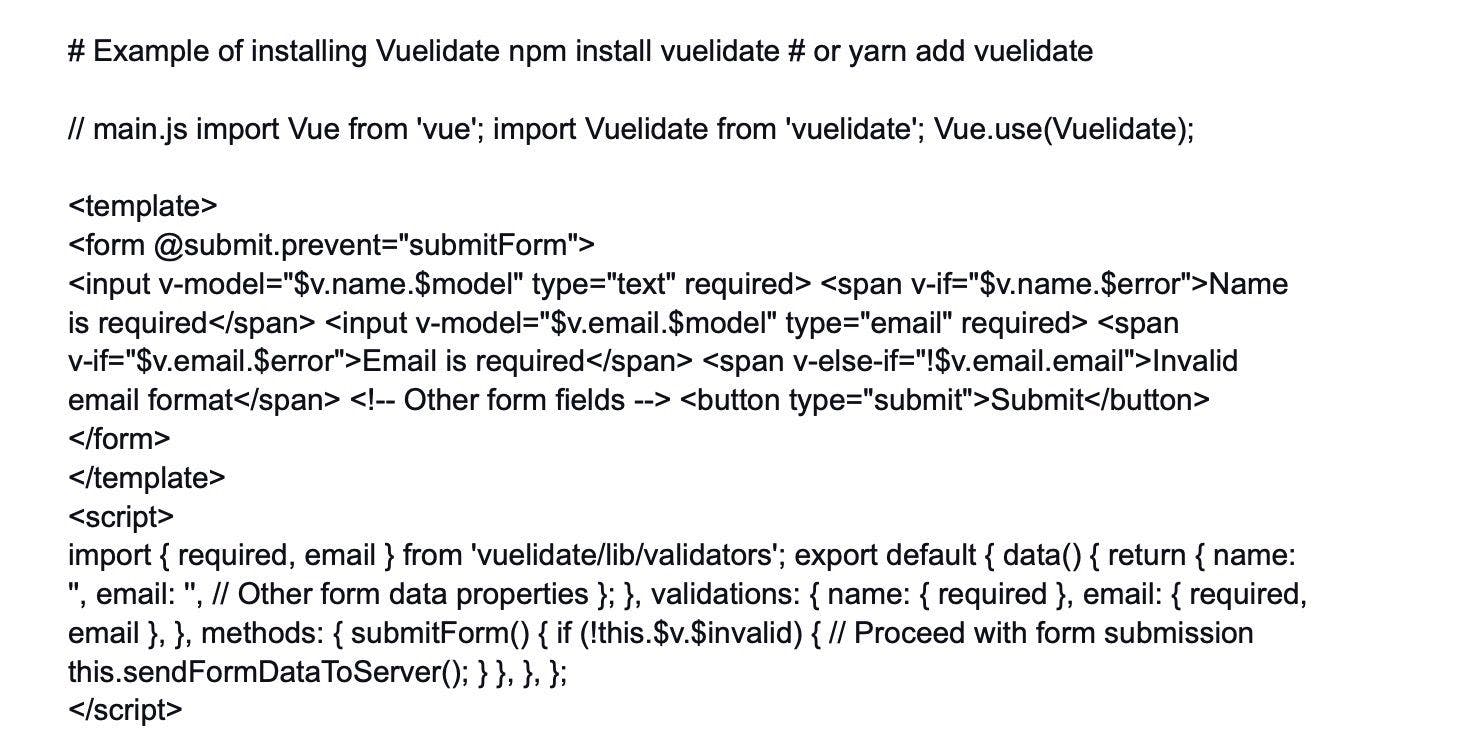
37.

How do you handle form submissions in Vue.js applications?

To handle form submissions in Vue.js applications, you can use the v-on directive with the "submit" event. By binding the form submission to a method, you can access form data and perform actions like data validation or making API calls.

38.

What are the differences between "v-show" and "v-if" directives in terms of rendering behavior?

The "v-show" directive toggles the element's visibility by modifying the "display" CSS property. The element remains in the DOM, but it's not visible when the condition is false. In contrast, the "v-if" directive completely adds or removes the element from the DOM based on the condition.

39.

How do you create custom events in Vue.js?

To create custom events in Vue.js, you can use the $emit method in the child component to send a specific event along with optional data. Then, in the parent component, you use the v-on directive (or @ shorthand) to listen to the custom event and trigger a method accordingly.

40.

Explain the concept of template ref and provide a scenario where you would use it.

Template refs allow you to access child components or DOM elements directly from the parent component. This is useful in scenarios where you need to call methods or access properties of child components programmatically. For example, using a ref to access a form element and trigger its validation method.

41.

How do you manage the application state without using Vuex?

While Vuex is a popular choice for state management, you can manage the application state without Vuex by leveraging Vue's reactivity system and passing down props between parent and child components.

However, for large-scale applications, Vuex simplifies state management and ensures a more organized and centralized approach.

Tired of interviewing candidates to find the best developers?

Hire top vetted developers within 4 days.

Hire Now

Intermediate Vue.js interview questions and answers

1.

Explain the concept of mixins and their use cases in Vue.js.

Mixins in Vue.js are a way to encapsulate and distribute reusable functionality that can be shared across multiple components. A mixin is an object that contains component options like data, methods, computed properties, and lifecycle hooks. It allows you to extend the capabilities of components without the need for inheritance.

Use Cases: Mixins are useful when you have certain functionalities that need to be shared among different components, but you want to keep the components decoupled and maintain a clear separation of concerns.

Some common use cases of mixins include sharing utility functions, implementing specific behaviors, and handling cross-cutting concerns like authentication or logging.

2.

How can you handle dynamic routes and route parameters in Vue Router?

Vue Router allows you to handle dynamic routes and route parameters by defining route patterns using dynamic segments. Dynamic segments are denoted by a colon followed by the parameter name in the route definition.

Example:

route parameters.webp

With this setup, when you navigate to a URL like "/user/123", the component "UserComponent" will be rendered, and the route parameter "id" will be accessible as this.$route.params.id within the component.

3.

Discuss the pros and cons of using template-based syntax versus render functions.

Template-based syntax:

Pros:

  • Readability: Templates are usually more human-readable and familiar, especially for developers coming from an HTML background.
  • Easy to Learn: For simple use cases, templates are easier to grasp and understand.
  • Rapid Development: It allows for quick prototyping and development with its declarative syntax.

Cons:

  • Limited flexibility: In complex scenarios, templates might not provide the same level of flexibility as render functions.
  • Tooling dependencies: Some advanced tooling and syntax checking may require additional plugins.

Render functions:

Pros:

  • Full Programmatic Control: Render functions offer complete control over the component's rendering process, enabling dynamic and advanced rendering logic.
  • Code Reusability: Render functions can be more reusable, especially when combined with higher-order functions or mixins.
  • Enhanced Performance: In certain cases, manually optimized render functions can lead to better performance.

Cons:

  • Steeper Learning Curve: Understanding render functions and their intricacies might be challenging, especially for developers new to the concept.
  • Readability: Render functions can become complex and harder to read as the logic grows.

4.

How do you perform API calls in Vue.js applications, and why would you use Axios or Fetch API?

To perform API calls in Vue.js applications, you can use the built-in Fetch API, which is a modern browser feature, or a popular third-party library like Axios.

Using Axios or Fetch API offers several advantages over traditional methods like XMLHttpRequest:

  • Promises: Both Axios and Fetch API return Promises, making it easier to handle asynchronous operations with async/await or using Promise chains.
  • Simplified Syntax: Axios and Fetch API provide a cleaner syntax compared to XMLHttpRequest, reducing boilerplate code.
  • Interceptors: Axios allows you to define interceptors for request and response, enabling centralized error handling and request/response transformations.
  • Cross-Browser Compatibility: Axios and Fetch API are well-supported in modern browsers and provide better cross-browser compatibility.

Axios, in particular, has gained popularity due to its ease of use, support for interceptors, and broader browser compatibility, making it a preferred choice for many Vue.js developers.

5.

Explain the concept of server-side rendering (SSR) and its advantages in Vue.js.

Server-side rendering (SSR) is a technique in which the server generates the initial HTML for a web page and sends it to the client. The client-side JavaScript framework (in this case, Vue.js) then takes over and rehydrates the page, attaching event handlers and making it fully interactive.

Advantages of SSR in Vue.js:

  • Improved SEO: SSR helps search engine crawlers easily index the content since the initial HTML is already available on the server.
  • Faster Time-to-Interactive: SSR can reduce the time it takes for a page to become interactive since some processing is done on the server.
  • Better Performance on Low-End Devices: SSR reduces the initial load on the client, making it more suitable for devices with limited processing power.
  • Enhanced User Experience: Users get to see the content faster, leading to a better overall user experience.
  • Social Media Sharing: SSR enables proper content rendering when URLs are shared on social media platforms, ensuring that the correct content is displayed in previews.

However, implementing SSR can be more complex and require additional server-side infrastructure, which might be a trade-off depending on the project's needs.

6.

How can you handle data caching in Vue.js applications?

In Vue.js applications, you can handle data caching in various ways, depending on the requirements and complexity of the caching needed.

Local component state: For simple data caching within a component, you can use the component's local state (data property) to store and reuse data. However, keep in mind that the cached data will be lost when the component is destroyed.

Vuex store: For caching data across multiple components, you can use the Vuex store. The store acts as a centralized state management system, allowing you to cache and share data between components efficiently.

LocalStorage or sessionStorage: If you need to persist data across page reloads or sessions, you can use the browser's localStorage or sessionStorage APIs to cache data locally. Be cautious with this approach, as it may lead to storage limitations and potential security risks, especially with sensitive data.

Caching libraries: There are caching libraries like lru-cache or memory-cache that you can use in combination with Vue.js to cache data in memory with expiration and cache eviction policies.

Remember to consider the sensitivity and size of the data you are caching, as well as the expected usage patterns, to choose the most appropriate caching strategy.

7.

Discuss the role of "nextTick" in Vue.js and its use cases.

In Vue.js, the "nextTick" method is a special method that allows you to execute a function after the next DOM update cycle. It is useful when you want to perform operations after a reactive update has been completed.

Use cases for "nextTick":

Modifying the DOM after a data change: When you want to make changes to the DOM that depend on reactive data updates, using "nextTick" ensures that the DOM is updated before your code runs, avoiding potential conflicts.

Testing: In unit tests, you might want to assert the DOM changes after a state update. "nextTick" allows you to wait for the DOM to be updated before making assertions.

Executing code after a component update: If you need to perform some actions, like measuring elements' dimensions or triggering animations, after a component has been updated due to data changes, "nextTick" is handy to ensure the DOM is ready for such operations.

Example:

nextTick in Vue.webp

8.

What are dynamic imports in Vue.js, and how do you implement them?

Dynamic imports in Vue.js allow you to load components or modules lazily, which means they are fetched only when they are needed, reducing the initial bundle size and improving application performance.

To implement dynamic imports, you can use the import() function provided by JavaScript's ECMAScript module syntax. In Vue.js, you can use dynamic imports in combination with Vue's resolveComponent or resolveDirective functions.

Example of dynamic component import:

dynamic component import.webp

In this example, the "LazyComponent" will be fetched and loaded when it is first used in the application.

Dynamic imports are especially useful when dealing with large applications where loading all components upfront can lead to slower initial load times.

9.

How can you implement error handling and fallbacks in dynamic imports?

To implement error handling and fallbacks in dynamic imports, you can use the import() function's catch method to handle any errors that occur during the import process. You can provide a fallback component or show an error message in case the dynamic import fails.

Example:

dynamic imports.webp

In this example, if the import of "LazyComponent" fails, the catch method will be triggered, and the "FallbackComponent" will be loaded instead.

Additionally, you can use this approach to display an error message to the user or handle the error in any way suitable for your application.

10.

Discuss the differences between "mixins" and "extends" in Vue.js components.

Both mixins and extends are techniques used to extend the functionality of Vue.js components, but they differ in their approach and implications.

Mixins:

  • Mixins are objects that contain component options (data, methods, etc.).
  • They allow you to share and reuse functionality among multiple components.
  • Components can use multiple mixins simultaneously, inheriting properties from all of them.
  • While mixins provide code reuse, they can also lead to conflicts or unintended side effects when properties with the same name are present in multiple mixins or the component itself.

Example of using a mixin:

mixin.webp

Extends:

  • "Extends" is a component inheritance mechanism, where a new component extends the behavior of another component.
  • The extended component inherits the properties and options of the parent component.
  • This allows you to build components with shared functionality while preserving a clearer parent-child relationship.
  • Extends can be more explicit and easier to manage compared to mixins when dealing with complex component hierarchies.

Example of using extends:

extends.webp

In summary, mixins are suitable for sharing smaller pieces of functionality across multiple components, whereas extends are more suitable when you want to create a clear parent-child relationship and extend the behavior of an existing component with more specific customizations.

11.

How can you use the "provide" and "inject" API for component communication?

The "provide" and "inject" API in Vue.js allows you to establish a form of dependency injection between components, enabling communication between parent and deeply nested child components without the need to pass props through intermediate components.

Here's how you can use them:

  • The parent component uses the "provide" option to provide data or methods:

parent component.webp

  • A child component can use the "inject" option to access the provided data or methods:

child component.webp

Keep in mind that "provide" and "inject" should be used with caution, as it introduces tighter coupling between components and can make it harder to trace the origin of data changes in larger applications. It's generally recommended to use props and events for most component communication needs, reserving "provide" and "inject" for specific scenarios where the coupling is intentional and well-managed.

12.

Explain the concept of dynamic components and provide use cases.

Dynamic components in Vue.js allow you to switch between multiple components dynamically at runtime within a single placeholder in a template. It enables you to conditionally render different components based on a state or user interactions.

Example of using dynamic components:

dynamic components.webp

In this example, the "currentComponent" can be a data property that determines which component should be rendered at a given time.

Use cases of dynamic components:

  • Tabs: Switching between different content tabs, where each tab is represented by a different component.
  • Modals: Displaying different modals based on user actions, like a login modal or a settings modal.
  • Conditional rendering: Based on user roles or application state, show different components for different user experiences.
  • Component reusability: Using dynamic components allows you to reuse the same placeholder to display various components, promoting code reusability.

Dynamic components are a powerful feature that enhances the flexibility and interactivity of Vue.js applications, making it easier to manage complex UI scenarios.

13.

What are render functions in Vue.js, and when would you use them?

In Vue.js, render functions provide a way to create the component's virtual DOM programmatically without using templates. Instead of defining the template using HTML-like syntax, you use JavaScript functions to describe the desired DOM structure.

Render functions are used when you need more control and flexibility over the component's rendering process. They are often used in advanced scenarios like building higher-order components, creating reusable component libraries, or when you need to generate dynamic content based on complex conditions.

Example of a render function:

render function.webp

In this example, we create a simple component using a render function, which renders a div with a class and text content.

Render functions are more verbose compared to templates, which can make them harder to maintain and read in some cases. However, they offer greater control and optimization opportunities, especially for performance-critical applications.

14.

How can you implement route guards in Vue Router to control navigation?

Route guards in Vue Router allow you to control and protect navigation by providing hooks at various stages of the route navigation process. There are three types of route guards: "beforeEach," "beforeResolve," and "afterEach."

beforeEach: This guard is used to perform checks before navigating to a route. It can be used for implementing authentication checks or redirecting users based on certain conditions.

Example:

router before each.webp

beforeResolve: This guard is called after all "beforeEach" guards have been resolved and before the route is fully resolved. It is useful for handling data fetching before the route is displayed.

Example:

router before resolve.webp

afterEach: This guard is called after navigation is completed. It is useful for implementing global logic after a route is resolved, such as logging, analytics, or scroll position restoration.

Example:

after each.webp

By using these route guards, you can have fine-grained control over navigation in your Vue Router-based application, ensuring that certain conditions are met before allowing users to access specific routes.

15.

What are the differences between "methods" and "computed properties" in Vue.js?

"Methods" and "computed properties" in Vue.js are both used to define functions within a Vue component, but they have some key differences in how they work and when to use them.

Methods:

  • Methods are defined as an object property inside the Vue component.
  • They are used for defining functions that are called explicitly, usually in response to user interactions or other events.
  • Methods are called each time they are referenced in the template or programmatically.
  • They are suitable for performing actions or calculations that don't need to be cached.

Computed Properties:

  • Computed properties are defined as object properties inside the Vue component, just like methods.
  • They are used for defining functions based on reactive data and cached until the dependent reactive data changes.
  • Computed properties are recalculated when the reactive data depend on changes, which makes them more efficient for complex calculations or filtering.

16.

How can you use slots to create reusable component templates?

Slots are a powerful feature in Vue.js that allows you to create reusable component templates with placeholders for the content provided by the parent component. They enable you to create flexible and customizable components that can be used in various contexts without the need for complex props.

To use slots, define them in the child component's template using the element. You can also give them a name to create named slots for more specific content insertion.

Example:

using slots.webp

In this example, the "ChildComponent" defines a default slot using , which will be replaced with the content provided by the parent component. The "ParentComponent" uses the "ChildComponent" twice, providing different content inside the default slot every time.

You can also use named slots to have more control over where the content is placed in the child component's template:

reusable component templates.webp

In this example, the "ChildComponent" defines three slots: a default slot, a "header" slot, and a "footer" slot. The "ParentComponent" uses named slots to provide specific content for each slot in the "ChildComponent."

Slots are a powerful way to create highly flexible and reusable components that can adapt to different content and layouts.

17.

Explain the purpose of the "transition" component in Vue.js and provide examples.

The "transition" component in Vue.js provides a way to add transitions and animations to elements when they are inserted, updated, or removed from the DOM. It allows you to create smooth and visually appealing transitions between different states of your components.

To use the "transition" component, wrap the element you want to animate with the "transition" tag. You can specify different CSS classes for entering, leaving, and active states, which define how the element should be animated during the different stages of the transition.

Example of a simple fade-in/fade-out transition:

transition component.webp

In this example, when the "show" data property is true, the content inside the "transition" component will be smoothly faded in. When the "show" property becomes false, the content will be smoothly faded out.

The "transition" component supports various types of transitions, including fading, sliding, and custom CSS animations. It also provides event hooks like "before-enter," "after-enter," "before-leave," and "after-leave," which allow you to add custom logic or trigger additional actions during the transition process.

The "transition" component is a great way to add visual appeal and enhance the user experience in your Vue.js applications.

18.

How can you use the "Axios" library to make HTTP requests in Vue.js?

"Axios" is a popular JavaScript library used to make HTTP requests in both browsers and Node.js. To use Axios in a Vue.js application, first, you need to install it:

npm install axios

Once installed, you can make HTTP requests by importing Axios and using its methods, like get, post, put, delete, etc.

Example of making a GET request:

get request.webp

In this example, we use Axios to make a GET request to the specified URL. The response data is handled in the .then block, and any errors are caught in the .catch block.

Axios also supports request and response interceptors, which allow you to modify requests or responses globally. Additionally, you can configure default headers, timeouts, and other settings as needed.

Axios is a popular choice for making HTTP requests due to its ease of use, promise-based syntax, and broad browser support, making it a reliable solution for most Vue.js applications.

19.

Discuss the advantages and disadvantages of using Vuex for state management.

Advantages of using Vuex for state management:

  • Centralized State: Vuex provides a centralized store for managing the application's state. This makes it easier to access and update the state across multiple components without the need for prop drilling or event buses.
  • Predictable State Changes: Since state modifications in Vuex are performed through mutations, changes to the state are explicitly tracked and easy to debug. This predictability improves the maintainability of the application.
  • Reactive: Vuex state is reactive, meaning when the state changes, all components that are using the state will automatically react to the changes and update accordingly.
  • Devtools Integration: Vuex integrates seamlessly with Vue.js Devtools, which allows developers to monitor state changes, time-travel debugging, and inspect the store during development.
  • Easy to Test: Vuex's strict separation of concerns and explicit mutations make it easier to write unit tests for state management, ensuring more robust and reliable testing.

Disadvantages of using Vuex for state management:

  • Boilerplate Code: As your application grows, the number of actions, mutations, and getters in Vuex may increase, leading to a certain amount of boilerplate code.
  • Learning Curve: For small to medium-sized applications, using Vuex might introduce unnecessary complexity and a steeper learning curve for developers, especially those new to state management patterns.
  • Overkill for Simple Apps: If your application is small and doesn't require extensive state management, using Vuex might be overkill and introduce unnecessary overhead.
  • Dependency on a Global Store: Vuex introduces a global state store, which means any component can access and modify the state. While this can be powerful, it may also lead to coupling and make it harder to track state changes in larger applications.
  • Asynchronous Operations: Handling asynchronous operations with Vuex, like API calls, might require the use of additional plugins or patterns like "actions," which can add complexity.

In summary, Vuex is a powerful state management solution for large, complex applications, but it might not be the best fit for small applications or situations where simpler state management solutions like local component state or props might suffice.

20.

How does Vue.js handle asynchronous components?

In Vue.js, you can make a component load asynchronously using the **import() **function and dynamic imports. This feature is available natively in modern browsers and can be transpired to older versions using tools like Babel.

To create an asynchronous component, use the import() function to dynamically load the component file and define it as a component using Vue.component.

Example:

asynchronous components.webp

In this example, when the "async-component" is used in the template, the component file (e.g., "AsyncComponent.vue") will be fetched lazily only when the component needs to be rendered, reducing the initial bundle size and improving application performance.

Asynchronous components are particularly useful when you want to split your application into smaller chunks and load specific parts of it only when needed. This is especially important in larger applications where the initial loading time can be optimized by loading critical components first and deferring the loading of non-critical components until later.

It's important to note that dynamic imports are a feature of ECMAScript modules, so they might require additional configurations when working with older browsers or when using module bundlers like Webpack.

21.

Explain the Virtual DOM and how it contributes to Vue.js' performance.

The Virtual DOM is an abstract representation of the actual DOM (Document Object Model) in memory. It is a data structure that mirrors the real DOM and allows efficient updates and manipulation without directly interacting with the browser's DOM, which can be slow and resource-intensive.

When you make changes to the state of a Vue.js component, Vue creates a Virtual DOM representation of the component's template. This Virtual DOM is then compared to the previous Virtual DOM to identify the minimal number of changes needed to update the actual DOM.

The benefits of the Virtual DOM in Vue.js include:

Reduced DOM Manipulation: With the Virtual DOM, Vue.js can efficiently calculate the difference (diff) between the current and previous states and perform only the necessary updates in the actual DOM. This minimizes the number of expensive DOM operations, leading to better performance.

Batched Updates: Vue.js batches multiple DOM updates together, reducing the number of DOM manipulations and improving performance by minimizing reflows and repaints.

Faster Rerendering: When the state of a component changes, Vue.js creates a new Virtual DOM representation and calculates the minimum required changes before applying them to the actual DOM. This process is faster than directly updating the real DOM for every small change.

Declarative Updates: In Vue.js, you declare how the UI should look based on the component's state, and Vue handles updating the Virtual DOM and the actual DOM accordingly. This declarative approach simplifies the process of building complex UIs.

Cross-Platform Compatibility: The Virtual DOM abstraction allows Vue.js to work not only in browsers but also in non-browser environments like server-side rendering (SSR) and NativeScript, enabling code reuse and a consistent development experience.

Overall, the Virtual DOM is a core part of Vue.js' performance optimization strategy. It ensures that only the necessary updates are made to the real DOM, leading to a more efficient and smooth rendering process, especially in complex and dynamic user interfaces.

22.

Discuss the concept of watchers versus computed properties, and when to use each.

Watchers and computed properties in Vue.js are both used to reactively update data based on changes to other data in the Vue instance. However, they have different use cases and functionalities.

Watchers:

Watchers are set up using the watch option in a Vue component.
They are used to perform asynchronous or expensive operations in response to changes in the observed data.
Watchers watch for specific data changes and execute a callback function when that data changes.
Watchers are useful when you need to perform an action, such as making an API call or updating external data, in response to a change in a data property.

Example:

watchers.webp

Computed Properties:

Computed properties are defined as functions in the computed option of a Vue component.
They are used to perform calculations or derive new data based on existing data in the Vue instance.
Computed properties are cached, meaning they are recalculated only when their dependent data changes, improving performance.
Computed properties are ideal for situations where you need to transform or filter data before using it in the template.

Example:

computed properties.webp

In this example, "itemCount" is a computed property that calculates the number of items in the "items" array, and "filteredItems" returns a new array with items that have a price greater than 50.

In summary, use Watchers when you need to perform side effects or asynchronous operations in response to data changes. Use computed properties when you need to transform or derive data based on existing data, and when you want to take advantage of caching for better performance.

23.

What are custom directives in Vue.js, and how do you create one?

Custom directives in Vue.js allow you to create reusable, low-level behavior that can be applied directly to DOM elements. They enable you to extend the capabilities of Vue's template syntax by binding custom JavaScript logic to DOM elements, attributes, or events.

To create a custom directive in Vue.js, you use the Vue.directive method. The method takes two arguments: the directive's name and a definition object with various hooks and options.

Example of creating a custom directive to change the background color of an element:

custom directive.webp

In this example, we create a custom directive called "highlight" that changes the background color of an element based on the directive's value. The value of the directive is passed as a binding object, which contains the "value" property representing the value of the directive.

To use the custom directive in a component's template:

coomponent template.webp

When this component is rendered, the custom directive "highlight" will be applied to the element, and the background color will be set to yellow.

Custom directives are powerful tools that allow you to encapsulate complex behavior in a reusable way and keep your templates clean and easy to read. However, they should be used judiciously, as they introduce low-level DOM manipulation, which can make your code harder to understand and maintain if not used carefully.

Always try to use existing Vue features like computed properties and methods before resorting to custom directives.

24.

How can you optimize Vue.js applications for production deployment?

Optimizing Vue.js applications for production deployment is crucial to ensure optimal performance, faster load times, and a better user experience. Here are some key optimization techniques:

  • Minify and Bundle: Use tools like Webpack or Vue CLI to bundle and minify your JavaScript, CSS, and other assets. This reduces the size of your files and the number of HTTP requests required to load the application.
  • Code Splitting: Employ code splitting to divide your application into smaller chunks. This allows users to download only the necessary code for the current page, reducing the initial load time. Tools like Webpack's dynamic imports can help achieve this.
  • Enable GZIP Compression: Configure your web server to enable GZIP compression for your assets. This reduces the size of files sent over the network, improving load times for users.
  • Use Vue.js Production Mode: Always use the production version of Vue.js in your production build. The production version is smaller and faster as it omits development warnings and debugging tools.
  • Optimize Images: Compress and optimize images to reduce their file size without sacrificing quality. Use modern image formats like WebP when possible, and use lazy loading to load images only when they are visible in the viewport.
  • Caching and Cache Busting: Set up caching strategies for your assets to reduce server requests. Use cache-busting techniques (e.g., adding version hashes to filenames) to force users to download the latest version of your assets when they change.
  • Async and Defer: Add the async or defer attribute to your script tags to improve page load performance. async loads the script asynchronously, while defer ensures scripts are executed in the order they appear in the document.
  • Optimize CSS: Minimize and optimize your CSS code. Remove unused styles, consider using critical CSS to render above-the-fold content faster, and avoid excessively large CSS files.
  • Server-Side Rendering (SSR): Consider implementing SSR for better SEO, initial load performance, and perceived performance. Vue.js supports SSR through its official SSR guide.
  • Use Production APIs: Ensure your Vue.js application uses production-ready APIs that are optimized for performance and security.
  • Tree Shaking: Use ES6 module syntax and tree shaking to remove unused code during the build process, further reducing bundle size.
  • Performance Auditing: Regularly audit your application's performance using tools like Lighthouse or WebPageTest. Identify and address performance bottlenecks and opportunities for improvement.
  • CDN Hosting: Host your assets, like JavaScript, CSS, and images, on a Content Delivery Network (CDN) to ensure faster and more reliable content delivery globally.

By implementing these optimization techniques, you can significantly improve the performance and user experience of your Vue.js applications in production. Remember to regularly test and measure performance to identify areas for further improvement.

25.

Explain the concept of dependency injection in Vue.js.

Dependency injection in Vue.js refers to the practice of passing dependencies (e.g., services, utilities, or external modules) into a component from its parent or an external source. It allows components to be more flexible, reusable, and easier to test.

In Vue.js, dependency injection is typically achieved using props. The parent component passes data or functions down to its child components through props. This way, child components can access and use the provided dependencies without having to manage their creation or instantiation.

For example, consider a parent component that provides an API service to its child component through props:

dependency injection.webp

In this example, the parent component creates an instance of the ApiService and passes it to the child component using the apiService prop. The child component can then use the provided API service to fetch and display data.

Dependency injection promotes the separation of concerns and enhances component reusability, as the child component doesn't need to know how the API service is created or managed. Additionally, it facilitates easier testing since you can provide mock or stub implementations of dependencies during testing.

26.

Discuss the differences between "template refs" and "DOM refs" in Vue.js.

In Vue.js, "template refs" and "DOM refs" are two different ways to access elements in the component's template or the actual DOM.

Template Refs (or Refs):

  • Template refs are defined using the ref attribute in a template.
  • They allow you to access Vue components or elements within a template.
  • You can access template refs using the $refs object in the component instance.

Example:

template ref.webp

In this example, the "inputRef" is a template ref assigned to the input element. The focusInput method uses this.$refs.inputRef to access and focus the input element.

DOM Refs:

  • DOM refs are used to directly access elements in the actual DOM, bypassing Vue's reactivity system.
  • They are defined using the ref attribute with a string value prefixed by dom-.

Example:

dom refs.webp

In this example, the "dom-inputRef" is a DOM ref assigned to the input element. The focusInput method uses this.$refs['dom-inputRef'] to directly access and focus the input element in the actual DOM.

In summary, template refs are used when you want to access Vue components or elements within the template, and they are part of Vue's reactivity system. DOM refs, on the other hand, allow direct access to elements in the actual DOM and are useful when you need to manipulate the DOM outside of Vue's reactivity flow.

27.

How can you implement real-time communication in Vue.js applications using WebSockets?

To implement real-time communication in Vue.js applications using WebSockets, you can use the "WebSocket" API or a library like "Socket.IO" for a more feature-rich experience. Here's a high-level overview of how you can set up real-time communication with WebSockets:

Set Up a WebSocket Server:

  • Create a WebSocket server using a technology like Node.js with libraries such as "ws" for a simple WebSocket server or "Socket.IO" for a more advanced implementation.
  • Configure the server to listen for WebSocket connections on a specific port.

Establish a WebSocket Connection from the Vue.js Application:

  • In your Vue.js application, create a WebSocket connection using the "WebSocket" API or the "Socket.IO" client library.
  • Connect to the WebSocket server using the server's URL and port.

Emit and Listen for WebSocket Events:

  • Once the WebSocket connection is established, you can emit and listen for events between the server and the client (Vue.js application).
  • On the server-side, handle incoming WebSocket events and broadcast messages to all connected clients.
  • On the client-side (Vue.js), listen for WebSocket events and update the application's state or perform actions based on received data.

Example with Socket.IO:

  • Set Up Socket.IO Server (Node.js):

setup socket server io.webp

  • Set Up Vue.js Application:

set up vue js app.webp

In this example, the Vue.js application connects to the WebSocket server using Socket.IO. When the user sends a message through the input field, the message is emitted to the server, which broadcasts it to all connected clients, including the sender. The messages are then displayed in the Vue.js application's template.

By using WebSockets, you can achieve real-time communication between the server and the Vue.js application, enabling instant updates and interactions in your application without the need for constant HTTP polling.

28.

Explain the use of dynamic components and provide examples.

Dynamic components in Vue.js allow you to dynamically switch between different components at runtime, based on a condition or user interaction. This provides a powerful way to create flexible and reusable components that can adapt their behavior based on changing requirements.

To use dynamic components, you can use the built-in component called and bind it to a data property that holds the name of the component you want to render dynamically. When the value of the data property changes, the corresponding component will be rendered.

Example:

dynamic compo.webp

In this example, we have two components named "FirstComponent" and "SecondComponent." The parent component has a button that toggles between these two components using dynamic components. The currentComponent data property controls which component is displayed.

When the "Toggle Component" button is clicked, the toggleComponent method is called, which changes the value of currentComponent. As a result, the corresponding component is rendered dynamically.

Dynamic components are extremely useful when you have different variations of a component or when you want to conditionally show certain components based on user actions or data. This flexibility makes your Vue.js application more adaptable and easier to maintain.

29.

How can you implement server-side rendering (SSR) in a Vue.js application?

Server-Side Rendering (SSR) in Vue.js allows you to render the initial state of your application on the server before sending it to the client, providing faster initial load times and improved search engine optimization (SEO).

To implement SSR in a Vue.js application, you'll need to use a server-side rendering framework or tool like "Nuxt.js" or "Vue SSR." Here's a high-level overview of how to set up SSR using Nuxt.js:

Install Nuxt.js:

  • Install Nuxt.js globally using npm or yarn.
  • npm install -g create-nuxt-app

Create a Nuxt.js Project:

  • Use the create-nuxt-app command to create a new Nuxt.js project.
  • create-nuxt-app my-nuxt-app cd my-nuxt-app

Develop Your Vue.js Application:

  • Write your Vue.js application code within the Nuxt.js project structure in the pages and components directories.
  • Use the component for navigation between pages.

Run in Development Mode:

  • Start the development server to test your application in SSR mode.
  • npm run dev

Build and Run in Production Mode:

  • When you are ready to deploy your application, build it and start the server in production mode.
  • npm run build npm start

Nuxt.js handles the SSR setup for you, ensuring that your Vue.js application is rendered on the server and sent to the client with the initial state. This enables faster time-to-content and improves SEO, as search engines can crawl and index your application more effectively.

It's important to note that SSR introduces additional complexity, and not all applications may benefit from it. In some cases, it might be more efficient to use client-side hydration (universal mode) with Nuxt.js or opt for pure client-side rendering if your application has minimal SEO requirements and requires a more interactive user experience.

Choose SSR when the benefits of faster initial load and SEO improvements outweigh the complexity introduced.

30.

Discuss the benefits of using Vuex over traditional event buses for state management.

Both Vuex and traditional event buses (custom event systems) are used for state management in Vue.js applications, but they serve different purposes and offer different benefits.

Benefits of using Vuex over traditional event buses:

  • Centralized State Management: Vuex provides a centralized store for managing the application's state. This centralization makes it easier to understand and manage the overall state of the application as it grows in complexity.
  • Predictable State Changes: With Vuex, state modifications are performed through mutations, which are explicit and trackable. This predictability helps ensure that state changes happen in a controlled and understandable manner.
  • Two-Way Data Binding: Vuex follows a unidirectional data flow, where state changes are triggered by actions and components update based on the updated state. This unidirectional flow helps prevent data inconsistencies and makes the application easier to reason about.
  • Computed Properties and Getters: Vuex allows the use of computed properties and getters to derive and compute values from the store's state. This promotes a cleaner and more efficient way to access and transform state data when compared to event buses.
  • Debugging and Time-Traveling: Vuex integrates well with Vue.js Devtools, providing powerful debugging capabilities, including the ability to time-travel through state changes, inspect actions, mutations, and state snapshots.
  • Strict Mode: Vuex offers a strict mode that helps catch unintended state mutations, making it easier to maintain a clean and reliable state.
  • Middleware Support: Vuex allows the use of middleware, such as logging or analytics, to intercept actions and mutations, providing additional capabilities to enhance application behavior.
  • Optimized Reactivity: Vuex uses Vue.js' reactivity system, ensuring that components react efficiently to state changes and only update when necessary.
  • Robust Ecosystem: Vuex is a widely adopted and well-supported state management solution for Vue.js applications. It has a rich ecosystem of plugins and tools that make it even more powerful.

While traditional event buses can be useful for simple communication between unrelated components, they lack the structured approach and benefits that Vuex provides. For larger and more complex applications, Vuex offers a more organized and maintainable way to manage the state and helps developers adhere to best practices for state management.

31.

How can you use mixins to share functionality between multiple Vue.js components?

Mixins in Vue.js are a way to share reusable functionality between multiple components. They allow you to encapsulate and group common options, methods, and lifecycle hooks into a single object that can be mixed into multiple components.

To use mixins, you create an object with the desired functionality and then use the mixins option in your component to include that object. The properties and methods defined in the mixin will be merged into the component, effectively extending its behavior.

Example:

mixins.webp

In this example, we define a mixin called mixin.js, which contains a data function with a count property and two methods: increment and reset. Then, in the MyComponent.vue file, we use the mixins option to include the mixin, effectively adding the count property and the increment and reset methods to the component.

Now, any component that includes this mixin will have access to the shared count data property and the increment and reset methods.

It's important to use mixins carefully to avoid potential naming conflicts and make sure that the behavior shared by the components aligns well with the intended functionality. Also, be cautious about using too many mixins, as it can lead to complex and hard-to-maintain code.

Vue.js also provides other means of code reuse, such as components, custom directives, and plugins, which might be more appropriate depending on the scenario. Choose the appropriate technique based on the specific requirements and complexity of the components you want to build.

32.

Explain the use of "scoped slots" and how they differ from regular slots.

In Vue.js, slots are a powerful feature that allows you to pass content from a parent component to a child component. Regular slots are used to pass static content, while "scoped slots" provide a way to pass dynamic content along with data from the child component back to the parent component.

Regular Slots:

  • Regular slots are also known as "named slots" or "named content slots."
  • They allow you to define placeholders in the child component's template where the parent component can inject content.
  • The parent component can pass data or HTML markup to the child component to be displayed in these placeholders.

Example of a regular slot in a child component:

regular slot.webp

Scoped Slots:

  • Scoped slots allow the child component to send data back to the parent component through the slot content.
  • They are used when the child component needs to provide data or functionality to customize how the content should be rendered in the parent component.
  • The parent component receives this data and can use it to render the content dynamically.

Example of a scoped slot in a child component:

scoped slot.webp

In this example, the child component has a scoped slot named data, and it sends the value of the message to the parent component. The parent component uses the data sent by the child component to render the content dynamically.

Scoped slots are useful when you want to allow more customization and flexibility in how the content is rendered by the parent component, based on data from the child component. They enable a deeper level of communication and interaction between parent and child components, making it easier to build reusable and composable components.

33.

What are the advantages of using Vue.js in conjunction with TypeScript?

Using Vue.js with TypeScript offers several advantages. Firstly, TypeScript provides static typing, which enhances code reliability and makes it easier to catch errors during development. This helps in writing more robust and maintainable Vue.js applications.

Secondly, TypeScript's type annotations improve code documentation, making it easier for developers to understand the codebase. It also facilitates code navigation and autocompletion in modern development environments, which leads to increased productivity.

Furthermore, integrating Vue.js with TypeScript allows better collaboration among team members, as it enforces a clearer contract between components and improves communication.

Overall, Vue.js and TypeScript combination ensures better code quality, increased developer productivity, and enhanced collaboration in larger projects.

34.

How can you optimize the performance of Vue.js applications using code splitting?

Code splitting is a technique to optimize the performance of Vue.js applications by dividing the application code into smaller, more manageable chunks that can be loaded on-demand when needed. This can significantly reduce the initial loading time and improve the overall user experience.

To implement code splitting in Vue.js, you can leverage features like dynamic imports and Webpack's code-splitting capabilities. Instead of loading the entire application at once, you can split it into separate modules for each route or component.

Using Vue Router, you can enable code splitting for routes by utilizing the component property with a function that returns a dynamic import:

code splitting vue js.webp

Similarly, you can use dynamic imports within components to load heavy or less frequently used parts of the application only when necessary.

By employing code splitting, Vue.js applications can reduce the initial bundle size, load only the required modules on demand, and improve the application's performance, particularly on slower networks or devices.

35.

Discuss the concept of dynamic imports and how they enhance application performance.

Dynamic imports are a feature in modern JavaScript that allows you to load modules or code chunks only when they are needed, rather than being included in the main bundle during the initial page load. This feature is particularly beneficial in large-scale Vue.js applications where optimizing performance is crucial.

Dynamic imports are typically used with the import() function, which returns a promise that resolves to the module you want to import. This function can be used with async/await or .then() syntax to handle the loaded module.

Here's an example of dynamic import in Vue.js:

dynamic import vue.webp

The benefits of dynamic imports include:

  • Faster Initial Load: By deferring the loading of non-essential modules, the initial bundle size is reduced, leading to faster loading times for the main application.
  • Lazy Loading: Dynamic imports enable lazy loading of components or features in Vue.js, allowing the application to load faster and only fetch the necessary code when a specific route or component is accessed.
  • Optimized Resource Usage: Components or modules that are rarely used may never be loaded, saving bandwidth and reducing memory usage, thus providing a more efficient user experience.
  • Improved Performance: With dynamic imports, the critical rendering path is streamlined, which can lead to improved overall performance, especially on low-bandwidth or mobile devices.

Overall, dynamic imports are a powerful tool for enhancing Vue.js application performance by intelligently loading resources on demand, resulting in a more responsive and efficient application.

36.

How can you use the "renderError" function in Vue.js to handle errors in render functions?

The renderError function in Vue.js is a powerful tool to handle errors that occur during the rendering process of components. When a child component throws an uncaught error, the parent component can use the renderError function to provide a fallback UI or display an error message, preventing the entire application from crashing.

To use renderError, you should define it in the parent component and then specify it within the component options:

render error in vuewebp.webp

When a child component throws an error during rendering, Vue.js will invoke the renderError function, passing the h (createElement) function and the error object as arguments. The h function is used to create a fallback UI to be displayed when an error occurs.

It's important to note that the renderError function only handles errors that occur during the rendering phase and won't catch errors that happen during component lifecycles like those created or mounted.

By implementing renderError, you can gracefully handle errors and provide a better user experience by showing a meaningful error message or a fallback UI when something unexpected happens in your Vue.js components.

Tired of interviewing candidates to find the best developers?

Hire top vetted developers within 4 days.

Hire Now

Advanced Vue.js interview questions and answers

1.

Explain the role of the "v-slot" directive and its variations.

The "v-slot" directive in Vue.js is used for creating and distributing content in components, particularly in custom reusable components. It allows the parent component to pass content (such as markup, elements, or data) to its child components. The "v-slot" directive can be used in combination with the "slot" element in the child component to define named slots.
Variations of "v-slot":

"v-slot" without argument: Used to define the default slot in the child component, where the content from the parent will be rendered if no named slot matches.
"v-slot" with an argument: Used to define a named slot in the child component. This allows the parent to pass content specifically to this named slot.

Example: Parent component template:

v slot.webp

2.

How can you handle different environment configurations in Vue.js applications?

To handle different environment configurations in Vue.js applications, you can make use of environment variables. Vue CLI provides an easy way to manage environment-specific configurations using different environment files like ".env.development", ".env.production", etc.
Steps:

  • Create environment-specific files: Create separate ".env" files for each environment (e.g., ".env.development" and ".env.production") and define the environment-specific variables there.
  • Access environment variables: In your Vue.js code, you can access the environment variables using "process.env.VARIABLE_NAME".

Example:

environment configurations.webp

3.

Discuss the use of "provide" and "inject" for dependency injection in Vue.js.

The "provide" and "inject" options in Vue.js are used for dependency injection, allowing you to pass data or functions from a parent component to its descendants without the need to explicitly pass them as props through all intermediary components.

  • "provide": In the parent component, you define a "provide" property as an object containing the data or methods you want to share with the child components.
  • "inject": In the child component, you use the "inject" option to specify the names of the properties you want to access from the parent component.

It's important to note that "inject" can only be used in child components that are descendants of the component where "provide" is used.

Example:

dependency.webp

4.

How can you implement client-side routing in Vue.js applications?

In Vue.js applications, client-side routing can be achieved using the Vue Router library. The Vue Router enables you to navigate between different pages or views within the application without full page reloads.

Steps:

  • Install Vue Router: First, you need to install the Vue Router package. You can do this via npm or yarn.
  • Set up the routes: Define the routes in the router configuration. Each route corresponds to a specific component that will be displayed when the route is accessed.
  • Mount the router: Mount the Vue Router in the root Vue instance to enable routing throughout the application.

Example:

vue router.webp

Now you can use < router-link > and < router-view > components in your templates to navigate between the defined routes and display the corresponding components without full page reloads.

Example:

router link.webp

5.

Explain the concept of lazy loading in Vue.js and its benefits.

Lazy loading in Vue.js is a technique used to defer the loading of certain components until they are actually needed. Instead of loading all components at once during the initial page load, lazy loading allows components to be loaded on-demand, which can significantly improve the application's initial load time and overall performance.

Benefits of lazy loading:

  • Faster initial page load: Only the essential components are loaded initially, reducing the initial bundle size and improving the time it takes for the application to become interactive.
  • Reduced resource usage: Components that are not immediately required are not loaded, which helps conserve bandwidth and reduces server load.
  • Improved performance: By loading components only when they are needed, the application's responsiveness and user experience are enhanced.
  • Code splitting: Lazy loading often involves code splitting, where the JavaScript code is divided into smaller chunks, allowing for more efficient caching and reducing unnecessary downloads for subsequent visits.
  • Better scalability: Lazy loading allows large applications to be broken down into smaller chunks, making the application more maintainable and scalable.

Example (with Vue Router):

lazy loading.webp

Now, the "MyComponent" will only be loaded when the route is accessed, not during the initial application load. This helps optimize the bundle size and speeds up the initial page load time.

6.

How do you use the "keep-alive" element to cache and preserve component state?

In Vue.js, the "keep-alive" element is used to cache and preserve the state of a component. When a component is wrapped with the "keep-alive" element, it will be retained in memory instead of being destroyed and recreated when it's no longer active.

The "keep-alive" element has two main attributes: "include" and "exclude". These attributes allow you to specify which components should be cached or excluded from caching.

Example:

keep alive element.webp

In this example, we have two components, "CachedComponent" and "AnotherComponent". When the "Toggle Component" button is clicked, it switches between rendering the two components. However, because "CachedComponent" is wrapped with "keep-alive", its state will be preserved when it's not active, and it won't be re-rendered from scratch when we switch back to it.

This can be especially useful when dealing with form inputs or other components with complex states that you want to preserve between component switches.

7.

Discuss the differences between "async/await" and "Promises" in Vue.js.

Both "async/await" and "Promises" are used to handle asynchronous operations in Vue.js or any JavaScript application. The main differences between them are in syntax and usage:

Promises:

  • Promises are objects representing the eventual completion (or failure) of an asynchronous operation and its resulting value.
  • They provide a more structured way to handle asynchronous operations compared to traditional callbacks.
  • Promise methods include "then()" for handling resolved values and "catch()" for handling errors.
  • Chaining multiple asynchronous operations is achieved using multiple "then()" calls.
  • Error handling needs to be done separately with "catch()".

Example using Promises:

using promises.webp

Async/Await:

  • Async functions are a more recent addition to JavaScript and provide a more concise way to work with Promises.
  • An async function returns a Promise implicitly, and it allows you to use the "await" keyword to pause the execution until the Promise is resolved.
  • It simplifies the syntax for handling Promises, making the code more readable and less nested.
  • Error handling can be done using try/catch blocks.

Example using Async/Await:

async:await.webp

In summary, "async/await" is syntactic sugar over Promises, providing a more elegant and readable way to work with asynchronous operations, but both approaches achieve the same goal of handling asynchronous tasks in a Vue.js application.

8.

How can you implement content distribution using slots and named slots?

Content distribution in Vue.js allows you to pass content from the parent component to its child component for rendering. This can be achieved using slots and named slots. Slots allow you to define placeholders in the child component that can accept content from the parent component.

Named slots give you the ability to have multiple placeholders in the child component, allowing the parent to choose where specific content should be rendered.

Let's see an example:

content distribution slots.webp

9.

Explain the concept of scoped CSS in Vue.js components.

Scoped CSS is a feature in Vue.js components that encapsulates the CSS styles defined in a component so that they only apply to the elements within that component. When you define a style block in a Vue component with the scoped attribute, the CSS styles you write will only affect the HTML elements of that specific component and won't leak out to other components or the global styles.

Scoped CSS is particularly useful in preventing style conflicts between different components, as each component's style will be isolated from others.

scoped css vue.webp

In this example, the styles defined inside the style block with the scoped attribute will only apply to the elements within the "example-component" component. If you use the same class or tag name in another component, it won't be affected by these styles.

10.

How can you use the "v-mask" library for input masking in Vue.js applications?

The "v-mask" library is not a built-in feature of Vue.js, but it is a popular third-party library used for input masking in Vue.js applications. It allows you to enforce a specific pattern on user input, providing a more controlled way of handling user input, such as phone numbers, credit card numbers, dates, etc.

To use the "v-mask" library in your Vue.js application, follow these steps:

vmask library.webp

In this example, the "v-mask" directive enforces the pattern "##/##/####" on the input field, which means it will only accept dates in the format "dd/mm/yyyy". The "#" characters are placeholders for digits, and other characters like "/", "-", etc., are treated as literals.

Please note that the "v-mask" library is just one of many available libraries for input masking in Vue.js. Depending on your requirements, you might find other libraries that suit your needs better.

11.

Discuss the use of the "provide/inject" pattern for cross-component communication.

The "provide/inject" pattern in Vue.js facilitates cross-component communication without the need to pass props through all intermediary components. It allows you to provide data or methods from a parent component and then inject them into child components, even if they are not direct descendants.

This can be useful when you have deeply nested components that need access to certain shared data or functions without having to pass them down explicitly through props.

The "provide" and "inject" options are used together, and it's important to note that "inject" can only be used in child components that are descendants of the component where "provide" is used.

Example:

provide inject pattern.webp

In this example, the "provide" option in the parent component provides "sharedData" and "sharedMethod" to its child components. The child component uses the "inject" option to access these provided properties. Now, the child component can access "sharedData" and call "sharedMethod" as if they were defined locally in the child component.

12.

How do you handle internationalization (i18n) in Vue.js applications?

Internationalization (i18n) is the process of making your Vue.js application adaptable to different languages and regions. Vue.js provides various i18n solutions, and one popular approach is to use the "vue-i18n" library.

To handle internationalization in Vue.js applications using "vue-i18n", follow these steps:

internationalization.webp

In this example, we set up two locales: "en" (English) and "fr" (French), along with their respective translation messages. The "vue-i18n" instance is created with these messages, and we set the default locale to "en". The {{ $t('welcome') }} and {{ $t('greeting', { name: 'John' }) }} syntax is used in templates to display the translated strings.

You can switch the language dynamically by updating the "locale" property of the i18n instance.
Please note that this is just a basic implementation. For more complex i18n scenarios, you may need to consider other factors like pluralization, date formats, etc.

13.

Explain the concept of dynamic form fields and how to handle them in Vue.js.

Dynamic form fields in Vue.js refer to scenarios where the number of form fields or their properties are not known at compile-time and may change during runtime based on user input or other factors. For example, imagine a form where users can add multiple phone numbers or email addresses dynamically.

To handle dynamic form fields in Vue.js, you typically use data structures such as arrays or objects to store the dynamic form data and utilize Vue's reactivity system to update the UI.

Here's a general approach to handling dynamic form fields:

dynamic form fields.webp

In this example, we have a form with dynamic email and phone number fields. The form data is stored in the formData object, and we use v-for to render the dynamic fields based on the data in the arrays. The addEmailField and addPhoneNumberField methods allow users to add new fields, and the removeEmailField and removePhoneNumberField methods let users remove specific fields.

As the user interacts with the form fields, the formData object gets updated automatically, reflecting the changes in the UI. This way, Vue.js manages the dynamic form fields and ensures reactivity to keep the UI in sync with the underlying data.

14.

How can you handle application-level state management without using Vuex?

Vuex is a popular state management library for Vue.js applications, but there are scenarios where you might not need it, especially for smaller projects or simple state management requirements. In such cases, you can manage application-level state using Vue.js built-in features and patterns.

Here's how you can handle application-level state management without using Vuex:

  • Centralized Data: Create a centralized data object in the root Vue instance or a dedicated Vue instance that acts as a global store for your application's state.

centralized data.webp

  • Accessing State: To access the state from any component, you can use Vue's reactivity system and the "appState" object we created above.

accessing state.webp

  • Mutating State: To change the state, you can use methods within the same Vue instances where the state is defined, and these methods can be accessed from any component that needs to make changes.

mutating state.webp

  • Reactive Updates: Vue's reactivity system will automatically trigger updates in components whenever the state changes, so you don't need to worry about manually updating the UI.

reactive updates.webp

  • Component Communication: For cross-component communication, you can use Vue's built-in events, provide/inject, or even a simple event bus.

Please note that while managing state without Vuex may work well for smaller applications, as your project grows and the state management becomes more complex, it might be beneficial to consider Vuex or other state management solutions for better organization and maintainability.

15.

Discuss the differences between "v-model" and "v-bind" when dealing with form elements.

Both "v-model" and "v-bind" are directives in Vue.js used to handle data binding, but they serve different purposes when dealing with form elements.

"V-bind":

  • The "v-bind" directive is used to bind data to an element's attributes or properties.
  • It allows you to dynamically set the value of an attribute or property based on the data in your Vue instance.
  • It is often used to bind HTML attributes like "href", "class", "src", "disabled", etc.

Example:

v-bind vue.webp

In this example, the "v-bind:href" directive binds the "href" attribute of the anchor element to the "url" data property. If the "url" property changes, the "href" attribute will be updated accordingly.

"V-model":

The "v-model" directive is a two-way data binding directive specifically designed for form elements like input, select, and textarea.
It allows you to bind the value of a form element to a data property in the Vue instance, and any changes to the form element will automatically update the data property, and vice versa.

Example:

v model vue.webp

In this example, the "v-model" directive is used to bind the input element to the "message" data property. Any text entered in the input field will update the "message" property and the value of "message" will be displayed below the input field.

In summary, "v-bind" is used for one-way data binding, to bind data to an element's attributes or properties, while "v-model" is used for two-way data binding, specifically for form elements to bind their values to data properties in the Vue instance.

16.

How do you implement lazy loading for images in Vue.js?

Implementing lazy loading for images in Vue.js involves loading images only when they are about to be visible in the viewport, rather than loading all images at once during the initial page load. This helps improve the initial page load time and saves bandwidth for users who might not scroll to see all the images.

To achieve lazy loading in Vue.js, you can use the "Intersection Observer API" or utilize third-party Vue.js libraries that provide lazy loading functionality.

Using Intersection Observer API:

  • Install a polyfill (optional): The Intersection Observer API is supported by most modern browsers, but if you need to support older browsers, consider installing a polyfill.
  • Create a custom directive for lazy loading:

lazy loading vue.webp

  • Use the custom "v-lazyload" directive in your Vue templates:

v lazyload directive.webp

Using a third-party Vue.js library (e.g., "vue-lazyload"):

  • Install the library using npm or yarn:

npm or yarn.webp

  • Import and use the library in your main Vue file:

import vue.webp

  • Use the "v-lazy" directive in your Vue templates:

v-lazy directive.webp

Both approaches will result in lazy loading the images, and the images will load only when they are visible in the viewport.

17.

Explain the concept of error boundaries in Vue.js and their role in error handling.

Error boundaries in Vue.js are a mechanism to handle JavaScript errors that occur during the rendering of a component's template. When an error occurs in a component, it can cause the entire component tree to be unmounted and not render properly. With error boundaries, you can prevent such catastrophic failures and gracefully handle errors by defining fallback behavior.

Error boundaries work by wrapping a component with a special component that catches errors thrown by its children during rendering. If an error occurs, the error boundary component can display a custom error message or a fallback UI, allowing the rest of the application to continue working correctly.

In Vue.js, you can create an error boundary component by defining a special lifecycle hook called "errorCaptured".

Example of an error boundary component:

error boundary component.webp

To use the error boundary component, wrap your components that you want to be protected by the error boundary:

wrap your components.webp

Now, if an error occurs inside the "ChildComponent", it will be caught by the "ErrorBoundary" component, and the fallback UI or error message defined in "ErrorBoundary" will be shown instead of the broken UI. The rest of the application will continue running without being affected by the error in "ChildComponent".

Remember that error boundaries only catch errors that occur during rendering (i.e., in template or lifecycle hooks). They won't catch errors inside methods, watchers, or asynchronous operations like API calls. For those scenarios, traditional try/catch blocks or error-handling mechanisms should be used.

18.

How can you use the "vue-router" to implement nested routes and nested layouts?

Vue Router allows you to implement nested routes and nested layouts, making it easy to organize and structure complex Vue.js applications with multiple views and components.

Nested Routes: Nested routes are routes that are declared within other routes. They are used when you have components that require additional nested views. This can be useful when you have a layout or parent component that acts as a container for its child components.

Here's an example of how to implement nested routes in Vue Router:

nested layouts.webp

In this example, we have a parent component called "ParentComponent" and a child component called "ChildComponent". The "ChildComponent" is nested inside the "ParentComponent" using the children option in Vue Router.

Nested Layouts: Nested layouts are used when you want to have different layouts for different sections of your application. For example, you might have a different layout for the header, footer, and sidebar components.

To implement nested layouts, you can define different components with their own layouts and use them as containers for specific views or components.

nested routes in vue.webp

In this example, we have different components for the header, sidebar, footer, home, and about sections of the application. Each route specifies which components should be used as the layout, and the corresponding views or components will be rendered inside those layouts.

Nested routes and nested layouts are powerful features of Vue Router that allow you to create complex and organized Vue.js applications with ease.

19.

Discuss the impact of mixins on code maintainability.

To define a mixin, you simply create an object with the properties and methods that you want to share, and then you can apply the mixin to one or multiple components using the mixins option in the component definition.

Here's an example of a simple mixin that provides a method to log messages:

// messageMixin.js export default { methods: { logMessage(message) { console.log(message); }, }, };

Now, let's apply this mixin to two different components:

applying mixins.webp

With this setup, both ComponentA and ComponentB will have access to the logMessage method from the mixin.

Impact on Code Maintainability:

Mixins can have a positive impact on code maintainability by promoting code reuse and reducing duplication. They allow you to extract common functionality and separate it from the component-specific code.

However, improper or excessive use of mixins can also introduce challenges:

Name Collisions: If multiple mixins define methods or data with the same name, it can lead to unexpected behavior and conflicts.

Code Traceability: When mixins are used in many places, tracking the origin of certain behaviors or logic can become challenging, making it harder to debug issues.

Tight Coupling: Overuse of mixins can lead to tight coupling between components and mixins, making it difficult to refactor or modify them independently.

To ensure maintainable code, consider the following best practices when using mixins:

  • Use mixins for small, specific pieces of functionality that are genuinely reusable.
  • Keep mixins simple and focused on a single concern to minimize potential conflicts and side effects.
  • Use clear and descriptive names for mixins to improve code traceability.
  • Consider using composition API (available in Vue 3) instead of mixins for more complex component logic.

By following these best practices, mixins can be a valuable tool for improving code maintainability in your Vue.js applications.

20.

How do you handle focus management in Vue.js applications?

Handling focus management in Vue.js applications is essential for creating accessible and user-friendly interfaces. Proper focus management ensures that users can navigate through your application using keyboard interactions and screen readers smoothly. Vue.js provides various tools and techniques to manage focus effectively.

Here are some strategies for handling focus management in Vue.js applications:

Using the "v-if" directive: If you have dynamic components that appear or disappear based on certain conditions, you can use the "v-if" directive to conditionally render them. When a component is rendered, the focus will automatically move to it, providing a smooth focus experience.

v if directive.webp

Using the "ref" attribute: The "ref" attribute allows you to assign a reference to an element or component in your template. You can use this reference to programmatically manage focus.

ref attribute.webp

In this example, when the button is clicked, the focusInput method will be called, and it will programmatically set the focus to the input field using the "focus" method.

Using "vue-focus-lock" library: The "vue-focus-lock" library helps manage focus within a specific container, such as a modal dialog or a dropdown menu. It prevents the focus from moving outside the container until it's closed.

In this example, the "vue-focus-lock" component is used to wrap the content of the modal. When the modal is visible, the focus will be trapped inside the modal content until it's closed.

By using these techniques and following best practices for focus management, you can create more accessible and user-friendly Vue.js applications that accommodate various input methods, including keyboard navigation and screen readers. Proper focus management is crucial for ensuring your application is usable and accessible to all users.

npm install vue-focus-lock # or yarn add vue-focus-lock

vue focus lock library.webp

In this example, the "vue-focus-lock" component is used to wrap the content of the modal. When the modal is visible, the focus will be trapped inside the modal content until it's closed.

By using these techniques and following best practices for focus management, you can create more accessible and user-friendly Vue.js applications that accommodate various input methods, including keyboard navigation and screen readers. Proper focus management is crucial for ensuring your application is usable and accessible to all users.

21.

Explain the use of the "sync" modifier and its limitations.

In Vue.js, the "sync" modifier is a two-way binding method that allows a child component to update a prop's value in the parent component directly. It simplifies the process of passing data back and forth between parent and child components. The "sync" modifier is a shorthand for using props with custom events.

To use the "sync" modifier, you need to follow these steps:

  • Define a prop in the child component with the "sync" modifier:

prop in child component.webp

  • Use the "v-bind" directive with the "sync" modifier in the parent component:

prop in parent component.webp

With this setup, any changes made to the input field inside the "ChildComponent" will be reflected in the "message" data property of the "ParentComponent". Similarly, if the "message" property is updated in the "ParentComponent", the change will be propagated to the "ChildComponent" through the "value" prop.

Limitations of the "sync" modifier:

Prop Naming Convention: The prop name in the child component must follow a specific convention. It should be the name of the prop with the addition of the ".sync" suffix. For example, if the prop is named "value", the corresponding prop in the child component should be named "value".

Limited to One Prop: The "sync" modifier can only be applied to a single prop in a child component. If you need to pass multiple props back and forth, you'll have to use custom events and emit them manually.

Implicit Mutation: The "sync" modifier introduces an implicit mutation of the prop's value. This can make it harder to track the flow of data changes in your application, especially as it grows in complexity. This is why Vue 3's Composition API encourages using explicit props and emits for better predictability.

Passing Down: In deeply nested components, passing down the "sync" prop can become cumbersome. Custom events or Vuex can provide a cleaner alternative in such cases.

Due to these limitations, the use of "sync" has been deemphasized in Vue.js in favor of using explicit prop passing and custom events. Vue 3 introduces the Composition API, which encourages a more explicit approach to state management and data communication between components, resulting in more predictable and maintainable code.

22.

How can you use the "props" option to pass data to child components?

In Vue.js, the "props" option is used to pass data from a parent component to its child components. It allows you to communicate and share data between components in a one-way flow, where changes in the parent's data can be reflected in the child component, but not vice versa (unless using "sync" or custom events).

To use the "props" option, follow these steps:

  • Define the "props" option in the child component:

props option.webp

  • Pass data from the parent component to the child component using the "v-bind" directive:

parent component in vue.webp

In this example, the "ChildComponent" has a prop named "message," and the "ParentComponent" passes the data "Hello from the parent component!" to the "ChildComponent" using the "v-bind" directive with the syntax :message="parentMessage". The "message" prop in the child component is then accessible using this.message.

The data passed through props is reactive, meaning if the "parentMessage" data changes in the "ParentComponent", the "ChildComponent" will automatically update with the new value.

It's important to note that props are intended for one-way data flow, meaning that changes made to a prop's value inside the child component won't affect the original data in the parent component. If you need to update the parent's data from a child component, you should emit custom events or use the "sync" modifier (which has some limitations, as discussed in the previous answer).

Additionally, you can define default values for props and specify their types and other validations to ensure proper data handling. For more complex scenarios, consider using Vuex for centralized state management or the Composition API in Vue 3 to create reusable and composable logic for components.

23.

Discuss the differences between "v-bind" and "v-on" shorthands and their uses.

In Vue.js, both "v-bind" and "v-on" are essential directives used to handle data binding and event handling, respectively. They have shorthand notations that make them more concise and convenient to use in templates.

"v-bind" Shorthand:

The "v-bind" directive is used to bind data to an element's attributes or properties. It allows you to dynamically set values for HTML attributes, CSS properties, or other DOM properties based on data in your Vue instance. The "v-bind" shorthand is denoted by a colon ( : ) before the attribute or property you want to bind.

Example of "v-bind" shorthand:

v bind shorthand.webp

In this example, "v-bind" is used to set the "href" attribute of the anchor element, the "src" attribute of the image element, and the "value" property of the input element.

"v-on" Shorthand:

The "v-on" directive is used to listen to DOM events and trigger methods in response to those events. It allows you to handle user interactions like clicks, keypresses, mouse movements, etc. The "v-on" shorthand is denoted by an @ symbol before the event you want to listen to.

Example of "v-on" shorthand:

v on shorthand.webp

In this example, "v-on" is used to listen to the "click" event on the button element and the "input" event on the input element. When the button is clicked, the "incrementCounter" method is called, and when the input value changes, the "handleInput" method is called to update the data property "inputValue."

In summary, "v-bind" is used for data binding, allowing you to set dynamic values for element attributes and properties, while "v-on" is used for event handling, enabling you to respond to user interactions by calling methods defined in your Vue instance. The shorthand notations (: for "v-bind" and @ for "v-on") make the syntax more concise and readable in templates, enhancing the overall development experience.

24.

How can you handle form validation in Vue.js applications?

Form validation is crucial for ensuring that data submitted by users meet certain criteria and is valid before being processed or sent to a server. In Vue.js applications, you can handle form validation using various techniques and libraries. Here's a general approach to form validation in Vue.js:

Form Data Binding: Use the "v-model" directive to bind form input elements to data properties in your Vue component. This allows you to access and manipulate form data easily.

form binding vue.webp

Form Validation Logic: Implement validation logic in the "submitForm" method or other methods that handle the form submission. You can use conditional statements, regular expressions, or external libraries to check if the form data meets your validation criteria.

form validation logic.webp

Displaying Error Messages: When form data is invalid, you can display error messages to the user to provide feedback. You can use conditional rendering to show or hide error messages based on the form's validation status.

displaying error messages'.webp

Using External Libraries: Vue.js has several third-party libraries that can simplify form validation, such as "Vuelidate," "VeeValidate," or "vee-validate." These libraries offer more advanced validation rules, custom error messages, and other helpful features to streamline form validation in larger applications.

using external libraries.webp

In this example, Vuelidate is used to simplify form validation. The validation rules are defined in the "validations" option, and the $v object provides information about the validation status of each field. The form will only be submitted if all validations pass.

By implementing form validation in your Vue.js applications, you can ensure data integrity and provide better user experiences by guiding users to enter valid information. Third-party libraries like Vuelidate or VeeValidate can streamline the process and provide additional features to handle more complex validation scenarios.

25.

Explain the concept of component-based development in Vue.js.

Component-based development is a fundamental concept in Vue.js, where the user interface is broken down into reusable and self-contained building blocks called components. Each component encapsulates its own template, logic, and style, making it easy to reason about, test, and maintain.

In Vue.js, a component is defined as a Vue instance with its own options, including data, methods, computed properties, and lifecycle hooks. Components can be nested within each other, creating a hierarchy of components that represent different parts of the user interface.

The benefits of component-based development in Vue.js include:

Reusability: Components can be reused throughout the application, promoting a consistent user interface and reducing code duplication.

Maintainability: Components are self-contained, making it easier to understand and modify specific parts of the application without affecting other components.

Composability: Components can be combined to create more complex components, allowing developers to build large applications with small, manageable pieces.

Readability: The component structure makes the code more readable and organized, especially in larger applications.
Collaboration: Components enable teams to work on different parts of the application independently, improving collaboration and productivity.

Here's an example of a simple Vue.js component:

vue js example.webp

In this example, the "HelloWorld" component displays a greeting with the value of the "name" data property.

Components can then be used in the parent component's template like this:

parent component template.webp

The component-based approach promotes modularity, code reusability, and maintainability, making Vue.js a powerful choice for building complex and scalable applications.

26.

How do you implement infinite scrolling in Vue.js applications?

Infinite scrolling is a popular technique to load more data as the user scrolls down a web page. Instead of paginated navigation, infinite scrolling dynamically loads new content, providing a smoother user experience. In Vue.js, you can implement infinite scrolling using a combination of event listeners and data manipulation.

Here's a basic example of implementing infinite scrolling:

infinite scrolling.webp

In this example, the component displays a list of items and simulates loading more items as the user scrolls down. The "handleScroll" method listens for the "scroll" event on the scrollable container and triggers the "loadMoreItems" method when the user reaches the bottom of the container. The "loadMoreItems" method asynchronously fetches new data and appends it to the existing list of items.

Remember to replace the "generateItems" function with actual data fetching logic from your API or data source.

27.

Discuss the use of Vuex getters to retrieve state data.

In Vuex, getters are functions that allow you to retrieve and compute state data from the store. They are similar to computed properties in Vue components but are meant for accessing state data from the Vuex store instead of component data.

Getters are particularly useful when you need to transform or filter data from the state without modifying the original data. By using getters, you can keep your state management logic centralized in the store and make it easier to access and reuse the computed values across multiple components.

Here's an example of how to define and use a Vuex getter:

vuex getter.webp

In this example, we have defined three getters: "completedTodos," "incompleteTodos," and "totalTodos." The "completedTodos" and "incompleteTodos" getters filter the todos based on their "completed" status, while the "totalTodos" getter returns the total number of todos in the state.

To use these getters in a component, you can use the mapGetters helper from "vuex" in the component's script section:

map getters.webp

In this example, we use the mapGetters helper to map the getters from the Vuex store to the component's computed properties. This way, we can access the computed values as if they were regular component data.

By using Vuex getters, you can centralize and optimize access to state data in your application. Getters are especially beneficial when you need to perform data transformations or calculations based on the state data, keeping your components lightweight and focused on the presentation logic.

28.

How can you use the "v-on" directive to listen to custom events?

The "v-on" directive in Vue.js is used to listen to DOM events triggered by the user, such as "click," "input," "keyup," etc. However, you can also use "v-on" to listen to custom events emitted by child components. Custom events allow child components to communicate with their parent components or even trigger actions in other components.

To listen to a custom event, you need to follow these steps:

Emitting the Custom Event in the Child Component:

In the child component, use the "$emit" method to trigger the custom event. The "$emit" method takes two arguments: the event name and an optional data payload to pass to the parent component.

child component vue.webp

In this example, when the button is clicked, the "sendMessage" method emits a custom event named "message-sent" along with the message "Hello from the child component!" as the payload.

Listening to the Custom Event in the Parent Component:

In the parent component, use the "v-on" directive (or its shorthand @) to listen to the custom event emitted by the child component. In the parent component's event handler, you can access the payload data if it was passed during the event emission.

parent component vue.webp

In this example, the "ParentComponent" listens to the "message-sent" event emitted by the "ChildComponent." When the event is triggered, the "handleMessage" method in the parent component is called, and it sets the "receivedMessage" data property with the message received from the child component.

By using custom events with "v-on," you can facilitate communication between components and make your Vue.js application more dynamic and interactive.

29.

Explain the concept of higher-order components (HOCs) in Vue.js.

Higher-Order Components (HOCs) is a design pattern in Vue.js (and other frameworks) used to enhance the functionality of components by wrapping them with additional features or behaviors. A HOC is a function that takes a component as an argument and returns an enhanced version of that component.

HOCs allow you to implement cross-cutting concerns, such as logging, authentication, or data fetching, in a reusable and composable way. They promote code reuse and make it easier to separate concerns and maintain a clear separation of responsibilities in your application.

Here's an example of an HOC that adds a "click count" feature to a component:

click count feature.webp

In this example, the "withClickCount" function is a HOC that takes a component as an argument and returns a new component with additional behavior. It adds a "clickCount" data property and a "handleClick" method to the component.
You can use this HOC to enhance any component by wrapping it with the "withClickCount" function:

with click count function.webp

In this example, the "OriginalComponent" is enhanced by wrapping it with the "withClickCount" HOC. Now, the "EnhancedComponent" has the "clickCount" data property and "handleClick" method, even though they are not explicitly defined in the "OriginalComponent."

HOCs are a powerful pattern to extend component functionality and promote code reuse. They make it easier to add common behaviors to multiple components without duplicating code, leading to more maintainable and modular Vue.js applications.

30.

How do you implement an event bus in Vue.js for cross-component communication?

An event bus is a mechanism in Vue.js that allows communication between components that are not directly related (e.g., parent-child relationship). It acts as a centralized hub for passing messages between components, making it useful for scenarios where components need to communicate without being tightly coupled.

To implement an event bus in Vue.js, you can create a separate Vue instance solely responsible for event handling and message passing. This instance will act as the event bus.

Here's a step-by-step guide to implementing an event bus:

Create the event bus instance:

event instance.webp

Import the event bus in components where communication is needed:

Image 18-09-23 at 9.29 PM (1).webp

In this example, "ComponentA" sends a message using the event bus when the button is clicked, and "ComponentB" listens for that message and updates its data when the message is received.

By using the event bus, you can easily enable communication between components that are not directly connected in the component tree. However, be cautious with the event bus approach as it can lead to a lack of clear data flow and make it harder to track data changes and debug issues. In larger applications, consider using state management solutions like Vuex for more structured and predictable communication between components.

31.

What is the purpose of Vue Router's navigation guards? Can you provide an example of when you would use them?

Vue Router's navigation guards are used to control and guard the navigation in a Vue.js application. They allow you to perform actions or checks before a route is entered or left. There are three types of navigation guards: beforeEach, beforeResolve, and afterEach.

Example:

navigation guard.jpeg

Tired of interviewing candidates to find the best developers?

Hire top vetted developers within 4 days.

Hire Now

Wrapping up

Vue.js is a potent and adaptable framework that is revolutionizing the web development industry. We hope that this thorough list of Vue.js interview questions and answers has been a beneficial resource for both prospective applicants and hiring managers.

Vue.js developers hold the key to unlocking innovation and building cutting-edge solutions for your company. In this era of fast pace development, the right talent with best skill-set can propelt yout towards the best outcome.

Are you ready to revolutionize your AI-powered IT service company with Vue.js expertise? Don't wait; start hiring top Vue.js developers today and stay ahead of the competition!

Hire Silicon Valley-caliber Vue.js developers at half the cost

Turing helps companies match with top-quality remote Vue.js developers from across the world in a matter of days. Scale your engineering team with pre-vetted Vue.js developers at the push of a button.

Hire developers

Hire Silicon Valley-caliber Vue.js developers at half the cost

Hire remote developers

Tell us the skills you need and we'll find the best developer for you in days, not weeks.