
iOS Swift
Basic Interview Q&A

1. What is Swift primarily used for in programming?
Swift is a powerful and intuitive programming language primarily used for developing applications within Apple's ecosystem, encompassing iOS, macOS, watchOS, and tvOS. It was created by Apple with a focus on safety, performance, and software design patterns, making it an excellent choice for crafting everything from mobile apps and desktop software to cloud services.
Swift's syntax encourages developers to write clean and maintainable code, which has led to its popularity not only for consumer-facing apps but also for enterprise and education software development.
2. Explain the difference between 'let' and 'var' in Swift.
In Swift, 'let' and 'var' are keywords used to declare constants and variables, respectively. When you declare a constant using 'let', you're telling the Swift compiler that this piece of data won't change throughout its lifetime in your code. In contrast, a 'var' declaration indicates that the data can be altered or reassigned at a later point.
let pi = 3.14159 // This is a constant, and its value cannot be changed.
var counter = 0 // This is a variable, and its value can be updated.
counter = counter + 1 // This is valid as counter is declared with 'var'.
Attempting to change the value of 'pi' after its initial declaration would result in a compile-time error, ensuring that constants remain immutable as the developer intended. Making appropriate use of 'let' and 'var' can help make your code safer and clearer, indicating the intended mutability of values.
3. How do you write single-line and multi-line comments in Swift?
In Swift, comments are used to include non-executable notes in your code. These are intended for developers to document the purpose, logic, or any other information useful for understanding the code.
For a single-line comment, you use two forward slashes //. The Swift compiler ignores any text following // on the same line. Here's an example of a single-line comment:
// This is a single-line comment.
For multi-line comments, you enclose the text between /* and */. The compiler ignores everything between these markers, regardless of the number of lines it spans. Here’s how you write a multi-line comment:
/* This is a multi-line comment.
It can span multiple lines.
These lines of text are not executed by the compiler. */
Comments are an essential part of programming, improving the readability and maintainability of the code by providing context or explaining complex logic to other developers who may read the code later.
4. Define type inference in Swift.
Type inference is a powerful feature in Swift wherein the compiler deduces the type of a variable or constant based on the initial value assigned to it. This capability allows developers to write less code while maintaining strong typing in the language, a characteristic that makes Swift code both concise and less prone to type-related errors.
For example:

In these cases, the Swift compiler infers studentName to be of type String and score to be of type Int without the need for explicit type annotations. Type inference also comes into play when determining the type of expressions:

Here, although 3 is an Int and 0.14 is a Double, Swift uses type inference to deduce the type of result as Double to accommodate the more precise representation of the expression.
Type inference optimizes the development process, enabling cleaner code and reducing potential verbosity. It also helps in situations where the type might be cumbersome to write out, like with complex generic types or closure expressions.
5. Compare 'print' and 'debugPrint' in Swift.
In Swift, both 'print' and 'debugPrint' functions are used for logging values to the console, but they serve slightly different purposes and provide different output formats, especially useful while debugging.
The print function outputs the given variable or message to the console in a human-readable form. This is the function you would typically use for quick debugging messages or for simple logging of information during development:

On the other hand, debugPrint is designed to provide more detailed debugging information about the data it prints. This function outputs the textual representation of an instance that is suitable for debugging. For types that conform to the CustomDebugStringConvertible protocol, debugPrint will use the debugDescription property to get a more detailed representation of the instance, including additional debugging information like explicit quotes around strings and visual representation of escape characters:
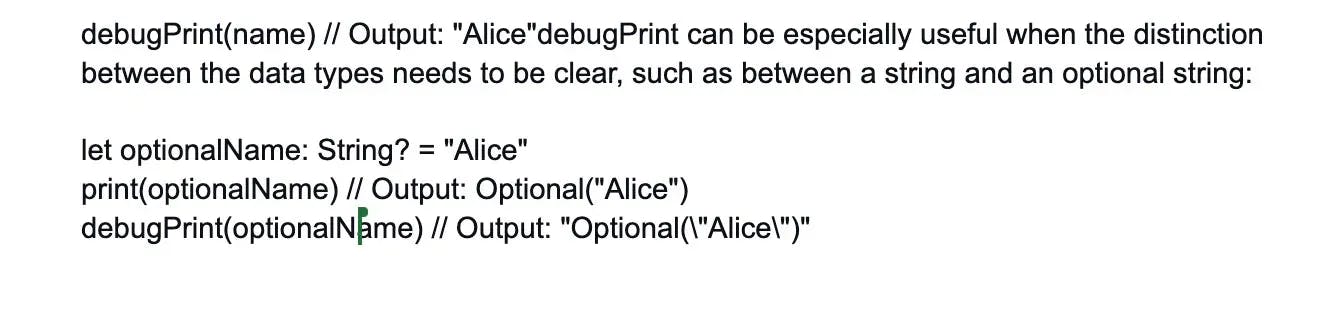
To sum up, you would typically use print for most day-to-day logging, but when you need precise format output for complex data types or want to inspect details that are not normally visible, debugPrint is the preferable choice.
6. Differentiate 'if let' from 'guard' statements.
In Swift, both 'if let' and 'guard' statements are used to safely unwrap optional values, but they are used in different contexts and have different implications for control flow within a function.
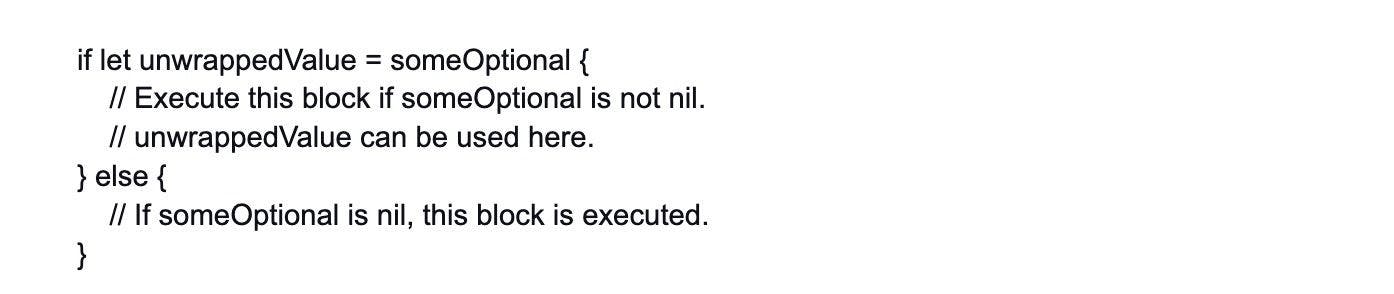
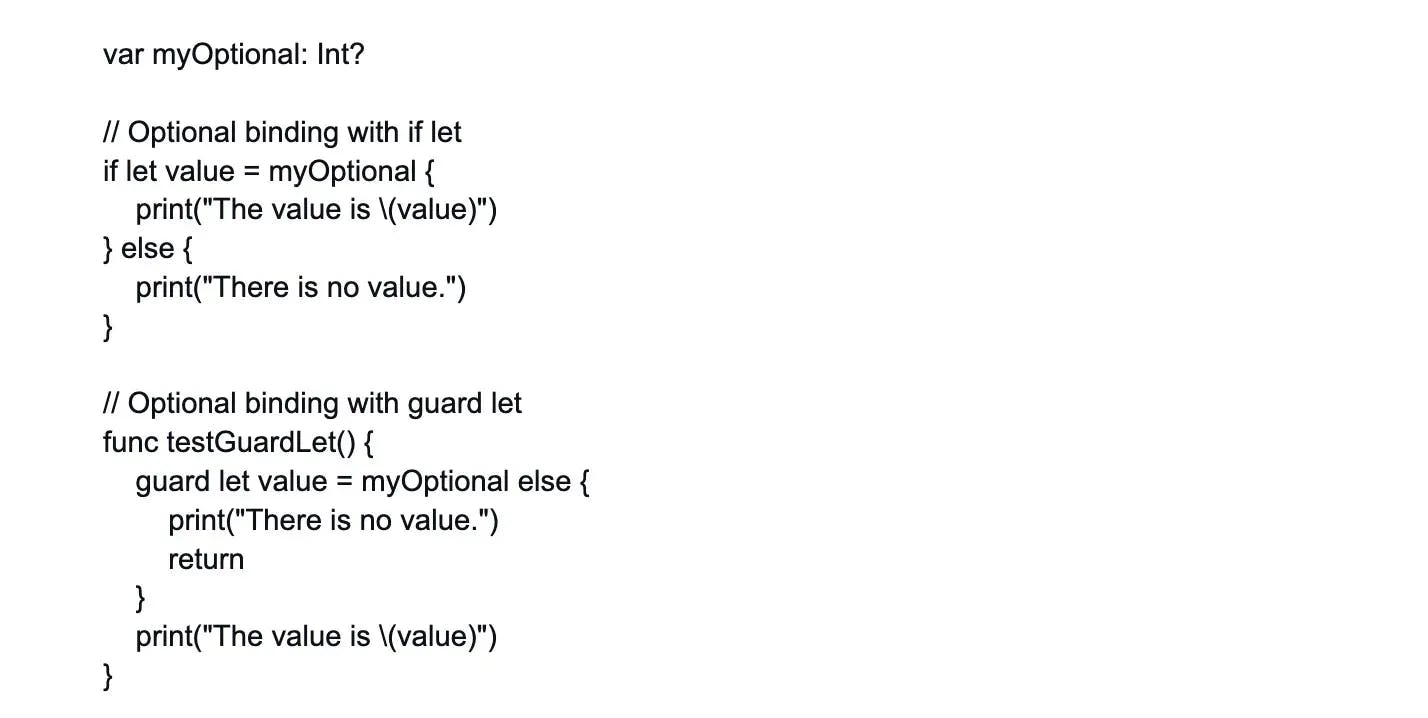
An 'if let' statement is used to try to unwrap an optional, and if it contains a non-nil value, the code within the braces {} gets executed. It’s a way to handle optional values safely without forcibly unwrapping them. The unwrapped optional is only available within the scope of the 'if' block:
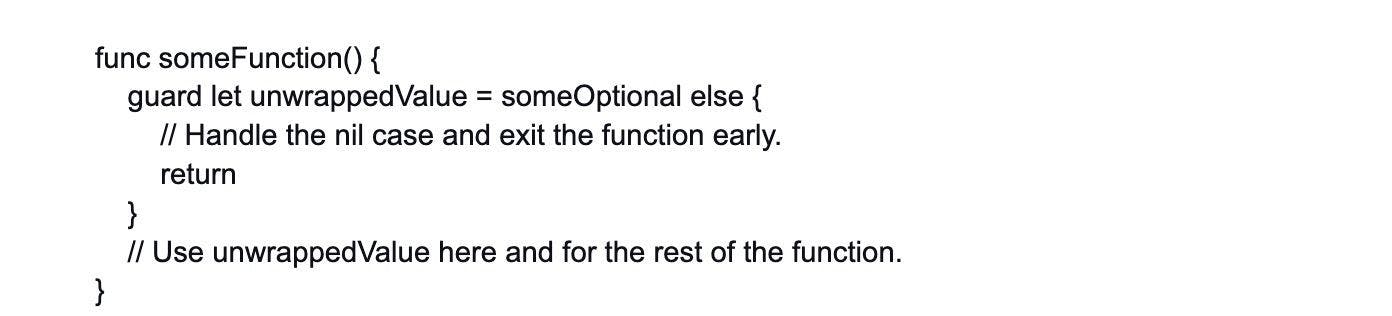
On the other hand, a 'guard' statement is commonly used to exit a function early if certain conditions are not met. While it can also unwrap an optional, its main purpose is to provide a sort of 'early return' pattern. If the optional can’t be unwrapped, the code within the 'else' block must exit the enclosing scope, typically with a 'return', 'break', or 'continue'. Unlike 'if let', the unwrapped variable from a 'guard' is available for the rest of the function or block after the 'guard' statement:
To summarize, use 'if let' when you need to unwrap an optional within a local scope and don’t necessarily want to exit the entire function if the optional is nil. Use 'guard' for cases where you want to affirm that certain conditions are met before proceeding in a function and handle the failure case early on.
7. Perform basic arithmetic operations using Swift.
In Swift, you can perform basic arithmetic operations such as addition, subtraction, multiplication, and division using standard arithmetic operators. These operations work with numerical values such as integers and floating-point numbers. Below are the basic arithmetic operations demonstrated with examples:

Note that the division operation in Swift when used with integers will perform an integer division and will truncate any decimal part of the result. If you need a floating-point division result, make sure at least one of the numbers is a floating-point number:
let floatDivision = 12.0 / 5 // Divides 12.0 by 5 to get 2.4.
It's also important to handle division by zero, which can cause a runtime error if not managed appropriately.
8. What is a tuple in Swift? Provide an example.
A tuple is a lightweight data structure that groups multiple values into a single compound value. Tuples can contain elements of any type and are useful when you want to return multiple values from a function or when you need a quick way to group related values together without creating a more complex structure like a class or a struct.
Here’s an extended example:
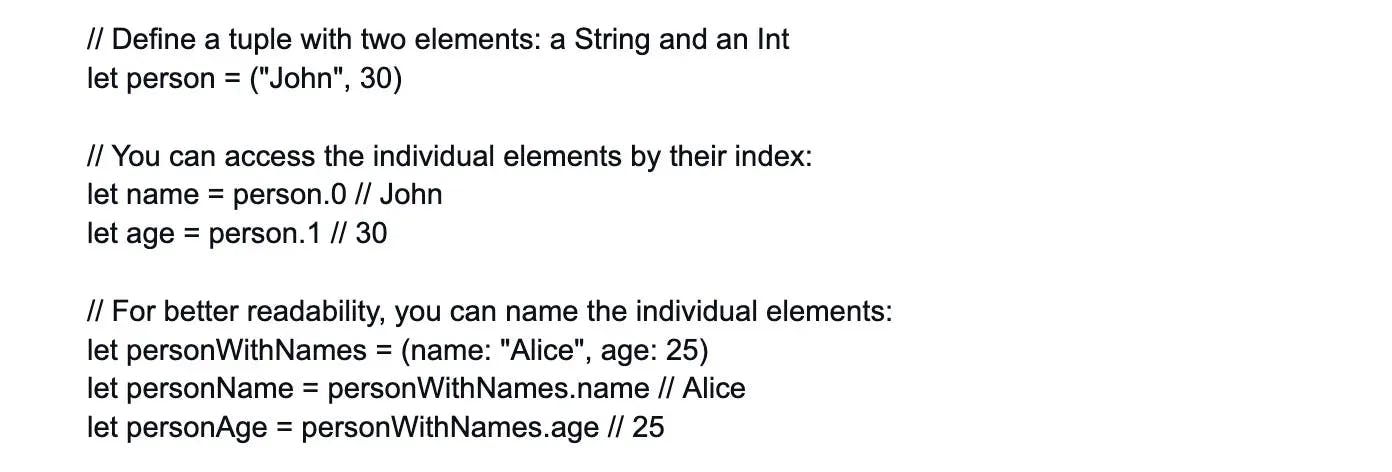
Tuples are particularly helpful for temporary groupings of related values. However, for more formal data structures where you need to include functionality (methods) or enforce specific types and names, a class or a struct might be more appropriate.
9. What are the fundamental data types available in Swift?
Swift provides a rich set of fundamental data types that cover a wide range of use cases. These include:
- Int: Represents whole numbers, both positive and negative. Example: var age: Int = 25
- UInt: Represents unsigned whole numbers (positive numbers including zero). Example: var itemsCount: UInt = 5
- Float: Represents a 32-bit floating-point number. It's less precise than Double and used when floating-point precision isn't as critical. Example: var height: Float = 1.75
- Double: Represents a 64-bit floating-point number and is used when higher precision is needed. Example: var distance: Double = 384_400.0 // distance to the Moon in km
- Bool: Represents a Boolean value that is either true or false. Example: var isCompleted: Bool = false
- String: Represents a sequence of characters for text manipulation. Example: var message: String = "Hello, Swift!"
- Character: Represents a single-character string literal. Example: var grade: Character = 'A'
10. How does Swift handle memory management?
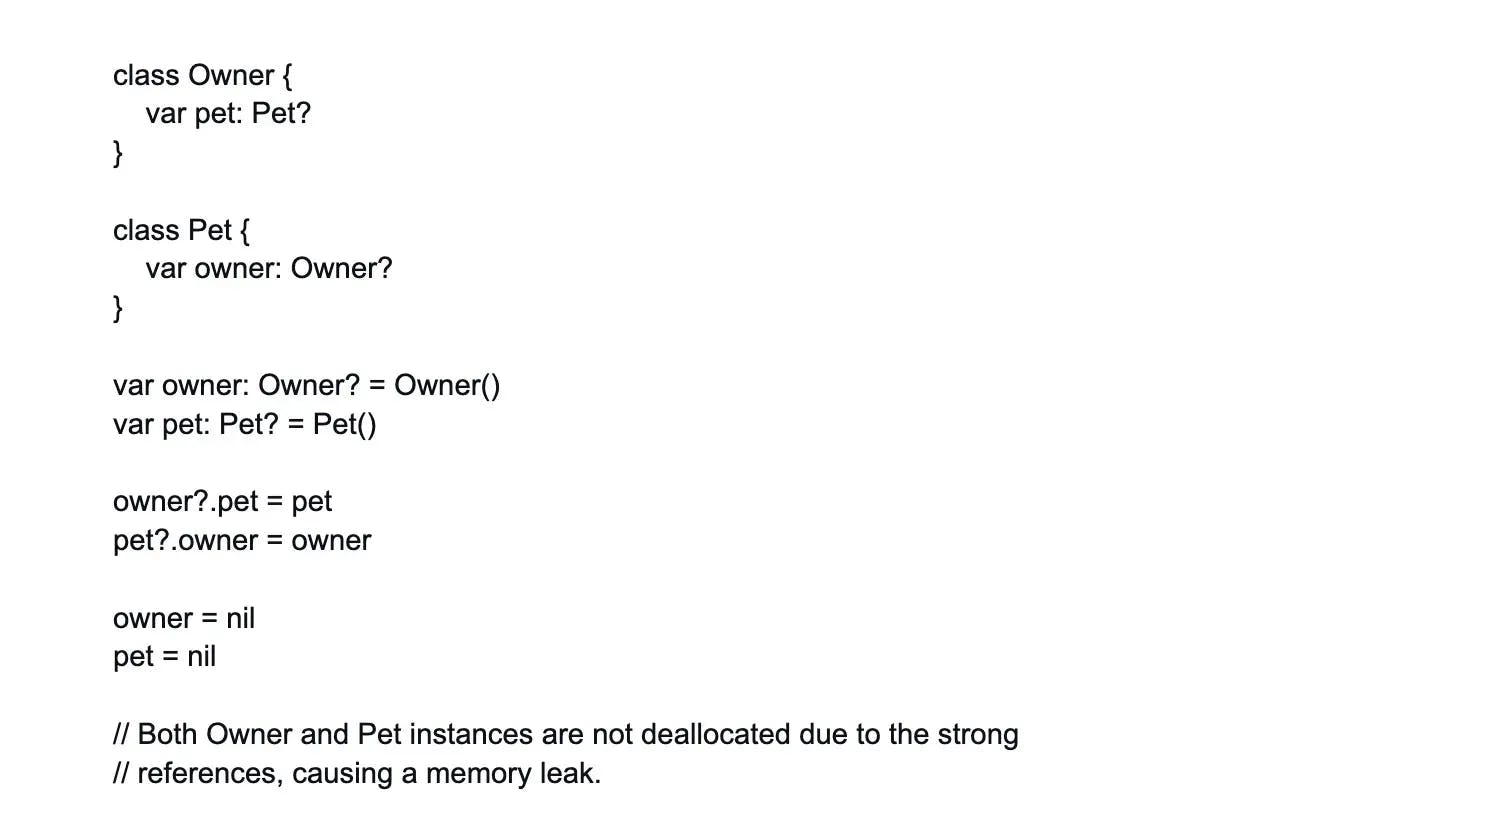
Swift handles memory management through Automatic Reference Counting (ARC), a mechanism that automatically keeps track of an object's reference count. When an object is instantiated, it has a reference count of one. As other parts of the code create references (or strong links) to the object, the reference count increments. Conversely, when the references are removed or go out of scope, the reference count decrements.
Once the reference count reaches zero, meaning there are no more active references to the object, ARC deallocates the memory used by that object, effectively cleaning it up from the memory. This helps prevent memory leaks—the condition where unused objects are not released from memory—ensuring efficiencies and performance for your Swift applications.
Here's a simple illustration of ARC:
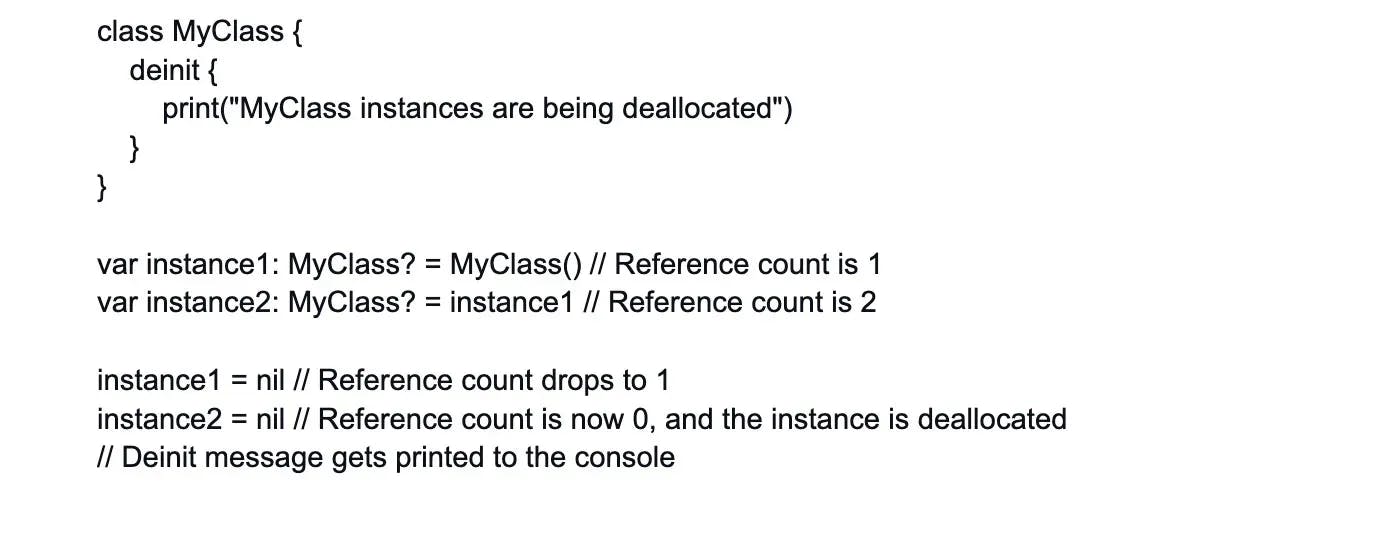
ARC is efficient and handles most of the work of memory management, but developers still need to be mindful of strong reference cycles—situations where two object instances reference each other, which can prevent ARC from deallocating them. Swift provides features like weak and unowned references to help break these cycles.
In addition to ARC, Swift uses compile-time checks to prevent many common memory issues that arise in programming, further solidifying its capabilities for high-performance and safe coding.
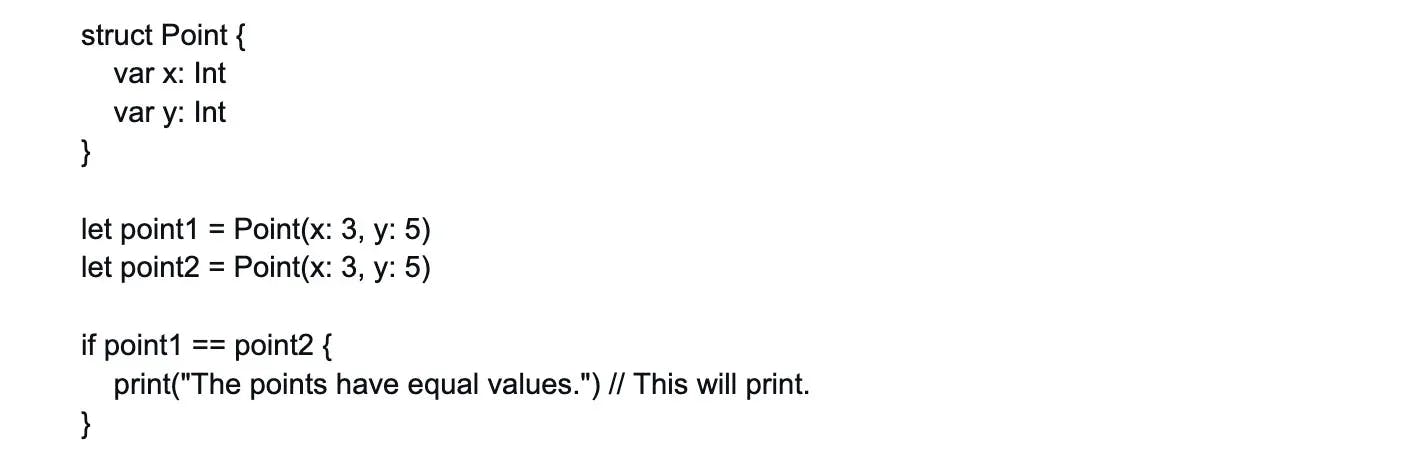
11. Compare '==' and '===' operators in Swift.
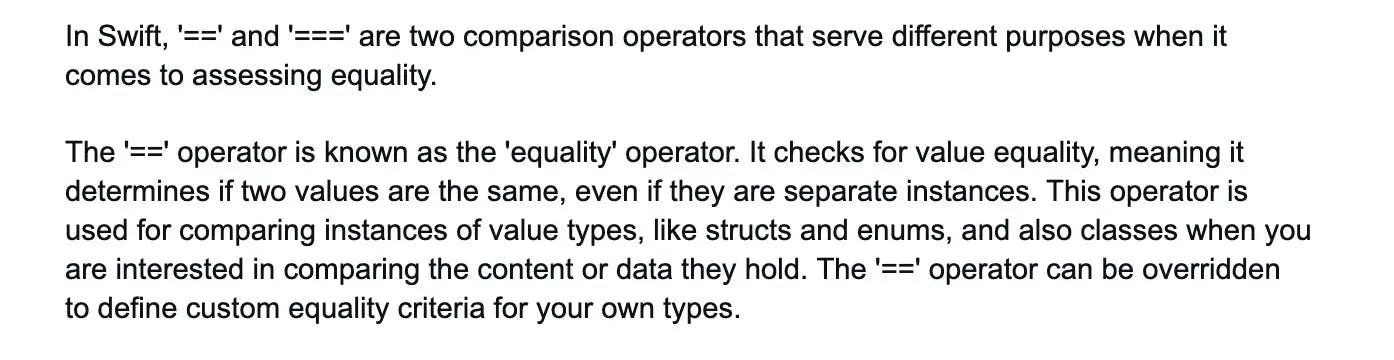
Example:
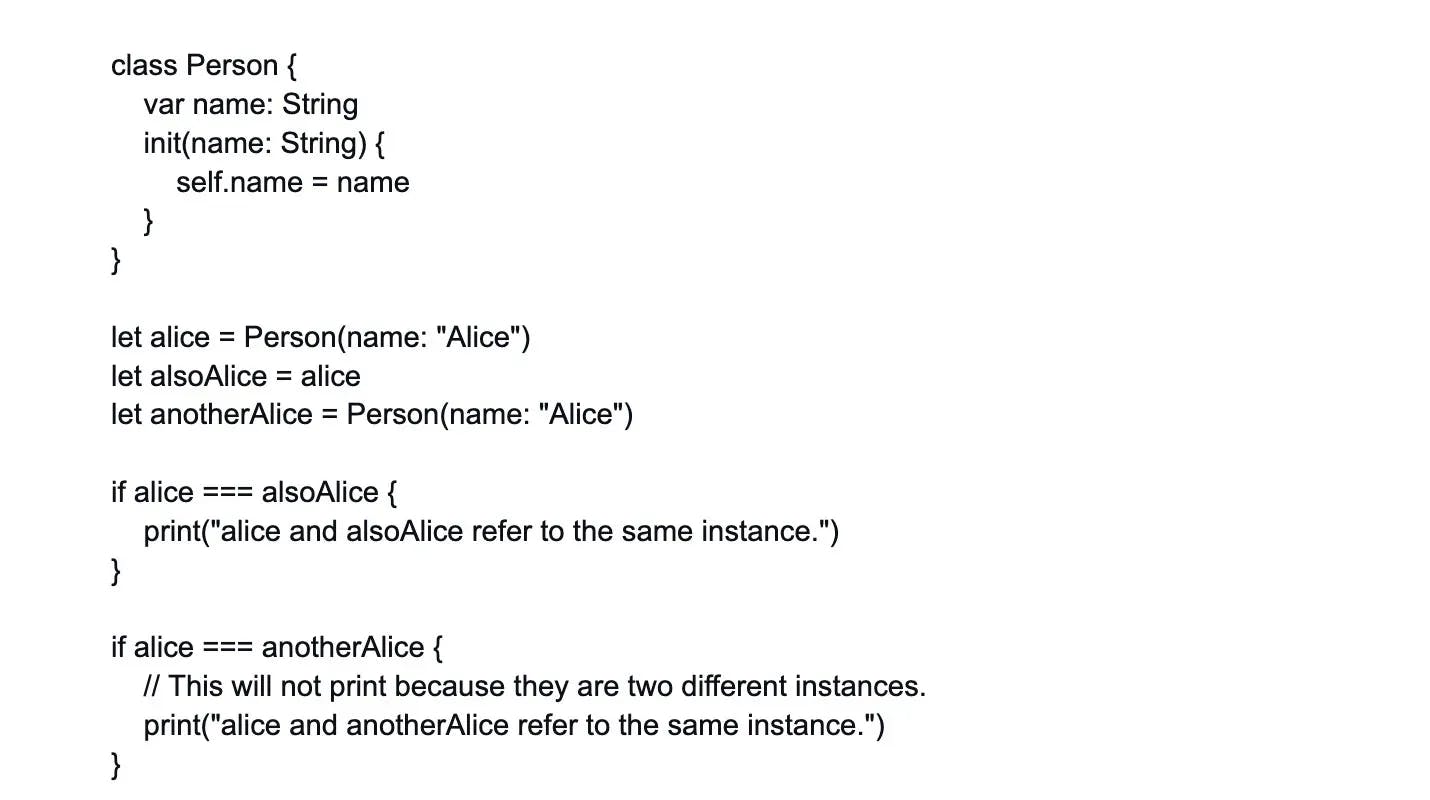
On the other hand, the '===' operator checks for identity equality, which means it's used to compare whether two references (such as class instances) are exactly the same instance in memory. It's known as the 'identity' operator and is used only with reference types.
Example:
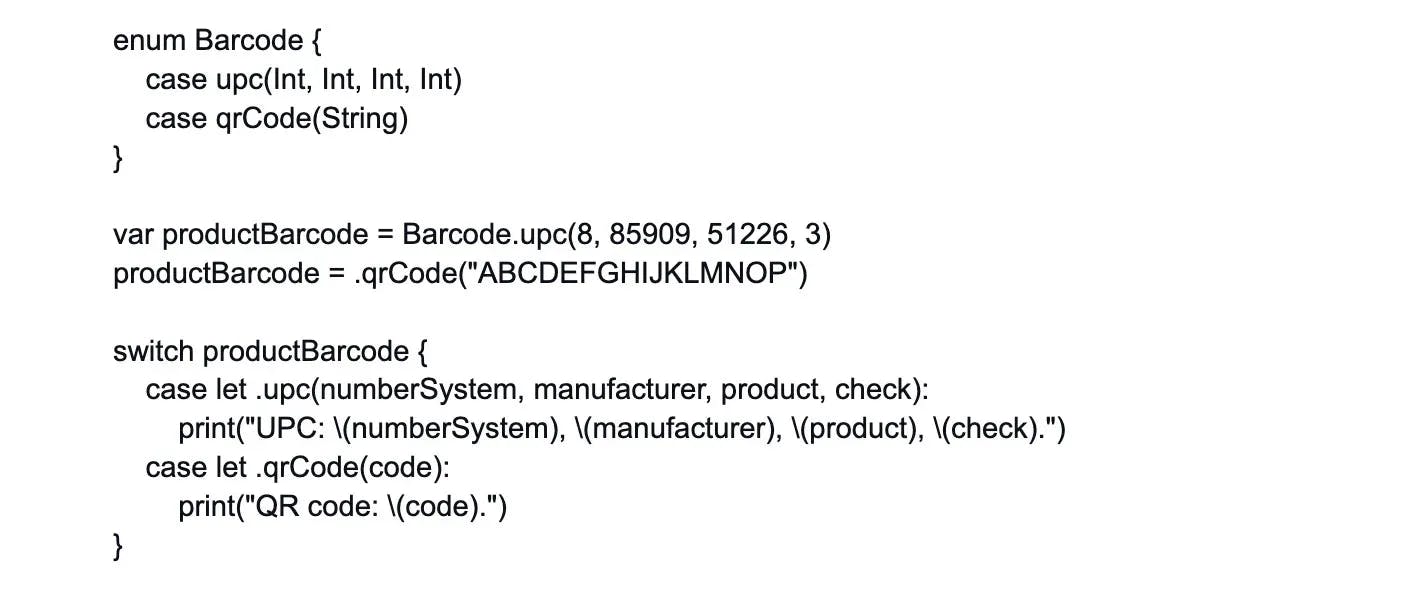
12. Explain the 'switch' statement in Swift.
The 'switch' statement in Swift provides a powerful and flexible way to respond to different values of a variable or constant. It evaluates an input against multiple 'case' conditions and executes the associated block of code for the matching case.
One distinct feature of Swift's 'switch' statement is that it must be exhaustive, which means that every possible value of the input needs to be accounted for. If not all values are covered by 'case' statements, a default 'case' must be provided to handle any potential unhandled cases.
Additionally, 'switch' in Swift supports a variety of pattern matching techniques, allowing you to match ranges, tuples, and even cast types. You can also use 'where' clauses to check for additional conditions.
13. Create a dictionary in Swift.
In Swift, a dictionary is a collection type that stores associations between keys of the same type and values of the same type in an unordered collection with no defined sequence. Each value is associated with a unique key which acts as an identifier for that value within the dictionary. Here's how you can create and manipulate a dictionary:
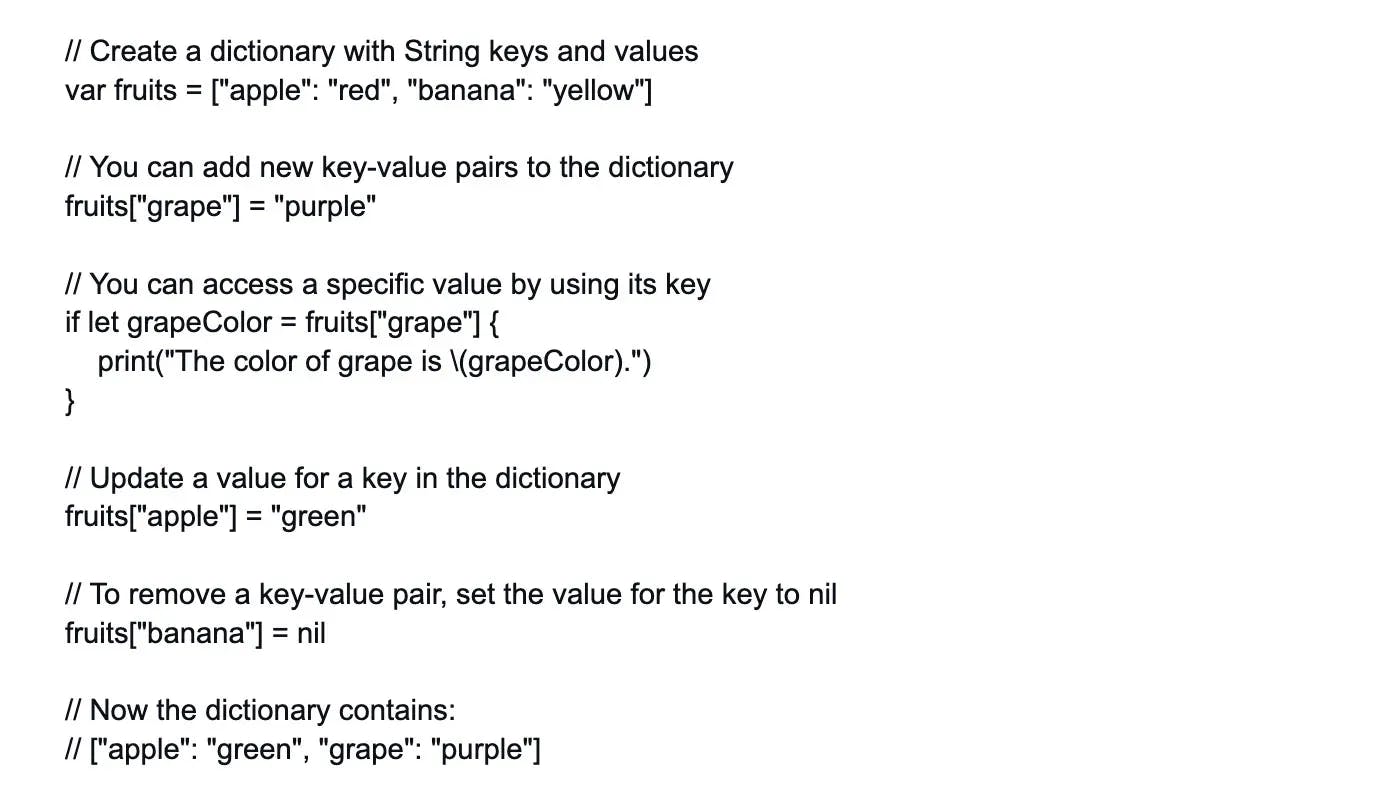
In this example, we start by creating a dictionary with two key-value pairs. We then add a third pair, update the value for "apple", and remove the pair with the key "banana". Note that dictionaries are mutable, meaning you can change them by adding, removing, or modifying their items as shown.
When defining a dictionary, you can also use dictionary literals with a colon : separating each key from its value, and each key-value pair separated by a comma. The entire dictionary is wrapped in square brackets [].
14. Explain 'for-in' loop and its usage in Swift.
The 'for-in' loop iterates over a sequence (like arrays, ranges, or collections) and performs a set of statements for each element.
Example:
let numbers = [1, 2, 3, 4, 5] for number in numbers { print(number) }
15. How do you check if two strings are equal in Swift?
You can use the '==' operator to compare strings for equality:
let string1 = "Hello" let string2 = "World" if string1 == string2 { // Strings are equal }
16. What's the difference between 'nil' and 'null' in Swift?
In Swift, 'nil' is a special value that represents the absence of a value for any type that is optional. Optionals are a powerful feature of Swift that allows you to store a value that might be absent; they can either contain a value or be 'nil' to express that no value exists. 'nil' is not a pointer, as used in some other programming languages, but a specific value that an optional can take on to signify 'no value'.
Example:
var optionalNumber: Int? = nil // optionalNumber does not hold a value
optionalNumber = 10 // optionalNumber now holds a value of 10
On the other hand, 'null' is a concept that exists in other programming languages like Java and JavaScript, often representing the absence of a value or a 'null' pointer. It is important to recognize that Swift does not use 'null'; instead, 'nil' is the keyword provided by the language to deal with the absence of a value. If you try to use 'null' in your Swift code, you will get a compile-time error since it is not recognized by the language.
By effectively using 'nil' and optionals, Swift programmers can write safer code that explicitly handles cases when data may be absent, which helps prevent common runtime errors such as null pointer exceptions found in many other programming languages.
17. Describe the 'fallthrough' keyword in a 'switch' statement.
In Swift, the switch statement is designed to be more safe and predictable than in many other languages, executing only the code within the matched case block and then exiting the switch statement. However, there are times when you might want the program to continue execution into the subsequent case after the current one finishes executing. To handle this scenario, Swift provides the fallthrough keyword.
The fallthrough keyword allows the code flow to continue to the next case after the matched case, effectively creating a 'fallthrough' effect. It's important to note that fallthrough does not check the next case's condition; it simply passes control to the code in the next case block directly.
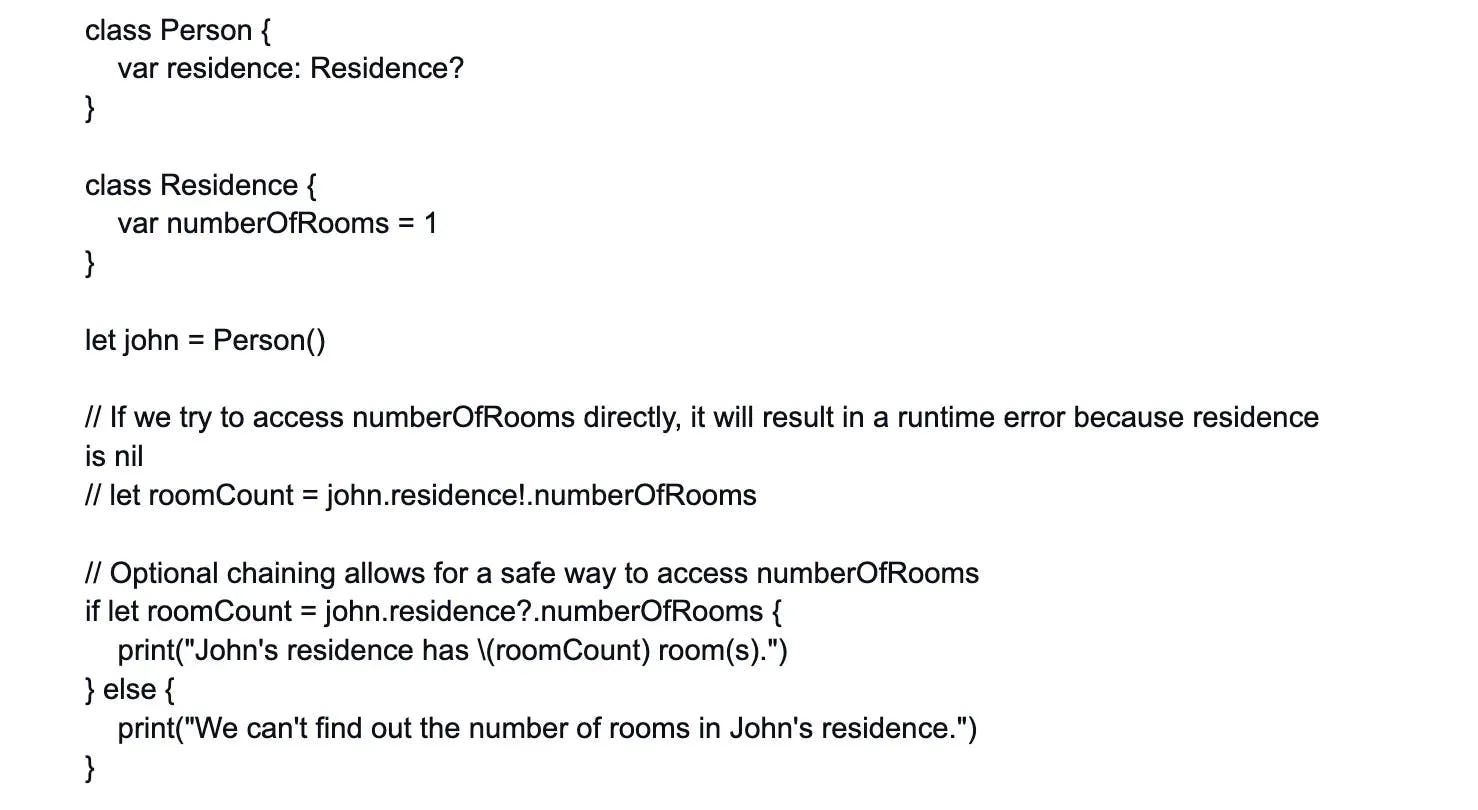
18. How is an optional binding different from force unwrapping?
In Swift, optionals allow you to represent the absence of a value, but when you come to use the value contained within an optional, it needs to be safely accessed. There are two common ways to handle this: optional binding and force unwrapping.
Optional binding is a safe method to unwrap optionals. It can be done using 'if let' or 'guard let' constructs. With optional binding, the optional is checked for a value, and if one exists, it is 'unwrapped' and made available within the scope of the 'if let' or 'guard let' statement.
For example:
With optional binding, if myOptional contains nil, the print statement inside the 'if let' won't execute, and in the case of 'guard let', the function will return early.
Force unwrapping is the straightforward extraction of an optional's value using the '!' operator. It’s a more dangerous action and should be done only when you are certain the optional contains a non-nil value. Failing to do so (i.e., if the optional is nil when you force unwrap it) will cause a runtime crash with a fatal error.
Example of force unwrapping:
var anotherOptional: Int? = 10
let forcedValue = anotherOptional! // This is safe because we know it's not nil
In general, the safe and recommended approach is to use optional binding to handle optional values. Force unwrapping should be used sparingly when you can guarantee that the optional isn’t nil. Avoiding force unwrapping can help prevent runtime crashes and results in more robust and predictable code.
19. Define 'break' and 'continue' statements in loops in Swift.
In Swift, 'break' and 'continue' are control transfer statements used to change the flow of execution within loops.
The 'break' statement immediately ends the execution of an entire control flow statement (i.e., for, while, or repeat-while loop) and transfers control to the first line of code after the loop's closing brace. It's useful when you need to terminate a loop based on a condition other than its built-in termination case.
Example using 'break':

The 'continue' statement, on the other hand, stops the current iteration and proceeds with the next one. It only ends the current loop iteration, not the entire loop itself. This is handy when you want to skip over an iteration based on a specific condition and move directly to the next iteration of the loop.
Example using 'continue':

Both 'break' and 'continue' contribute to flexible loop control, allowing more nuanced execution paths based on runtime conditions and logic.
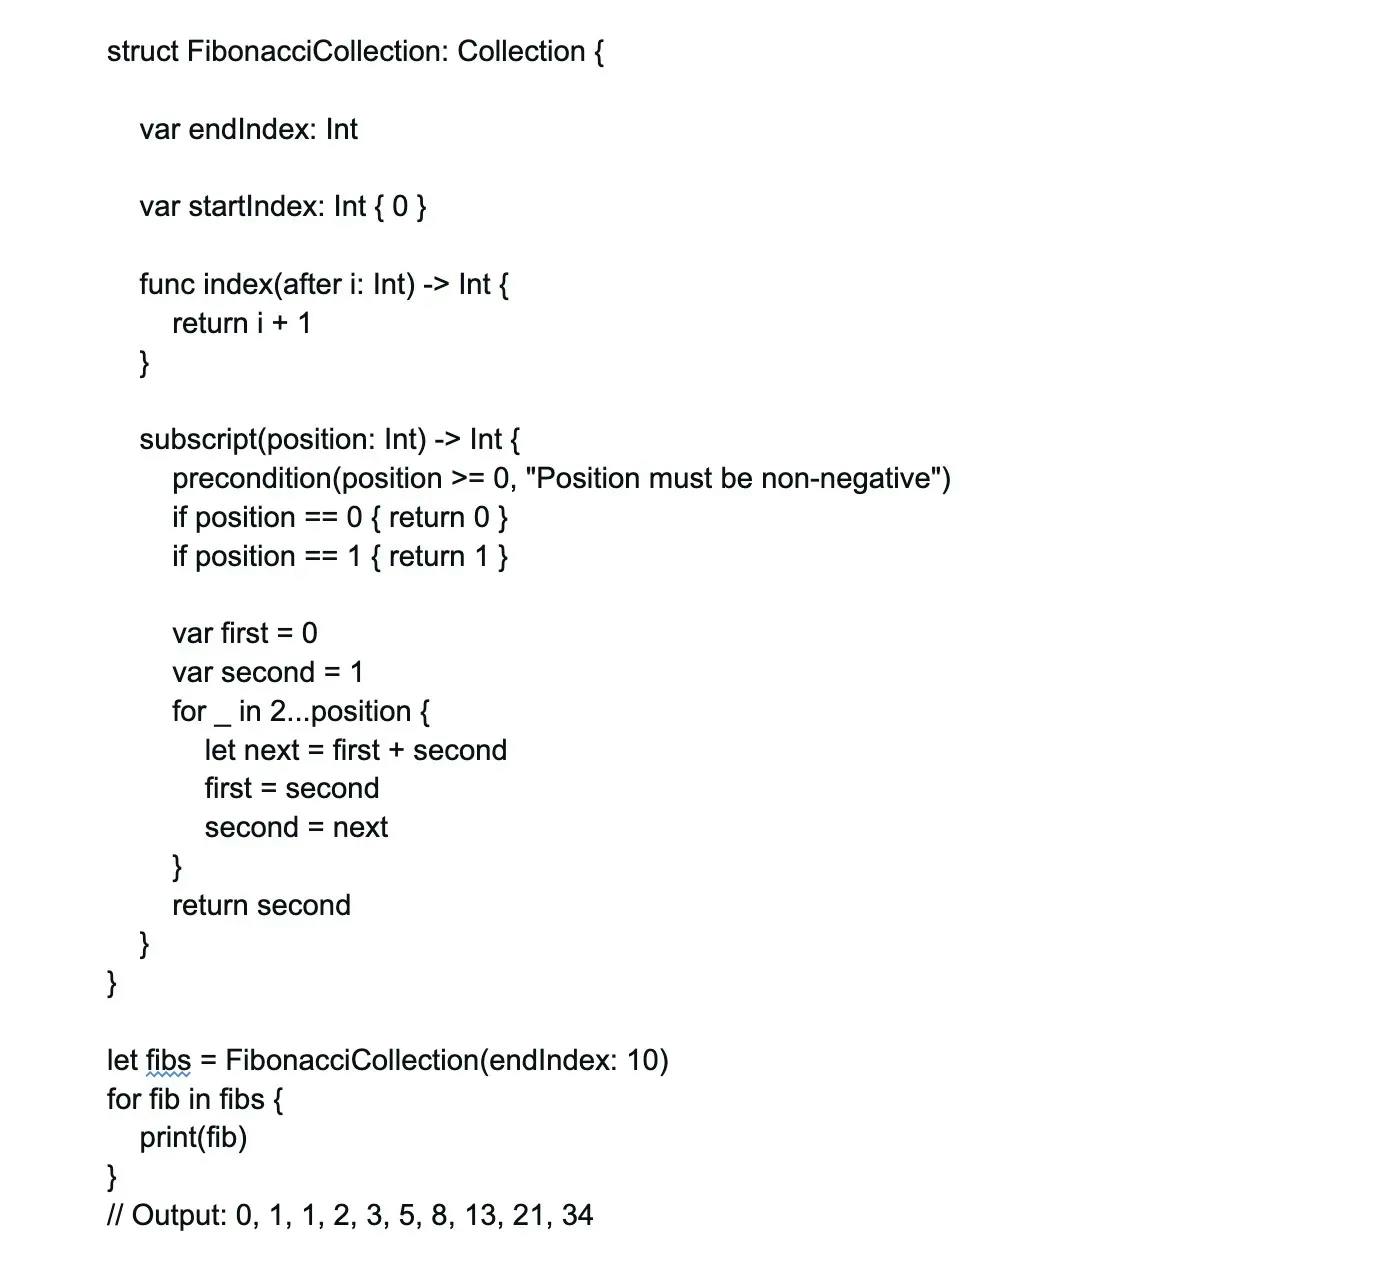
20. Explain the concept of a half-open range in Swift.
A half-open range is created using the ..< operator and defines a range that includes the first value but excludes the last value. This kind of range is useful when you want to iterate over a sequence without including the final element, which is common when dealing with zero-based sequences such as arrays.
Here's the syntax of a half-open range:
let start = 0
let end = 5
let range = start..<end // This will create the range [0, 1, 2, 3, 4]
In this example, the range includes 0 (the start) and goes up to, but does not include, 5 (the end). It is said to be "half-open" because one end of the range (the start) is included while the other end (the end) is not.
21. What is the 'is' operator used for in Swift?
In Swift, the 'is' operator is used for type checking. It allows you to check whether an instance is of a certain class or conforms to a protocol. When used, it returns a Boolean value (true or false) indicating whether the instance is of the specified type or a subclass thereof. This is particularly useful when working with class inheritance or when an instance's type might be unknown.
22. Describe the 'stride' function in Swift.
In Swift, the stride function is used to create a sequence of evenly spaced values within a specified range. This function can be particularly useful when you need to iterate over a range of numbers with a specific interval between them, which is especially common in for-loops.
There are two variations of the stride function to be aware of:
- stride(from:to:by:): Creates a sequence from a start value up to, but not including, an end value, stepping by a specific increment. It generates a so-called half-open range, which is suitable when the end value is not meant to be included in the sequence.
- stride(from:through:by:): Similar to the prior function, but this time the sequence includes the end value. It creates a closed range.
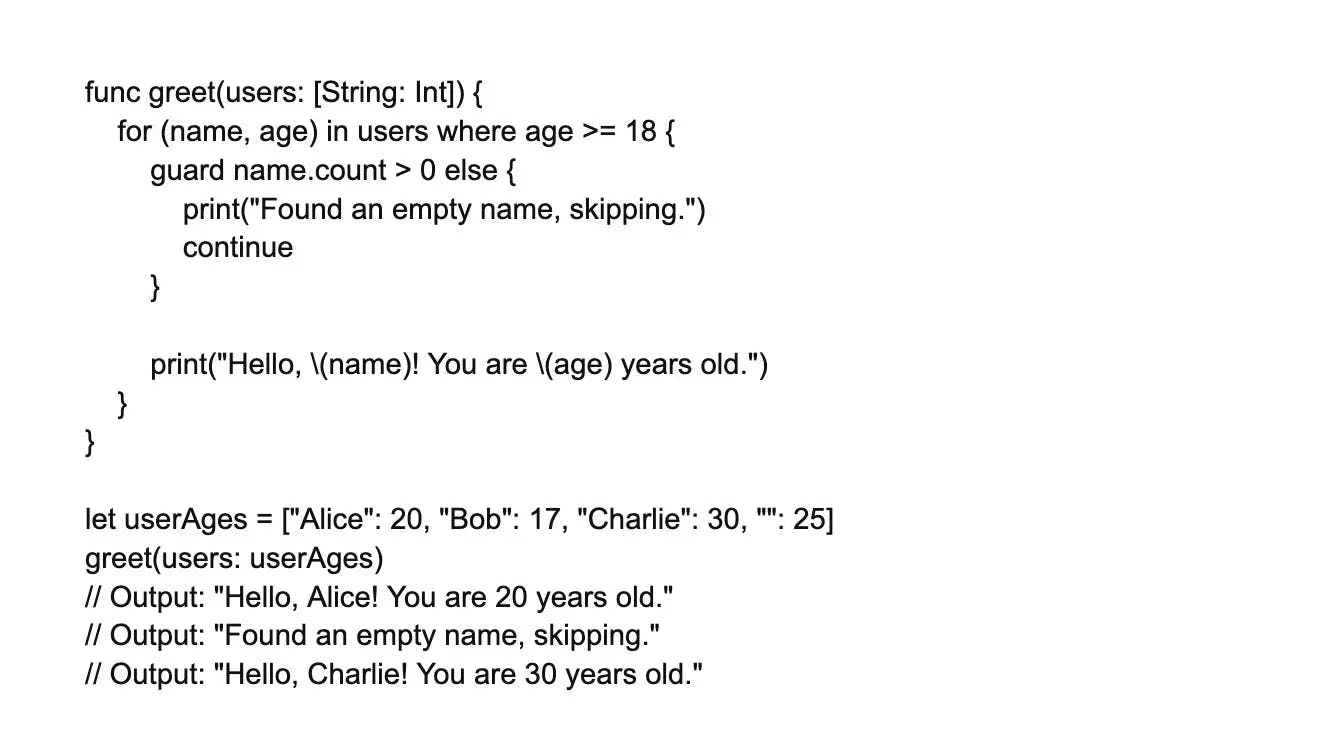
23. What's the purpose of the 'where' clause in Swift?
In Swift, the 'where' clause serves as a powerful conditional extension to various control flow and type declaration statements. It allows developers to specify one or more conditions that act as a filter or a constraint, refining the scope of the operation to which it's applied. The 'where' clause is used in various constructs like 'for-in' loops, 'switch' cases, and function declarations to add additional conditions that must be satisfied for the loop, case, or function to execute. It refines the conditions for execution.


Wrapping up
This guide on Swift interview questions and answers aims to give significant insights into the world of Swift development to both job applicants and hiring managers. They can serve as the foundation for evaluating your Swift development technical competency and problem-solving abilities.
We've highlighted crucial topics to consider when evaluating potential team members, ensuring that you can find top talent who can successfully contribute to your Swift projects. For hiring managers looking to access the top 1% of Swift developers, Turing is your gateway to exceptional talent. Partner with us today to streamline your recruitment process and find the right Swift developer to elevate your projects.
Hire Silicon Valley-caliber iOS Swift developers at half the cost
Turing helps companies match with top quality remote JavaScript developers from across the world in a matter of days. Scale your engineering team with pre-vetted JavaScript developers at the push of a buttton.
Tired of interviewing candidates to find the best developers?
Hire top vetted developers within 4 days.


Leading enterprises, startups, and more have trusted Turing

Check out more interview questions
Hire remote developers
Tell us the skills you need and we'll find the best developer for you in days, not weeks.