

React Native
Basic Interview Q&A

1. What is React Native and how does it differ from React?
React Native is a framework for building mobile applications using JavaScript and React. It enables the development of cross-platform apps with a single codebase that runs on both iOS and Android. While React is primarily for building web interfaces, React Native focuses on mobile UI components. React Native uses native components, providing a more authentic feel and better performance than web-based solutions.
2. Explain the concept of JSX in React Native.
JSX (JavaScript XML) is a syntax extension in React Native that allows embedding HTML-like elements within JavaScript code. It simplifies UI rendering by letting developers write components using a familiar HTML structure. JSX gets transpiled into JavaScript, enabling React Native components to be expressed in a more readable and intuitive format.
3. How do you create a component in React Native?
To create a component in React Native, you define a JavaScript function or class that returns JSX elements. For example:

4. What is the significance of the 'render' method in React Native components?
The 'render' method in a React Native component is responsible for returning the JSX representation of the component's UI. It defines what the component should render on the screen based on its current state and props. React Native automatically updates the UI when the state or props change, re-invoking the 'render' method to reflect those changes visually.
5. How would you style a React Native component?
React Native components can be styled using the 'StyleSheet' component. It provides an interface similar to CSS for defining styles. You can use properties like 'flex', 'margin', 'padding', 'color', and more. Here's an example:

6. Describe the purpose of 'props' in React Native.
'Props' (short for properties) are a way to pass data from a parent component to a child component in React Native. They allow components to be dynamic and reusable by providing different data and behavior based on where they are used. Props are read-only and help maintain a unidirectional data flow.
7. What is 'state' in React Native and how is it different from 'props'?
'State' is a mechanism in React Native for managing dynamic data within a component. Unlike 'props', which are passed down from parent to child, 'state' is managed internally by the component itself. While 'props' are immutable and provided by a parent component, 'state' can be changed using the 'setState' method and triggers the re-rendering of the component.
8. How do you handle user input using React Native?
User input in React Native can be handled using various event handlers like 'onPress', 'onChangeText', 'onSubmitEditing', etc.
Here’s an example for handling a button press:

9. Explain the React Native component lifecycle.
The React Native component lifecycle consists of several phases: mounting, updating, and unmounting. During mounting, the component is created and inserted into the DOM. During updating, it receives new props or states and updates accordingly. During unmounting, the component is removed from the DOM.
10. How would you debug a React Native application?
React Native provides tools like the in-app developer menu, logging using 'console.log', and integration with debugging tools like React DevTools or Flipper. You can also use Chrome Developer Tools for debugging by running your app in debug mode and accessing it from a web browser.
11. What is the 'StyleSheet' component in React Native and why is it used?
'StyleSheet' is a module in React Native used to create styles efficiently. It optimizes the styling process by allowing the app to bundle and apply styles more effectively, resulting in better performance. It's especially important in mobile development where performance is crucial.
12. How do you handle navigation between screens in React Native?
Navigation between screens in React Native is managed using libraries like React Navigation. You define a navigator component and configure the screens you want to navigate to. Then, you use navigation methods like 'navigate', 'push', 'goBack', etc., to move between screens.
13. Explain the concept of 'flexbox' and its role in React Native layout.
'Flexbox' is a layout model that allows you to distribute space and align-items within a container. It simplifies complex layouts and ensures that components adjust dynamically to different screen sizes. In React Native, 'flexbox' is the primary layout system and is used to position and organize UI components.
14. What are 'keys' in React Native and why are they important in lists?
'Keys' are special attributes used by React Native to uniquely identify elements in a list. They help React Native optimize re-rendering when the list changes, improving performance and preventing rendering glitches.
15. How can you make a network request in React Native?
Network requests in React Native are typically made using the 'fetch' API or third-party libraries like Axios. You make asynchronous requests to APIs and handle responses using promises or async/await syntax.
16. Describe the purpose of 'AsyncStorage' in React Native.
'AsyncStorage' is an API in React Native for asynchronous, unencrypted, and persistent storage of small amounts of data. It's often used to store settings, preferences, or authentication tokens locally on the user's device.
17. How can you integrate Redux with a React Native app?
In React Native, Redux can be integrated by creating a store to hold the global state and using components like 'Provider' to make the state available to the app. Actions, reducers, and middleware are used to update and manage the state.
18. How do you optimize performance in a React Native application?
Performance optimization in React Native involves using PureComponent and memoization techniques, optimizing render methods, avoiding unnecessary re-renders, and implementing code splitting. Profiling tools like React DevTools can help identify performance bottlenecks.
19. Explain the concept of 'HOC' (higher-order component) in React Native.
A HOC is a design pattern in React Native that allows you to wrap a component with additional functionality. It is used for cross-cutting concerns like authentication, data fetching, and logging, making code more modular and reusable.
20. How can you integrate third-party libraries in a React Native app?
Third-party libraries can be integrated using package managers like npm or yarn. You install the library, import it into your code, and use its components or APIs. Native modules can also be linked using the 'react-native link' command.
21. What are 'Touchable' components in React Native and how do they work?
'Touchable' components in React Native, such as 'TouchableOpacity' and 'TouchableHighlight', provide touch interactions for UI elements. They respond to touch events like 'onPress' and 'onLongPress' and provide visual feedback, making apps feel more interactive.
22. How do you handle form validation in React Native?
Form validation in React Native is often done using state and event handling. You capture user input using components like 'TextInput', validate the input based on your criteria, and display error messages accordingly.
23. Explain the architecture of a React Native app.
A React Native app follows a component-based architecture. It consists of reusable UI components, data management using state and props, navigation using libraries like React Navigation, and potentially global state management using libraries like Redux.
24. What is the role of 'navigator' in React Navigation?
'Navigator' is a core component in React Navigation that manages the navigation flow between screens in a React Native app. It defines the app's navigation structure, handles transitions, and maintains the navigation stack.
25. How do you handle platform-specific code in React Native?
React Native provides the 'platform' module to handle platform-specific code. You can use it to conditionally render components or apply styles based on the platform (iOS/Android). Alternatively, you can create separate platform-specific files using naming conventions (e.g., 'MyComponent.ios.js' and 'MyComponent.android.js').
1. Discuss the benefits and drawbacks of using Expo for React Native development.
Expo offers a streamlined way to start React Native development, providing a set of pre-built components, tools, and services. This accelerates the development process and reduces the need for native module configuration. However, there are benefits and drawbacks to using Expo:
Benefits:
- Expo simplifies setup: It abstracts the complexity of native modules, making it easier for developers to start building quickly without dealing with platform-specific configuration.
- Over-the-air updates: Expo enables seamless updates to apps without requiring users to download new versions from the app store.
- Access to native functionality: Expo provides a wide range of APIs to access device features like camera, location, and more.
- Unified codebase: With Expo, you can develop for both iOS and Android using a single codebase, saving time and effort.
Drawbacks:
- Limited native module support: Expo restricts access to certain native modules which might limit your app's capability if you require deep native integration.
- Bigger app size: Expo includes its runtime in the app package, potentially leading to larger app sizes compared to bare React Native projects.
- Dependency on Expo services: If Expo services are discontinued or changed, it could impact your app's functionality and maintenance.
- Customization constraints: Expo's tooling might not provide the flexibility needed for complex customization, especially in cases where you need to integrate third-party native libraries.
In summary, Expo is an excellent choice for rapid prototyping, smaller apps, or when you want to get started quickly. However, for more complex applications that require deep native integrations and greater customization, a bare React Native setup might be more suitable.
2. Explain the concept of 'props drilling' and how to avoid it.
Props drilling occurs when props are passed from a top-level component to multiple nested components, even though some intermediate components do not use those props. This can lead to cluttered code and reduced maintainability.
To avoid props drilling, you can use techniques like Context API or Redux.
Context API: React's Context API allows you to share the state between components without directly passing props. You can create a context at the top level and provide it to any component that needs the shared data.
Redux: Redux is a state management library that centralizes the state of your app. It eliminates the need to pass props down through many layers of components by allowing any component to access the state from the store.
These approaches can help you ensure that components only receive the data they need, reducing unnecessary prop passing and making your codebase cleaner and more maintainable.
3. Explain the role of managed and bare workflows in Expo.
Expo's managed workflow offers simplicity and speed but limited access to native modules. The bare workflow provides full control but requires more setup and native code management.
4. What is the importance of gesture handling for creating rich and responsive user interfaces in React Native?
Gesture handling is vital for natural and responsive user interfaces. It's needed for swipe navigation, pinch-zoom, drag-and-drop, animations, carousels, pull-to-refresh, long-press actions, and rotations.
5. How can you handle offline storage in a React Native app?
Handling offline storage is crucial for providing a seamless user experience in React Native apps. One common approach is to use AsyncStorage, a simple key-value storage system. It's asynchronous and built into React Native.
Here's a basic example of using AsyncStorage to handle offline storage:

AsyncStorage is suitable for smaller amounts of data. For larger or more complex data, you might consider using libraries like react-native-sqlite-storage for an SQLite database or realm for a NoSQL database.
Remember to handle errors appropriately and provide user feedback when dealing with offline storage.
6. Discuss the role of 'shouldComponentUpdate' in React Native.
shouldComponentUpdate is a lifecycle method that allows you to control whether a component should update and re-render when its props or state change. By default, React components re-render whenever there's a change in props or state. However, in some cases, you might want to optimize performance by preventing unnecessary renders.
Here's an example of using shouldComponentUpdate:

Use **shouldComponentUpdate **when you have expensive operations in your render method or when you want to avoid re-renders that wouldn't change the component's output. However, don’t overuse it as it can make your code more complex and harder to maintain.
Note: In modern React, you might prefer using React.memo higher-order component (HOC) or the useMemo hook for similar optimization purposes.
7. Explain the Virtual DOM and its relevance in React Native.
The Virtual DOM is a concept in React (and React Native) that represents the UI as an in-memory tree structure of components. When there are changes to a component's props or state, React generates a new Virtual DOM tree, compares it with the previous one using a process called "reconciliation", and then updates the actual DOM with the minimal necessary changes.
In React Native, the Virtual DOM operates similarly to how it does in the web version of React. However, instead of directly manipulating the browser's DOM, React Native's Virtual DOM communicates with the native platform's UI elements.
The relevance of the Virtual DOM in React Native includes:
- Performance optimization: The Virtual DOM allows React Native to minimize actual DOM manipulations, resulting in improved performance by batching updates and reducing the number of reflows and repaints.
- Cross-platform consistency: React Native's Virtual DOM enables a consistent development experience across different platforms (iOS, Android). Developers write code targeting the Virtual DOM which is then translated to platform-specific UI components.
- Developer productivity: Developers can focus on writing declarative UI code while letting React Native handle the efficient rendering updates. This makes the development process more productive and less error-prone.
- Reconciliation control: The Virtual DOM's reconciliation process ensures that only necessary updates are applied to the UI. This avoids unnecessary re-renders and enhances the app's responsiveness.
In summary, the Virtual DOM is a key component of React Native's architecture that contributes to its performance, cross-platform capabilities, and developer-friendly approach.
8. How can you achieve a responsive design in React Native?
Achieving a responsive design in React Native involves creating layouts that adapt effectively to different screen sizes and orientations. Here are some techniques:
- Flexbox: React Native uses Flexbox for layout which allows components to dynamically adjust their size and position based on available space. It's crucial for creating responsive designs.
- Dimensions API: You can use the Dimensions module to get the screen dimensions and adjust your layout accordingly.
- Platform-specific code: React Native provides platform-specific extensions (e.g., Platform.OS) to write code that's specific to iOS or Android. This allows you to fine-tune your design for each platform.
- Orientation changes: Listen for orientation change events and update your UI accordingly. You can use the Dimensions module or the react-native-orientation-locker library.
- Responsive fonts: Use the PixelRatio module to adjust font sizes based on screen density.
- Layout components: Libraries like react-native-responsive-screen provide components that adapt their size based on the screen dimensions.
- Media queries: You can use the react-native-responsive library to implement CSS-like media queries for responsive styling.
By combining these techniques, you can create UIs that look and feel great on a variety of devices and screen sizes.
9. What is the purpose of the 'PixelRatio' module in React Native?
The PixelRatio module in React Native helps developers handle the differences in screen densities across various devices. Mobile devices have different pixel densities (measured in pixels per inch or PPI) that affect how content is displayed.
The main purpose of the PixelRatio module is to assist in creating consistent and visually appealing designs on screens with varying pixel densities. It provides methods to calculate and adjust sizes based on the device's pixel density.
For example, the PixelRatio.get() method returns the device's pixel density as a number. This can be used to adjust font sizes, dimensions, and other visual elements to ensure they appear consistent across different devices.
Here's a basic example of how you might use PixelRatio:
![]()
With the PixelRatio module, you can enhance the visual consistency of your React Native app across various devices.
10. How do you handle push notifications in a React Native app?
Push notifications are essential for keeping users engaged with an app. To handle push notifications in a React Native app, these steps can be followed:
Set up push notification services
Integrate a push notification service like Firebase Cloud Messaging (FCM) or Apple Push Notification Service (APNs) for iOS.
Request permissions
Use the react-native-push-notification or @react-native-community/push-notification-ios library to request notification permissions from users.
Handle registration
Register the device token with the push notification service. The token is necessary for sending notifications to the device.
Handle notifications
Configure the app to handle incoming notifications, whether the app is foregrounded, backgrounded, or closed. You can define custom behaviors based on notification data.
Display notifications
Use the notification library to display local or remote notifications to users.
Here's a basic example of handling push notifications using react-native-push-notification:

Make sure to consult the documentation of the specific push notification service you're using and follow the guidelines for your target platforms (iOS and Android).
11. Explain the concept of 'NativeBase' and how it simplifies React Native development.
NativeBase is a popular open-source UI component library for React Native that provides a set of pre-designed, customizable, and platform-specific components. It simplifies React Native development by offering a consistent and aesthetically pleasing design across different platforms.
Key features and benefits
- Ready-to-use components: NativeBase offers a wide range of components, such as buttons, cards, headers, tabs, and more, which can be easily integrated into an app.
- Platform-specific styling: Components automatically adapt their appearance based on the platform, ensuring a native look and feel on both iOS and Android.
- Customization: While NativeBase provides default styles, you can easily customize these components to match your app's branding and design.
- Ease of use: Developers can use these components by simply importing and including them in their code, reducing the need for manual styling.
- Responsive design: NativeBase components are built with responsiveness in mind, ensuring they work well across various screen sizes and orientations.
- Theming: You can create and apply themes to your app, allowing consistent styling across different screens and components.
- Accessibility: NativeBase components are designed to be accessible which is crucial for creating inclusive apps.
NativeBase simplifies development by providing a set of building blocks that adhere to design best practices, saving time and effort in UI development and allowing developers to focus more on app logic.
12. How can you implement bi-directional communication in React Native?
Bi-directional communication involves the exchange of data and events between parent and child components. React Native provides ways to achieve this:
- Props: Pass data from parent to child components using props. Child components receive data as props and can trigger events by using callbacks passed from the parent.
- Context API: Use the Context API to share data between components that are not directly connected in the component tree. This avoids the need to pass props through intermediate components.
- State management libraries: Libraries like Redux and MobX enable global state management, allowing any component to access and modify shared state.
- Events and callbacks: Child components can emit events or call callbacks provided by the parent components to communicate changes or trigger actions.
- React hooks: Use custom hooks to encapsulate stateful logic and share it across components, enabling reusable behavior.
- Native modules (for native communication): For complex scenarios, you can create native modules that expose native functionality to JavaScript and vice versa.
The choice of communication method depends on the complexity of your app and the level of decoupling you need between components.
13. Discuss the role of 'SafeAreaView' in React Native and why it's important.
SafeAreaView is a component provided by React Native that ensures content is displayed within safe insets, avoiding overlaps with notches, status bars, and navigation bars on various devices. It's particularly important for creating a consistent and user-friendly UI across different screen sizes and device types.
Key points:
- Safe insets: Notches, status bars, and navigation bars can vary in size and shape across devices. SafeAreaView automatically calculates and applies insets to your content to prevent it from being obstructed.
- Consistent UI: By using SafeAreaView, you ensure that critical UI elements and content are always visible and accessible, enhancing the user experience.
- Platform specifics: SafeAreaView accounts for platform-specific guidelines and automatically adjusts the layout based on the device's platform (iOS or Android).
- Ease of use: Wrapping your top-level components or screens with SafeAreaView will enable it to handle insets for you.
Here's a basic example of how to use SafeAreaView:

Using SafeAreaView helps you design your app in a way that accommodates the unique characteristics of different devices, providing a polished and visually pleasing experience for users.
14. How can you implement a custom font in a React Native app?
To implement a custom font in a React Native app, these steps can be followed:
Add the font files
Place your font files (usually in .ttf or .otf format) in a folder within your project directory.
Link fonts
For iOS, add the font files to your Xcode project and ensure they're included in the target. For Android, create an XML font resource file and link the font files.
Install dependencies
Install the react-native-vector-icons package, which provides a convenient way to manage and use custom fonts.
Import and use fonts
Import and use the custom font in your components using the Text component. You can set the fontFamily style property to the font's name.
Here's an example of implementing a custom font:

Make sure to replace 'CustomFont' with the actual font family name defined in your font files.
With these steps, you can easily integrate custom fonts into your React Native app's design.
15. Explain the purpose of the 'AppState' module in React Native.
The AppState module in React Native allows you to monitor the current state of your app, whether it's in the foreground or background. It provides a way to respond to app state changes such as when the app is minimized or brought back to focus.
Common use cases:
- Background tasks: You can use AppState to trigger background tasks or pause ongoing tasks when the app is sent to the background.
- User engagement: You might want to pause or adjust notifications when the app is active to avoid interrupting the user, or to update the UI when the app returns to the foreground.
- Data detching: You can control when to refresh data based on the app's state to optimize network requests.
Example:

The change event is fired whenever the app's state changes. By listening to this event, you can manage your app's behavior based on whether it's active, inactive, or in the background.
16. Describe the bridge communication in React Native.
Bridge communication in React Native refers to the mechanism that enables JavaScript code to communicate with native code on the device. Since React Native apps run JavaScript code on a separate thread from the native UI, this bridge facilitates the exchange of data and events between the two environments.
Key points:
- Asynchronous communication: The bridge handles asynchronous communication between JavaScript and native modules. JavaScript sends requests to native modules, which are executed on the native thread, and the results are then sent back to JavaScript.
- Native modules: Native modules are JavaScript modules that expose methods to be called from JavaScript. These modules are implemented in the native code (Java/Objective-C) and provide access to native functionality.
- Performance: The bridge allows React Native to achieve native performance by delegating heavy computations and UI rendering to the native side.
- Serialization and deserialization: Data sent between JavaScript and native code is serialized and deserialized as JSON, ensuring compatibility between the two environments.
- Communication overhead: Frequent communication between JavaScript and native code can introduce communication overhead. It's important to optimize communication patterns for performance.
Example:
The bridge communication is a fundamental part of React Native's architecture, enabling seamless integration of native functionality into the JavaScript-based UI layer.
17. How does React Native achieve native performance?
React Native achieves native performance through a combination of approaches:
- Direct native rendering: React Native components map directly to native UI components, allowing the app to render UI elements using the platform's native APIs. This results in a UI that's indistinguishable from one built using native code.
- Asynchronous bridge: React Native uses a bridge to communicate between JavaScript and native code. Expensive computations and rendering are done on the native side and the results are sent back to JavaScript. This minimizes the performance impact of crossing between the JavaScript and native environments.
- Optimized UI updates: React Native's reconciliation process (Virtual DOM) intelligently updates only the necessary parts of the UI, reducing unnecessary rendering and enhancing performance.
- Native modules: React Native allows developers to create and use native modules, enabling access to device-specific APIs and functionalities directly from JavaScript.
- GPU acceleration: React Native leverages the GPU for graphics-intensive tasks, ensuring smooth animations and transitions.
- Native threads: JavaScript runs on a separate thread from the main UI thread, ensuring that the app remains responsive even during heavy computations.
- Platform-specific code: React Native allows developers to write platform-specific code when needed, ensuring that the app takes full advantage of each platform's capabilities.
React Native provides high performance. However, it's important to consider performance implications in your code such as minimizing unnecessary re-renders and optimizing interactions with the bridge to achieve the best user experience.
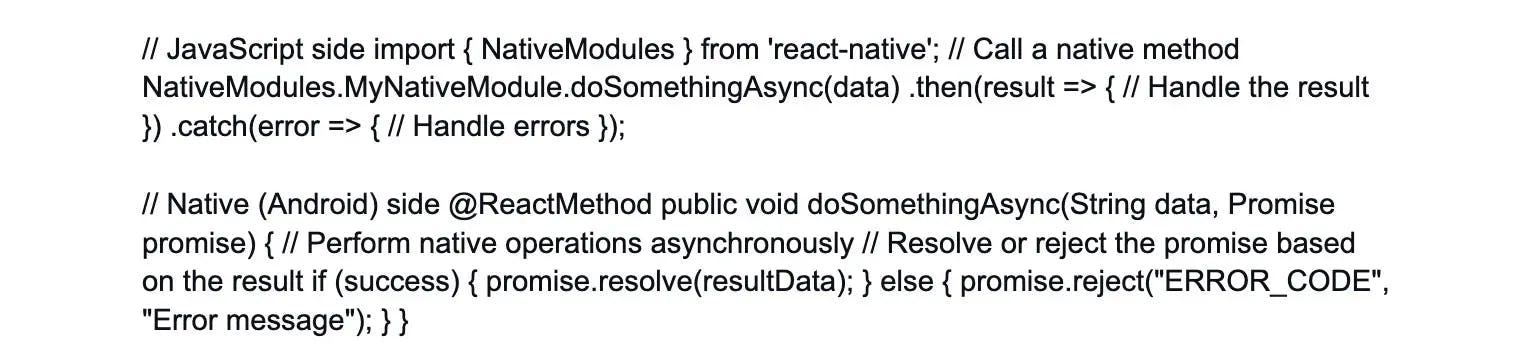
18. Explain the use of 'native modules' in React Native.
Native modules in React Native are JavaScript modules that provide a bridge between the JavaScript code and the native code of the underlying platforms (iOS and Android). They enable you to access native functionality and APIs that are not available out-of-the-box in React Native.
Key points:
- Accessing native APIs: Native modules allow you to tap into the platform-specific APIs and capabilities of iOS and Android. This is crucial when you need to perform tasks like accessing device sensors, interacting with device hardware, and using platform-specific UI components.
- Custom functionality: You can create native modules to expose custom native functionality to your React Native app.
- Method exports: Native modules export methods that can be called from JavaScript. These methods can accept parameters and return values.
- Asynchronous communication: Methods in native modules often involve asynchronous communication with the native side, which is common for tasks like fetching data from a network.
- Platform-specific implementation: Each platform (iOS and Android) requires separate implementation of native modules using platform-specific code (Objective-C/Swift for iOS and Java/Kotlin for Android).
Example (iOS):
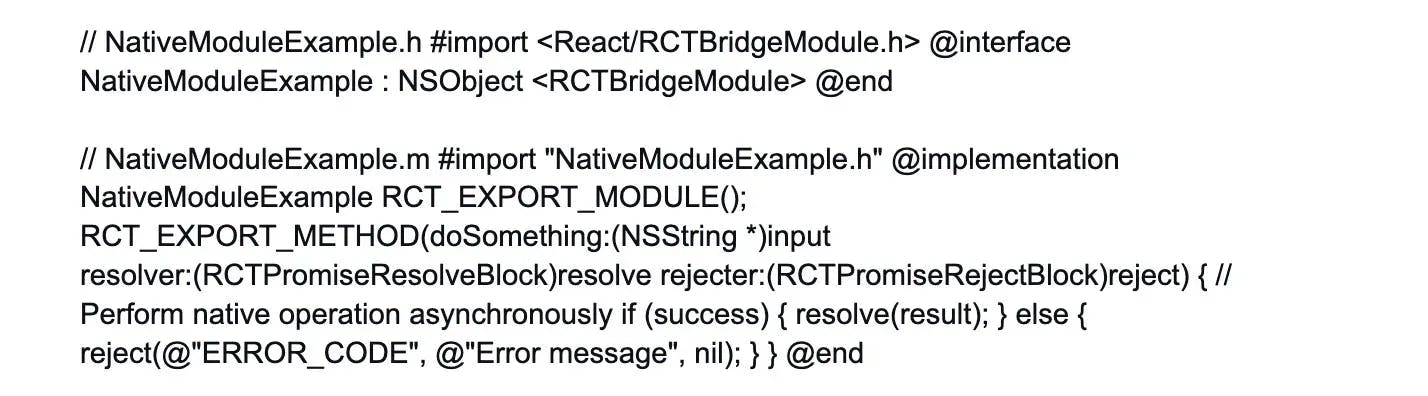
Usage (JavaScript):

Native modules are essential for extending the capabilities of a React Native app and accessing native features that aren't available through standard JavaScript APIs.
19. What are the limitations of React Native?
While React Native offers many advantages, it also has some limitations:
- Performance: React Native achieves native performance for most use cases but certain complex and graphics-intensive tasks may still require native code for optimal performance.
- Limited access to native APIs: While React Native provides access to many native APIs, there might be cases where you need to write custom native modules to access specific platform features.
- Third-party libraries: Not all native libraries are readily available for React Native. Some might need to be wrapped or rewritten to work with React Native.
- UI flexibility: Although React Native provides a rich set of UI components, intricate UI designs might require custom native code or third-party libraries.
- Debugging: Debugging React Native apps can sometimes be more challenging compared to debugging web applications, particularly when dealing with interactions between JavaScript and native code.
- Version compatibility: Keeping up with React Native updates and ensuring compatibility with third-party libraries can sometimes be time-consuming.
- Platform-specific design: Some platform-specific design guidelines might be challenging to implement consistently across iOS and Android.
- Learning curve: React Native has a learning curve, especially for developers new to JavaScript or those transitioning from native app development.
Despite these limitations, React Native remains a powerful framework for cross-platform app development, offering a productive and efficient way to build mobile applications.
20. How would you handle state synchronization between React components?
State synchronization involves ensuring that different React components share and display the same state accurately. You can achieve this using the following approaches:
- Lifting state: If multiple components need to share the same state, lift that state to their common ancestor. Pass the state down as props to child components, ensuring they stay in sync.
- Context API: Use the Context API to share the state between components that are not directly connected in the component tree. This avoids prop drilling and simplifies state management.
- State management libraries: Use state management libraries like Redux or MobX to centralize and manage the state of your application, ensuring that all components access the same source of truth.
- React hooks: Use React hooks like useState, useEffect, and useContext to manage and share states within functional components.
- Event emitter/observer pattern: Implement a custom event emitter or observer pattern to notify components of state changes and keep them synchronized.
- Local storage/AsyncStorage: For persisting data across components or sessions, you can store the state in local storage or AsyncStorage.
The approach you choose depends on the complexity of your app and the scale of state synchronization needed.
21. Discuss the role of 'LayoutAnimation' for creating smooth transitions in React Native.
LayoutAnimation is a module in React Native that allows you to create smooth animations and transitions for layout changes. It simplifies the process of animating changes in component sizes, positions, and appearances.
Key points:
- Ease of use: LayoutAnimation provides a simple way to create animations without needing to explicitly manage animation frames.
- Implicit animations: With LayoutAnimation, you define animation properties (such as duration and easing) and the framework automatically animates the changes for you.
- Integration with state changes: You can use LayoutAnimation alongside state changes to create animations that respond to changes in your app's data.
- Performance: LayoutAnimation is designed to be performant and efficient, ensuring smooth animations even on lower-end devices.
- Supported animations: LayoutAnimation supports various types of animations including scaling, fading, and sliding.
Example:
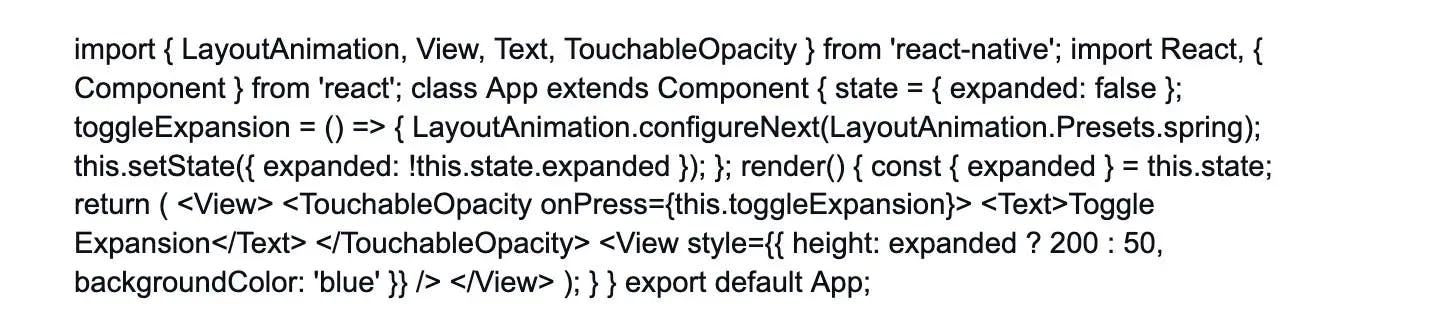
In this example, when the "Toggle Expansion" button is pressed, the height of the blue View element smoothly transitions between two values.
22. How can you implement background tasks in a React Native app?
Background tasks are important for performing operations that don't require user interaction when the app is not in the foreground. React Native provides mechanisms to achieve background tasks:
- Headless JS: Use Headless JS to run JavaScript code in the background, even when the app is closed. This is useful for tasks like data synchronization, sending analytics, and processing notifications.
- Background fetch: Use the react-native-background-fetch library to schedule background fetches that can periodically update data or trigger actions.
- Push notifications: While not true background tasks, push notifications can be used to prompt the app to perform certain actions or updates when they arrive.
- Native nodules: For tasks that require native capabilities, you can create custom native modules that handle background tasks on the native side.
- Background geolocation: Use the react-native-background-geolocation library to track device location and perform tasks based on location changes, even when the app is in the background.
Example (Headless JS):

Background tasks help keep your app's data and functionality up-to-date, even when the user isn't actively using the app.
23. How do you perform navigation using the 'react-navigation' library?
The react-navigation library is a popular choice for handling navigation in React Native apps. It provides a flexible and customizable way to manage navigation between different screens and components.
Basic usage:
Installation:
Install the required packages using npm or yarn.
npm install @react-navigation/native @react-navigation/stack
Create navigator:
Set up a navigation stack by creating a navigator using createStackNavigator.

Navigate:
Use the navigation prop to navigate between screens.

Customization:
react-navigation provides various navigators (stack, tab, drawer, etc.) and allows you to customize navigation options, headers, animations, and more.
It simplifies the process of creating a navigation flow in your React Native app, providing a consistent and intuitive user experience when moving between different parts of the application.
1. How can you handle the dynamic linking of libraries in a React Native project?
To handle the dynamic linking of libraries in a React Native project, you can use the react-native link command. It automates the process of linking native modules by modifying the necessary native files.
However, manual linking might be required for some complex libraries or custom native modules. Manual linking involves modifying native files yourself to integrate the library properly. Remember to rebuild the project after linking to ensure the changes take effect.
2. Explain the concept of 'Babel' and its role in React Native development.
Babel is a JavaScript compiler that converts modern JavaScript code (ES6/ES7) into an older version (ES5) that is compatible with most browsers and environments. In React Native development, Babel allows developers to write modern JavaScript syntax in their codebase, which is then transformed into code that the React Native runtime can understand. This enables the use of features like arrow functions, classes, and destructuring. Babel is crucial for ensuring cross-platform compatibility and leveraging the latest language features while maintaining broader device support.
3. Discuss the use of 'ErrorUtils' in error handling within a React Native app.
'ErrorUtils' is a utility provided by React Native to enhance error handling. It allows you to catch JavaScript errors that occur outside of the normal execution flow such as those in asynchronous code or event handlers. By wrapping your code with ErrorUtils.setGlobalHandler, you can specify a custom function to handle these errors. This is especially useful in production environments to gracefully handle unexpected errors and prevent crashes, enabling you to provide a better user experience.
4. How would you implement a custom loading spinner in React Native?
To implement a custom loading spinner in React Native, you can create a component that uses the ActivityIndicator component from the React Native library. Customize its appearance by styling it according to your design specifications. You can also create a reusable wrapper component that encapsulates the ActivityIndicator along with additional UI elements like text or icons. This allows you to easily reuse the loading spinner throughout your app with consistent styling.
5. Explain the concept of 'code signing' and its importance in React Native app deployment.
Code signing is a security practice used in app deployment to ensure the authenticity and integrity of the app. In React Native, when you build an app for distribution (iOS or Android), the app is digitally signed using cryptographic signatures. This process involves generating a unique signature for your app and linking it to your developer account. Code signing is crucial as it prevents unauthorized modifications to your app's code and ensures that the app comes from a trusted source. It is a key step in in-app security and app store approval processes.
6. Discuss the role of 'PureComponent' in React Native and when to use it.
'PureComponent' is a base class in React Native (and React) that optimizes the rendering performance of a component by automatically implementing a shallow comparison of the component's props and state. It helps to prevent unnecessary re-renders when there are no changes in the data.
Use 'PureComponent' when a component's output is solely determined by its props and state without any additional complex logic or side effects. This can lead to performance improvements, especially in components that render frequently.
7. How do you create a custom transition animation between screens using 'react-navigation'?
To create a custom transition animation between screens using 'react-navigation', you can utilize the 'createStackNavigator' function's 'transitionConfig' option for older versions of “react-navigation” and for new versions after v6.x you can use “TransitionPresets”. These animations can be tailored to your app's design and user experience, allowing you to achieve unique and engaging transitions when navigating between screens.
8. Explain the purpose of 'AccessibilityRole' and 'AccessibilityState' in React Native.
'AccessibilityRole' and 'AccessibilityState' are attributes used to improve the accessibility of components in React Native. 'AccessibilityRole' defines the role of a component (e.g., button, image, heading) in the app's user interface. 'AccessibilityState' defines additional accessibility-related properties such as 'disabled', 'checked', or 'selected'.
By using these attributes, you can make your app more inclusive and usable for users with disabilities. This is because screen readers and other assistive technologies can better understand and convey the purpose and state of your UI elements.
9. Discuss the benefits of using TypeScript with React Native.
Using TypeScript with React Native brings several benefits:
- It provides static typing, enabling early detection of type-related errors during development. This enhances code quality and reduces runtime errors.
- TypeScript improves code readability and maintainability by adding type annotations to function parameters, return values, and variables. IDEs can provide better code suggestions and auto-completions due to the type of information.
- Additionally, TypeScript interfaces can be used to define clear data structures, making collaboration among developers smoother and reducing the risk of data-related bugs.
10. How can you implement a parallax effect in a React Native app?
To implement a parallax effect in a React Native app:
- Install react-native-reanimated for animations.
- Import necessary modules like useSharedValue, useAnimatedScrollHandler, useAnimatedStyle, interpolate, ScrollView, View, and Text.
- Create a shared value to track scroll position (scrollY).
- Define a scroll handler with useAnimatedScrollHandler to update scrollY as the user scrolls.
- Animate elements using useAnimatedStyle and interpolate, mapping scroll position to animation properties (e.g., translateY for vertical parallax).
- Use Animated.Extrapolate.CLAMP to constrain animation values within a defined range.
This approach will create a parallax effect where elements respond to the user's scrolling actions.
11. Explain the role of 'requestAnimationFrame' in managing animations.
'requestAnimationFrame' is a browser and React Native API that helps optimize animations by synchronizing them with the browser's refresh cycle. It's particularly useful for creating smooth and efficient animations.
When you use 'requestAnimationFrame', the animation callback is executed just before the browser repaints the screen. This reduces the risk of jank and stuttering in animations as they are aligned with the device's display refresh rate. In React Native, the 'Animated' library often uses 'requestAnimationFrame' internally to manage animations effectively.
12. How can you ensure data consistency and integrity when syncing large datasets in a React Native app, especially in scenarios where network connectivity is unreliable or intermittent?
To ensure data consistency in a React Native app with unreliable connectivity:
- Store data locally using SQLite or AsyncStorage.
- Implement differential sync.
- Handle conflicts with resolution strategies.
- Use batched updates and an offline queue for network failures.
13. Discuss the use of 'react-native-webview' for embedding web content in a React Native app.
'react-native-webview' is a component that allows you to embed web content (HTML, JavaScript, etc.) within a React Native app. It provides a bridge between native code and web code, enabling you to display web-based features seamlessly. This can be useful for showing external websites, web-based authentication, and integrating third-party web services.
However, it’s important to be cautious with security and performance considerations as web views can impact app performance and introduce potential vulnerabilities if not used carefully.
14. How do you handle orientation changes in a React Native app?
To handle orientation changes in a React Native app, you can utilize the 'react-native-orientation' library or the built-in 'Dimensions' API. 'Dimensions' provides information about the screen dimensions including orientation.
You can subscribe to orientation change events and update your UI accordingly. Additionally, you might need to use responsive design techniques, such as Flexbox or percentage-based dimensions, to ensure your UI elements adapt correctly to different orientations and screen sizes.
15. Explain the purpose of the 'ImageBackground' component and its benefits.
The 'ImageBackground' component in React Native allows you to display an image as the background of a container. It simplifies the process of creating visually appealing UIs with background images.
'ImageBackground' provides props for controlling aspects like image source, image style, and content alignment. It's particularly useful when you want to add images behind other UI elements while maintaining proper sizing and positioning. This component streamlines the design process and contributes to a more polished app interface.
16. Discuss the role of 'ActivityIndicator' in indicating a loading state in a React Native app.
'ActivityIndicator' is a built-in component in React Native used to display a spinning indicator to signify a loading or processing state. It is a visual cue that informs users that something is happening in the background. You can control the color, size, and visibility of the 'ActivityIndicator' based on the loading status of your app.
Implementing 'ActivityIndicator' enhances user experience by providing feedback and preventing user confusion during asynchronous operations.
17. How would you handle the global app state without Redux or Context API?
To handle global app state without Redux or Context API, you can create a module that exports a function to manipulate the state and listeners to subscribe to state changes. This module can act as a simple custom global state manager.
Alternatively, you could leverage a state management library like MobX or Zustand which provide more structured solutions for managing a global state. Remember to consider the app's complexity and the need for state synchronization across components when choosing an approach.
18. Explain the use of 'LayoutDebugger' in identifying layout issues in a React Native app.
'LayoutDebugger' is a tool provided by the 'react-native' package that helps identify layout-related problems in an app. When enabled, it overlays colored borders on components, highlighting their boundaries and dimensions. This can assist in diagnosing issues like unexpected spacing, alignment problems, and incorrect sizing.
'LayoutDebugger' is particularly useful during the development and debugging phases, enabling you to fine-tune your UI layout for consistent and visually appealing designs.
19. Discuss the use of 'react-native-svg' for rendering vector graphics in a React Native app.
'react-native-svg' is a library that enables the rendering of scalable vector graphics (SVG) in React Native applications. It provides components for creating SVG-based UI elements such as shapes, paths, and text. Using SVG allows for resolution-independent graphics that look crisp on various screen sizes. 'react-native-svg' is beneficial for creating visually rich and scalable designs, icons, and illustrations within an app while maintaining a small memory footprint.
20. How do you handle version updates and migrations in a React Native project?
Handling version updates and migrations in a React Native project involves a systematic approach:
- Maintain a version control system (e.g., Git) to track changes.
- Document your codebase and dependencies, and keep your project's dependencies up-to-date. Use tools like 'react-native-git-upgrade' to update the React Native version while managing compatibility issues.
- Additionally, follow platform-specific guidelines for handling version updates, especially for native modules. Thorough testing and continuous integration help ensure a smooth transition during updates.
21. Explain the process of integrating React Native with existing native code in an app.
Integrating React Native with existing native code involves creating a "bridge" between the JavaScript code of React Native and the native code (Java for Android, Objective-C/Swift for iOS). You can set up native modules to expose native functionality to JavaScript and use 'RCT_EXPORT_METHOD' or annotations to define methods accessible from React Native.
For advanced integration, 'ReactRootView' can be used to embed React Native components into native views. Effective communication between React Native and native code enables leveraging existing platform-specific features within an app.
22. Describe the process of handling deep linking in a React Native application.
Handling deep linking in a React Native application involves intercepting and processing URLs that point to specific sections of your app. You can use the 'react-native-linking' library to handle deep links. Register URL schemes or universal links (for iOS) in your app's configuration. When your app is launched through a deep link, the library triggers an event containing the URL. You can then parse the URL and navigate to the appropriate screen or perform the desired action based on the link's data.
23. Explain the purpose of 'FlatList' and 'SectionList' for efficient data rendering.
'FlatList' and 'SectionList' are components in React Native that efficiently render large lists of data. 'FlatList' is suitable for a single-column layout while 'SectionList' adds sections and headers. Both components employ a technique called "virtualization" where only the visible items are rendered, which improves performance and memory usage.
They also offer features like lazy loading, pull-to-refresh, and customizable rendering through props like 'renderItem' and 'renderSectionHeader'. This makes them ideal for efficient and optimized data presentation.
24. Discuss the role of 'Geolocation' in obtaining the user's current location in a React Native app.
'Geolocation' is a React Native API that provides access to the device's GPS capabilities to determine the user's current geographic location. By using the 'navigator.geolocation' object, you can request the user's permission to access location services and retrieve latitude and longitude coordinates. This is useful for building location-based apps, mapping features, and providing location-specific content. Keep in mind that handling location permissions and accuracy considerations are crucial aspects of using 'Geolocation'.
25. How can you implement a sliding menu (drawer) navigation in a React Native app?
You can use the 'react-navigation' library's 'createDrawerNavigator' to implement sliding menu (drawer) navigation in a React Native app. This creates a navigation structure with a hidden menu that can be accessed by swiping from the edge of the screen or tapping a navigation icon. You define the content of the drawer and its behavior including custom animations and gestures. Sliding menu navigation is a popular approach for organizing app navigation and providing easy access to various screens.
26. Explain the concept of 'Imperative vs Declarative' animations in React Native.
'Imperative' animations involve directly controlling the animation process through step-by-step instructions. For example, using 'Animated.timing' to specify the animation properties and durations explicitly.
In contrast, 'Declarative' animations describe the desired outcome, and the library handles the details. In React Native, the 'Animated' library supports declarative animations by allowing you to define the end state and interpolate intermediate values. Declarative animations offer a more concise and intuitive way to create complex animations while abstracting the low-level animation logic.
27. Discuss the concept of 'Bridgeless' architecture in React Native (Hermes engine).
The 'Bridgeless' architecture is a concept introduced in the Hermes JavaScript engine. It is an alternative runtime for React Native apps. It aims to reduce the communication overhead between JavaScript and native code (the "bridge") by optimizing the execution of JavaScript code on the native side. This leads to improved app startup performance and reduced memory consumption. By minimizing the need for frequent data serialization and deserialization across the bridge, 'Bridgeless' architecture enhances the overall React Native app experience.
28. How do you implement smooth transitions when navigating between screens using 'react-navigation'?
Implementing smooth transitions between screens using 'react-navigation' involves utilizing transition animations provided by the library. You can define custom transition animations using the 'transitionSpec' and 'screenInterpolator' options in 'createStackNavigator'.
By configuring these options, you can control how the old screen fades out and the new screen fades in, slides, or scales, creating a visually pleasing transition effect. Properly designed transitions enhance the user experience and make navigation feel seamless.
29. Explain the purpose of 'VirtualizedList' and how it improves performance in long lists.
'VirtualizedList' is a component in React Native (used by 'FlatList' and 'SectionList') that optimizes rendering performance for long lists of data. Instead of rendering all items at once, 'VirtualizedList' renders only the items visible within the viewport, recycling components as the user scrolls. This approach significantly reduces memory consumption and rendering time, making the UI more responsive and efficient. 'VirtualizedList' is particularly valuable when dealing with large datasets, ensuring smooth scrolling and a better user experience.
30. Discuss the role of 'NetInfo' in managing network connectivity in React Native.
'NetInfo' is a module in React Native that provides information about the device's network connectivity. It allows you to monitor the network state, detect changes in connection status, and respond accordingly. By subscribing to network change events, you can adapt your app's behavior based on whether the device is online, offline, or transitioning between states. 'NetInfo' is essential for creating robust apps that gracefully handle varying network conditions and provide a consistent user experience.
31. How can you implement GraphQL with a React Native app?
You can use the Apollo Client library to implement GraphQL in a React Native app. 'Apollo Client' provides tools for making GraphQL queries, mutations, and subscriptions, while managing data caching and state management. You define the GraphQL operations, fetch data from a GraphQL server, and update your app's UI based on the responses. 'Apollo Client' simplifies data management and synchronization, enabling efficient communication with a GraphQL backend and enhancing the app's performance and responsiveness.
32. Explain the purpose of 'PanResponder' for handling touch gestures.
'PanResponder' is a built-in module in React Native used to handle touch gestures and user interactions. It allows you to create complex touch-driven interactions such as dragging, swiping, and zooming. With 'PanResponder', you can define callbacks for various touch events like 'onStartShouldSetPanResponder', 'onMoveShouldSetPanResponder', and 'onPanResponderMove'. This gives you fine-grained control over touch interactions and enables the creation of interactive and engaging user interfaces.
33. Describe the use of the 'Animated' library for creating complex animations.
The 'Animated' library in React Native provides a powerful framework for creating complex animations using a declarative API. It allows you to animate various properties of UI elements, such as opacity, scale, and position, over time. You can chain and combine animations, create physics-based animations, and handle gesture-based interactions. The 'Animated' library seamlessly integrates with React Native's rendering pipeline, ensuring smooth and performant animations that enhance the visual appeal and user experience of an app.
34. Discuss the use of 'CodePush' for over-the-air updates in React Native.
'CodePush' is a tool that enables over-the-air updates for React Native apps without requiring users to download a new version from the app store. It allows for pushing updates directly to users' devices, ensuring quick bug fixes, feature enhancements, and other changes.
'CodePush' is particularly useful for non-critical updates that don't require a new app store release. However, it’s important to exercise caution with updates that might affect the app's stability or compatibility, and follow best practices to ensure a seamless update process.
35. How would you implement biometric authentication in a React Native app?
To implement biometric authentication in a React Native app, you can use native modules or third-party libraries like 'react-native-biometrics' or 'react-native-touch-id'. These libraries provide APIs to interact with the device's biometric authentication features such as Face ID or Touch ID on iOS and fingerprint recognition on Android. These APIs can prompt users for biometric authentication before granting access to sensitive parts of your app, adding an extra layer of security and convenience.
36. Explain the purpose of 'InteractionManager' module in React Native.
'InteractionManager' is a module in React Native that helps manage interactions and prioritize tasks based on user interactions. It provides methods like 'runAfterInteractions' and 'createInteractionHandle' that allow you to schedule tasks to be executed after the current interaction cycle is complete. This is useful for deferring less critical tasks, such as data fetching or animations, until the user interactions and UI updates are finished. 'InteractionManager' ensures a smoother user experience by preventing tasks from affecting immediate interaction responsiveness.
37. Discuss the concept of 'React Native Fabric' and its advantages.
'React Native Fabric' is an ongoing effort by the React Native community to rewrite and improve the core architecture of React Native. It aims to enhance performance, reduce memory usage, and provide better synchronization between JavaScript and native threads.
'Fabric' introduces a more efficient rendering pipeline, optimized layout calculations, and improved concurrency. Its benefits include faster app startup, smoother animations, and a more responsive UI. 'Fabric' represents a significant step towards improving React Native's performance and user experience.
38. How can you implement real-time synchronization in a React Native app?
To implement real-time synchronization in a React Native app, you can use technologies like WebSocket, Firebase Realtime Database, or GraphQL subscriptions. They enable real-time communication between clients and servers, allowing instant updates when data changes on either side.
You can use this approach for features like chat applications, live notifications, and collaborative editing. Ensure that you handle network disconnections and gracefully manage state changes to provide a seamless and reliable real-time experience.
39. Explain the purpose of 'BackHandler' in handling Android back button events.
'BackHandler' is a module in React Native used to handle the Android hardware back button. It provides methods to register event listeners for back button presses and allows you to define custom behavior when the back button is pressed. This is particularly useful for managing navigation, modals, and dialog boxes.
With 'BackHandler', you can ensure consistent and intuitive navigation in your React Native app, enhancing user experience and preventing unexpected app behavior.
40. Describe the role of 'Error Boundaries' in React Native.
'Error Boundaries' are components in React (and React Native) that catch and handle errors occurring within their child components. They prevent crashes from propagating up the component tree and crashing the entire app. When an error occurs, the 'Error Boundary' displays a fallback UI such as an error message or a predefined component. This enhances app stability by isolating errors and allows users to continue using the app even when certain components encounter issues.
41. How do you handle dynamic data rendering using 'FlatList' and 'SectionList'?
'FlatList' and 'SectionList' are designed to handle dynamic data rendering efficiently. You provide these components with a data array, and they automatically render the items based on the data. By setting the 'data' prop and the 'renderItem' or 'renderSectionHeader' callback, you ensure that the UI updates whenever the data changes. These components also support optimizations like 'keyExtractor' for efficient re-rendering and 'getItemLayout' for better performance with large datasets.
42. Explain the use of 'DeviceEventEmitter' and 'NativeEventEmitter' in event handling.
'DeviceEventEmitter' and 'NativeEventEmitter' are mechanisms for handling events between JavaScript and native code in React Native. 'DeviceEventEmitter' is a part of the core 'react-native' package and is used for emitting and listening to events from the native side in JavaScript.
'NativeEventEmitter' is a wrapper around the native platform's event emitter and provides a more consistent API. These mechanisms allow you to communicate changes, actions, or events between different parts of your app's codebase, enabling seamless coordination and interaction.
43. Discuss the use of 'WebViews' for displaying web content within a React Native app.
'WebViews' in React Native allows you to embed web content (HTML, JavaScript, etc.) within your app as a separate view. It's useful when you need to display external web pages, render interactive web-based components, or integrate third-party web services.
While 'WebViews' provide flexibility, keep in mind that they introduce additional memory and performance overhead. Use them judiciously and consider factors like security, loading times, and responsiveness when integrating them in an app.
44. How would you implement a custom animated transition between screens?
To implement a custom animated transition between screens, you can use the 'react-navigation' library's 'TransitionPresets' or 'createStackNavigator' options. Define a custom animation configuration using 'TransitionSpecs' and 'screenInterpolator', specifying how the old screen exits and the new screen enters. You can use the 'Animated' library for more advanced animations. By adjusting timing, opacity transforms, and other properties, you can create unique and visually appealing transitions that match your app's design and branding.
45. Explain the purpose of 'TextInput' and its features in React Native.
'TextInput' is a core component in React Native used for capturing user input via a keyboard. It allows users to enter text, numbers, and other data into an app. It provides features like placeholder text, secure text entry (password fields), auto-capitalization, input validation, and event handling. 'TextInput' is a fundamental component for building forms, search bars, messaging features, and any other functionality that requires user input.
46. Discuss the role of 'useMemo' and 'useCallback' hooks in React Native.
'useMemo' and 'useCallback' are optimization hooks in React Native that help improve performance by memoizing values and functions. 'useMemo' memoizes values, preventing expensive recalculations when dependencies remain unchanged. 'useCallback' memoizes functions, ensuring they are not recreated on every render. These hooks are valuable for optimizing components that rely on computationally intensive operations or preventing unnecessary re-renders in functional components.
47. How can you achieve smooth animations in a React Native app?
To achieve smooth animations in a React Native app, these guidelines can be followed:
- Use 'Animated' library: Utilize the 'Animated' library for creating performant animations that run on the native thread.
- Optimize re-renders: Prevent excessive re-renders by using 'useMemo' and 'usecallback' hooks to memoize values and functions.
- Use 'requestAnimationFrame': Coordinate animations with the device's refresh rate using 'requestAnimationFrame'.
- Avoid heavy operations: Minimize heavy operations during animations such as complex calculations or data fetching.
- Use native animations: Use native animation drivers like 'Animated.spring' and 'Animated.timing' for smoother animations.
- Avoid layout changes: Animating layout changes (e.g., changing dimensions) can be less performant. Consider opacity or transform animations instead.
- Batch updates: Use 'batchedUpdates' to group multiple updates into a single render cycle to optimize performance.
- Test on devices: Test animations on actual devices to gauge performance accurately.
48. Explain how you would implement background tasks in a React Native app.
To implement background tasks in a React Native app, you can use libraries like 'react-native-background-task' or native modules like 'HeadlessJS'. These allow you to run tasks in the background even when the app is not active. For periodic tasks, you can use platform-specific APIs like 'BackgroundFetch' on iOS or 'JobScheduler' on Android. You can implement task scheduling, handle task completion, and consider battery and performance implications while designing background tasks to provide a seamless user experience.
49. Discuss the role of 'NavigationContainer' and its significance.
'NavigationContainer' is a core component in the 'react-navigation' library that manages the navigation tree for an app. It acts as a container for all your navigation components, such as 'StackNavigator', 'DrawerNavigator', and 'TabNavigator'.
'NavigationContainer' provides a common context for navigation state, enabling navigation components to communicate and coordinate seamlessly. It simplifies the setup of navigation and ensures a consistent navigation experience throughout your React Native app.
50. How do you handle version updates and migrations in a React Native project?
Handling version updates and migrations in a React Native project involves several steps:
- Version control: Use a version control system (e.g., Git) to track changes and maintain different app versions.
- Dependency management: Keep track of your app's dependencies and ensure they are up-to-date. Use tools like 'yarn' or 'npm' for managing packages.
- React Native upgrade: Regularly update your React Native version to benefit from performance improvements, bug fixes, and new features.
- Test updates: Thoroughly test your app after each update to ensure compatibility and identify any issues.
- Continuous integration: Implement a CI/CD pipeline to automate testing and deployment for smoother updates.
- Backward compatibility: Ensure backward compatibility with older app versions and handle data migration if needed.
51. Explain the concept of 'Error Boundaries' and their significance in React Native.
'Error Boundaries' are components in React Native that catch and handle JavaScript errors that occur during rendering. They prevent these errors from crashing the entire app and allow you to display a fallback UI instead.
'Error Boundaries' help maintain a stable user experience by isolating errors to specific components, enabling users to continue using the app even when parts of it encounter issues. They improve app robustness, debugging, and user satisfaction by preventing unexpected crashes.
52. Explain the purpose of 'PanResponder' for handling touch gestures.
'PanResponder' is a module in React Native used to handle touch gestures and user interactions such as dragging, swiping, and pinch-to-zoom. It provides a way to respond to touch events by creating custom touch responders.
'PanResponder' allows you to define touch handlers for various stages of touch events, enabling complex and interactive touch-based behaviors. It's essential for creating engaging and intuitive user interfaces that respond to user actions with fluid and natural interactions.
Wrapping up
It takes a solid foundation in the fundamentals of React Native, a talent for managing challenging situations at intermediate levels, and a thorough comprehension of advanced ideas to master the framework. This selection of questions is a comprehensive resource for both enthusiastic job seekers and astute hiring managers looking to assess potential React Native developers.
Remember that a successful combination of practical experience and conceptual knowledge will empower you to approach every React Native interview with composure as well as succeed in creating amazing cross-platform mobile applications!
Hire Silicon Valley-caliber React Native developers at half the cost
Turing helps companies match with top quality remote JavaScript developers from across the world in a matter of days. Scale your engineering team with pre-vetted JavaScript developers at the push of a buttton.
Tired of interviewing candidates to find the best developers?
Hire top vetted developers within 4 days.

Expert in
- React Native
- C
- Flash
- Jira
- Git
- CSS
- JavaScript
Truong has 6+ years of experience in full-stack development. He has extensive experience in building websites and designing web games.

Expert in
- React Native
- iOS
- React.js
- iOS-Swift
- Laravel
- iOS Development
- Java
ChengWei has 12+ years of experience in full-stack development. He is proficient in technologies such as Swift, Java, PHP, and cross-platform frameworks.

Expert in
- React Native
- React.js
- Node.js
- Google Cloud Platform
- MongoDB
Robert is a full-stack developer with 10+ years of experience in web development. He has a solid knowledge of web & mobile technologies such as React and React Native.

Expert in
- React Native
- MVP
- MacOS
- iOS-Swift
Alex is a React Native developer with 3+ years of experience in software development. He wants to work with companies changing the world in health, fitness, or finance.

Expert in
- React Native,Node.js
- TypeScript
- React.js
- JavaScript
Andrew is a front-end heavy full-stack developer with 7+ years of experience. He is highly skilled in technologies such as React Native, Node.js, TypeScript, and React.js.
Leading enterprises, startups, and more have trusted Turing

Check out more interview questions
Hire remote developers
Tell us the skills you need and we'll find the best developer for you in days, not weeks.