
Jenkins
Basic Interview Q&A

1. What is Jenkins? Why is Jenkins widely used?
It is an open-source automation tool that automates software development parts in relation to building, testing, deploying, and facilitating CI/CD. Also, it keeps track of the version control system. Further, it is a server-based system that runs on servlet containers.
- Jenkins is a popular automation tool that is widely used in software development for several reasons.
- To automate the testing of builds.
- To detect errors in software development.
- For real-time monitoring of code and integrating changes into the build.
- Jenkins is very suitable for building CI/CD pipeline.
2. List some features of Jenkins.
Some of the valiant features of Jenkins are:
- Free and open source
- A good collection of plugins
- Pipeline support
- Easy to set-up
- Easy upgrades
3. List some features of Groovy in Jenkins.
- Dynamic object oriented programming language that serves as a scripting language for Java platforms.
- Orchestrate Jenkins pipeline.
- Enables different teams to provide support for work in varied languages
- Syntax similar to Java makes it seamless with the Java interface
- Provides features such as Java compatibility and development support.
4. Mention the steps required to install Jenkins.
Step 1: Install Java
Step 2: Install the Apache Tomcat server
Step 3: Download the war file in Jenkins
Step 4: Deploy this file
5. What commands can start Jenkins?
- To start Jenkins,
- Firstly, open the command prompt
- Secondly, navigate to the directory to locate Jenkins war
- Lastly, run the following command:
D:>java -jar Jenkins.war
6. Explain "Continuous Integration" w.r.t to Jenkins.
Continuous Integration (CI) is a software development practice that involves automatically building, integrating, and testing code as it is introduced and committed to a code repository. With respect to Jenkins, an open-source automation tool, here's how it works:
To implement Continuous Integration with Jenkins, follow these steps:
Installation and setup: Install Jenkins on your server or local machine and configure it according to your project needs.
Creating a Jenkins job: Create a new Jenkins job to build and test your software project. You can define triggers based on different events such as code commits or scheduled intervals. Configure the job to fetch the source code from a version control system like Git, Mercurial, or SVN.
Build process: Configure the build process in Jenkins, including specifying build tools like Maven or Gradle for Java projects, or any relevant build system for your project`s language. Jenkins will perform actions like code compilation and packaging of the software.
Automated testing: Configure Jenkins to execute automated tests, such as unit tests, integration tests, or even end-to-end tests. Jenkins will report the test results, making it easy to identify any issues in the code.
Notification system: Set up notification mechanisms to inform the development team of successful or failed builds and test results. Jenkins can send notifications via email, Slack, or other messaging platforms.
Continuous Deployment (optional): If you want to practice Continuous Deployment, configure the Jenkins job to automatically deploy the software to a staging or production environment upon a successful build.
Through these steps, Jenkins streamlines the process of Continuous Integration, ensuring that code is consistently merged, tested, and checked for quality as it is developed.
7. How do you set up a Jenkin job?
- You can easily set up a new built job in Jenkins by following the below steps -
- Log on to your Jenkins dashboard
- Click on "New Items" which is displayed at the top left corner of your dashboard
- Enter the relevant details (Enter an item name, select "Freestyle project", and press "OK")
- Enter project details
- Enter repository URL
- After providing the details, tweak the settings under the "build" section as required
- Click "Apply" and "Save" the project
- Build source code by clicking "Build Now"
- Check the status under "Build History"
- Click on "Build Number" and then "Console Output" to see the status
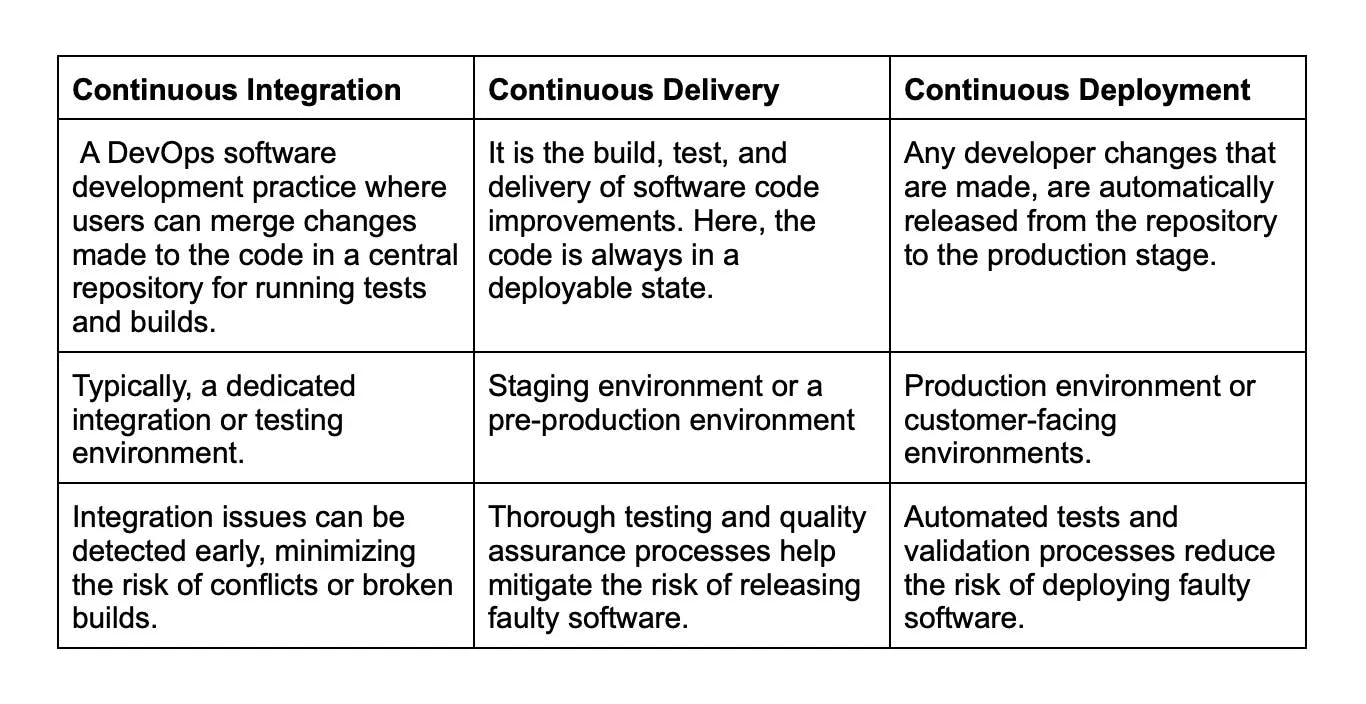
8. Differentiate between Continuous Integration, Continuous Delivery, and Continuous Deployment?
9. Explain CI/CD pipeline?
A CI/CD pipeline in Jenkins automates the process of building, testing, and deploying software changes. It does so by connecting to the code repository and keeping a check for any new changes. When any change is detected Jenkins triggers the pipeline. It transits through stages like building, testing, and deploying. Jenkins compiles the code, runs tests, and deploys the application to the desired environment. Also, the pipeline ensures that the code changes meet the quality standards for fast and reliable software updates.
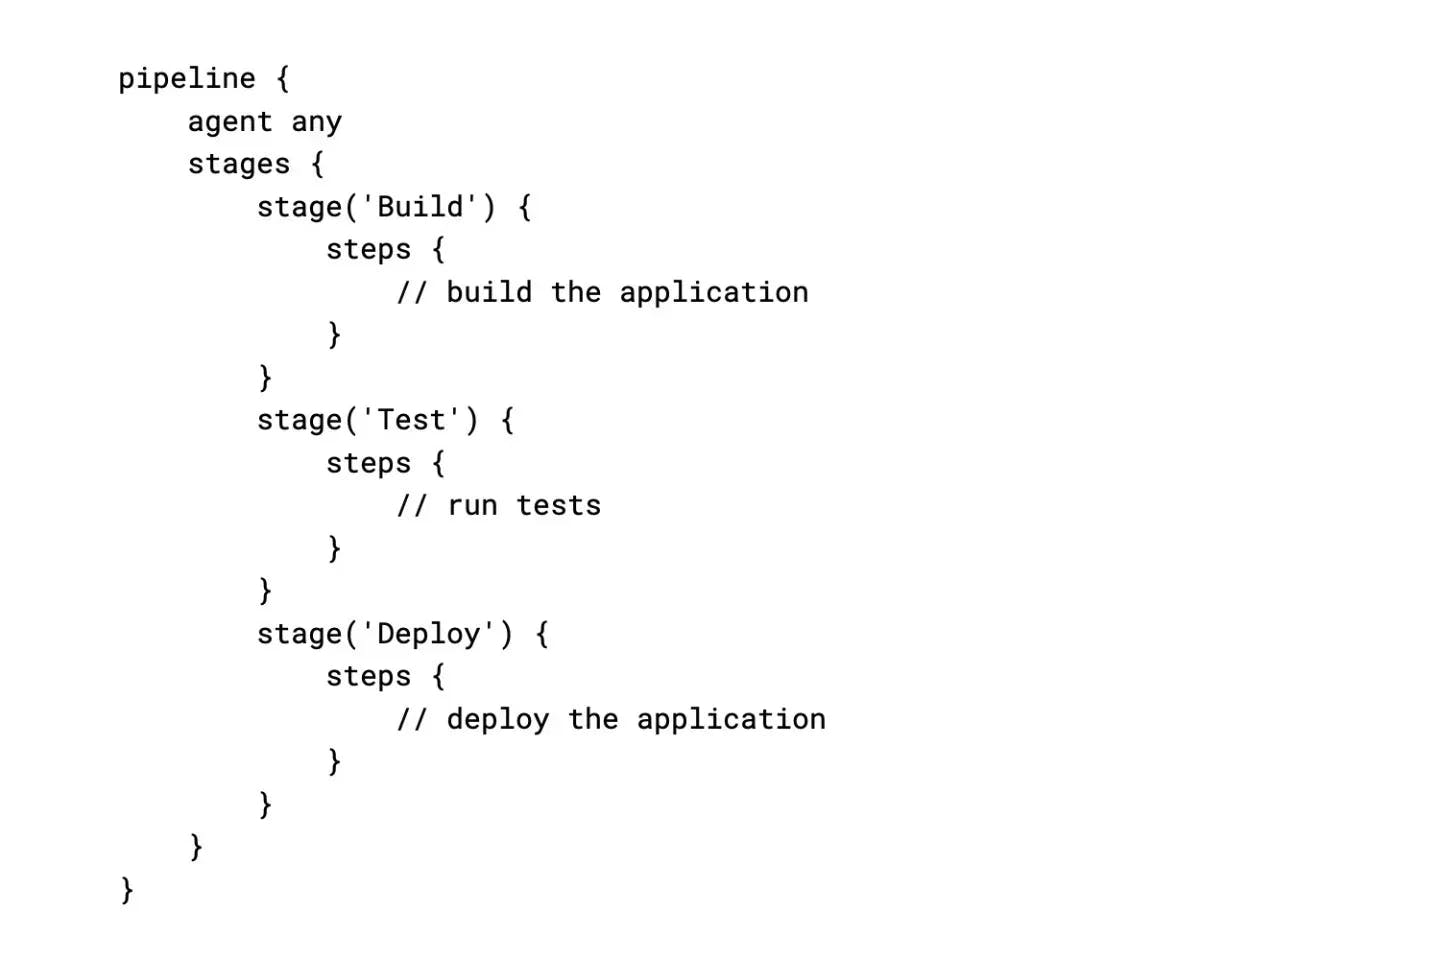
10. Explain Jenkins pipeline.
A Jenkins pipeline is an automation technique that enables developers to define an end-to-end process for building, testing, and delivering software by orchestrating various stages of the software development life cycle. Jenkins pipelines help improve the efficiency and consistency of software delivery, ensuring faster development cycles and better code quality.
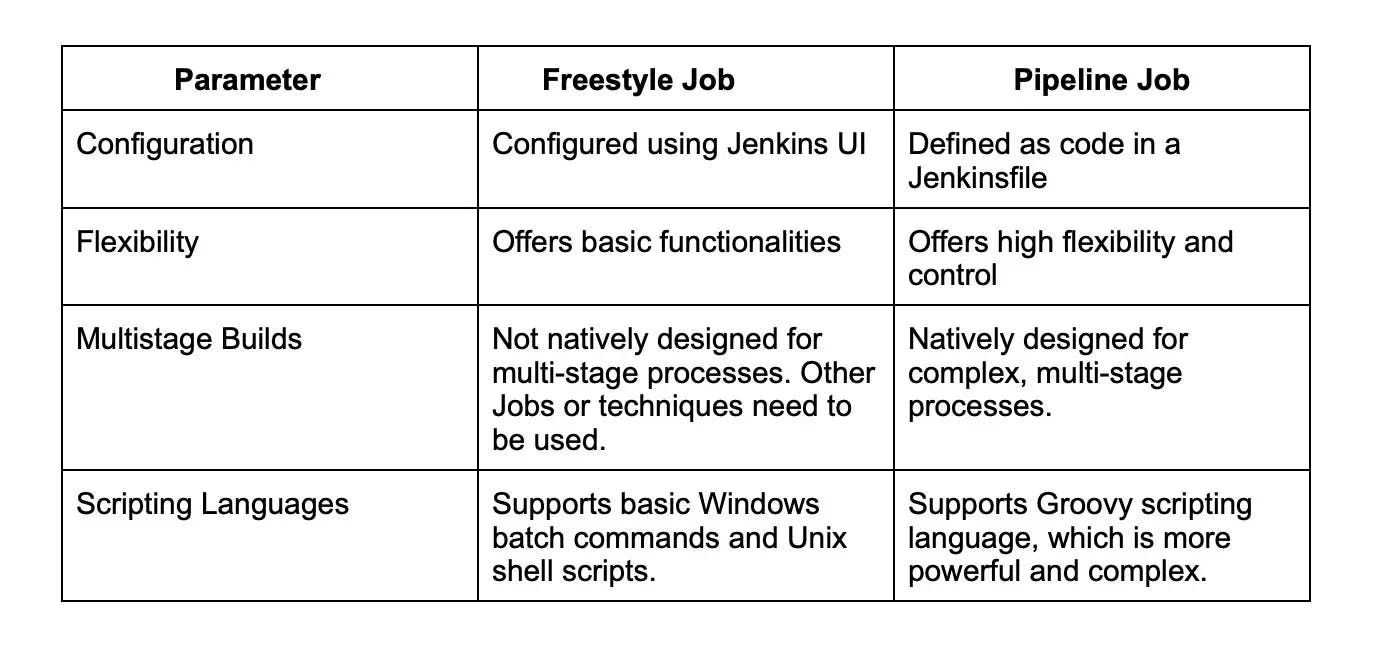
11. List the names of 3 pipelines in Jenkins.
In Jenkins, the term "pipelines" generally refers to two major pipeline types: Scripted and Declarative pipelines, which are used to automate the software development process. However, there is also the Freestyle project, which, although not officially a pipeline, achieves similar objectives in a simpler way.
Scripted Pipeline: The Scripted pipeline is a more powerful way to configure Jenkins jobs, using a Groovy-based Domain Specific Language (DSL). The Scripted pipeline code is written as a script, allowing developers to define the entire build process, test execution, and post-build actions. Scripted pipelines are represented by a Jenkinsfile stored in the project's source code repository, ensuring version control and a single source of truth for the pipeline configuration.
Declarative Pipeline: The Declarative pipeline is an evolution of the Scripted pipeline, also using a Groovy-based DSL, but with an easier-to-read and maintain syntax. This pipeline type has a structured syntax, making it well-suited for more complex automation tasks. Declarative pipelines are represented by a Jenkinsfile within the source code repository, providing version control and easy access for pipeline updates.
Freestyle Project: The Freestyle project is an easy-to-configure Jenkins job that uses a graphical user interface to define the build process, tests, and post-build actions. Although not as flexible as the Scripted and Declarative pipelines, Freestyle projects are suitable for relatively simple build processes.
12. Before you use Jenkins, what are the necessary requirements?
Before using Jenkins, which is a popular open-source automation server oftentimes used for Continuous Integration/Continuous Deployment (CI/CD) processes, you need:
A source code repository: A source code repository, such as Git, SVN, or Mercurial, acts as a central hub where the project's source code is stored and managed. This allows for effective team collaboration, strong version control, and enables Jenkins to fetch the latest code for building and deploying tasks.
A build script: This is a set of instructions or procedures that define how to compile, test, and package your application. Build scripts, often crafted using tools like Maven, Gradle, or Ant, specify the software's dependencies, the required build tools, and any custom commands necessary for the build process.
Remember, Jenkins can work with many different languages and tools, so having your environment correctly set up to work with your chosen language and toolchain is also key.
Also, you'd need to have a proper understanding of how to configure Jenkins as per your project needs, as Jenkins server requires proper setup to function optimally. This may include setting up different jobs, chains of jobs, nodes, and installing necessary plugins.
13. List some useful Jenkins plugins.
Git Plugin: Enables Jenkins to fetch code from Git repositories and integrate with popular Git-based platforms such as GitHub, GitLab, and BitBucket.
Pipeline Plugin: Facilitates the creation of scripted and declarative pipelines, allowing users to automate their CI/CD workflows and integrate multiple build steps.
Maven Integration Plugin: Provides build triggers and enhanced support for building Maven-based projects.
Blue Ocean Plugin: Offers a modern, visually appealing interface with improved user experience for Jenkins Pipeline and other plugin-related views.
Role-based Authorization Strategy: Implements a role-based access control strategy that manages the permissions of users and groups.
Performance Plugin: Analyzes and visualizes the performances of different tests, like JMeter and JUnit, to identify trends and potential issues.
14. What can you do for creating a backup and copying of files in Jenkins?
Creating backups and copying files in Jenkins are essential tasks to ensure the security of your configurations, job data, and system settings. Here's how you can perform these tasks in Jenkins:
Backup:
To create a backup of your Jenkins settings and data, you can use the "ThinBackup" plugin or manually back up essential files and folders.
ThinBackup Plugin: This plugin automates the backup process. After installing it, you can configure backup settings, such as location, backup intervals, and the retention policy for old backups.
Manual Backup: To manually back up your Jenkins data, you should archive the following directories and files:
- $JENKINS_HOME directory, which contains job configurations, build artifacts, and system settings.
- plugins directory, which contains all installed plugin files and their configurations.
- secrets directory, which holds encrypted secrets like API tokens and credentials.
- config.xml, jenkins.model.JenkinsLocationConfiguration.xml and hudson.tasks.Mailer.xml which store Jenkins system settings.
Copying Files:
To copy files within Jenkins jobs or across different jobs, you can use the "Copy Artifact" plugin or leverage build steps in the Jenkins Pipeline.
Copy Artifact Plugin: Install the Copy Artifact plugin to copy artifacts from other jobs or between different build stages. Configure the settings (source job, artifacts to copy, and target directory) within the Post-build Actions or Build Wrappers of your Jenkins job.
Jenkins Pipeline Steps: In the Jenkins script of your pipeline, you can use various steps to copy files. Here are some examples:
- stash and unstash steps to store and retrieve files across different stages in a pipeline.
- archiveArtifacts step to store build artifacts and make them accessible from the Jenkins UI.
- Use shell or batch scripts (via sh step on Linux/macOS or bat step on Windows) to copy files to different directories or across jobs. You can leverage commands like cp (for Unix-based systems) or copy (for Windows) in the script.
Regularly backing up your Jenkins configuration and using efficient file copying mechanisms ensures that you can quickly recover and restore your Jenkins setup in case of any issues or errors.
15. For a core plugin, how can you deploy a custom build?
You can deploy a custom build as follows:
- First stop Jenkins
- Then you will need to copy the custom HPI to $Jenkins_Home/plugins
- Next, delete the earlier expanded plugin directory
- Then create an empty file called PLUGIN_NAME.hpi.pinned
- Finally, again start Jenkins.
16. Explain to me the process for moving or copying Jenkins from one server to another?
To move or copy Jenkins from one server to another, you can follow these general steps:
Backup Jenkins Home Directory: The home directory contains all the necessary configurations, plugins, and job configurations. It is important to back up this directory before proceeding. you can locate the Jenkins home directory on the source server.
Install Jenkins on the Target Server: Install Jenkins on the new server using the same version as the source server. You can refer to the official Jenkins installation instructions depending on your operating system.
Transfer the backed-up Jenkiuns home directory: while doing this process ensure that file permissions and ownership are preserved during the transfer.
Start Jenkisn on new server: For this you can use appropriate commands for your operating system like sudo service Jenkins start (Linux) or starting the Jenkins service from the Services panel (Windows).
Verify configurations and functionality through the web interface: To ensure that everything is working as expected you can run sample buikds and tests.
Update DNS and URLs if needed: Update DNS records or any references to the old server's IP address or URLs in your system,
Monitor and troubleshoot: You can refer to Jenkins logs and documentation for troubleshooting guidance.
17. Can you list some continuous integration tools except Jenkins?
In addition to Jenkins, there are several other Continuous Integration (CI) tools available to help automate the software development process. Some popular CI tools include:
Travis CI: A cloud-based CI service, integrated with GitHub and offering support for multiple programming languages. Travis CI is widely used in open-source projects and has a simple configuration with YAML-based settings.
CircleCI: A cloud-based CI/CD platform that supports modern development practices like containerization and microservices. CircleCI integrates with popular version control systems (like GitHub and BitBucket) and offers a YAML-based configuration to define workflows.
GitLab CI/CD: GitLab comes with a built-in CI/CD tool, allowing you to maintain your code repository and CI/CD pipelines in a single platform. GitLab CI/CD supports Docker containers and runners, making it easy to set up and run builds in parallel.
TeamCity: A CI server created by JetBrains, TeamCity offers a rich interface and supports a wide array of plugins and build tools. It enables easy setup of build pipelines and displays real-time build results in a comprehensive dashboard.
Also read - Top CI/CD tools to increase productivity
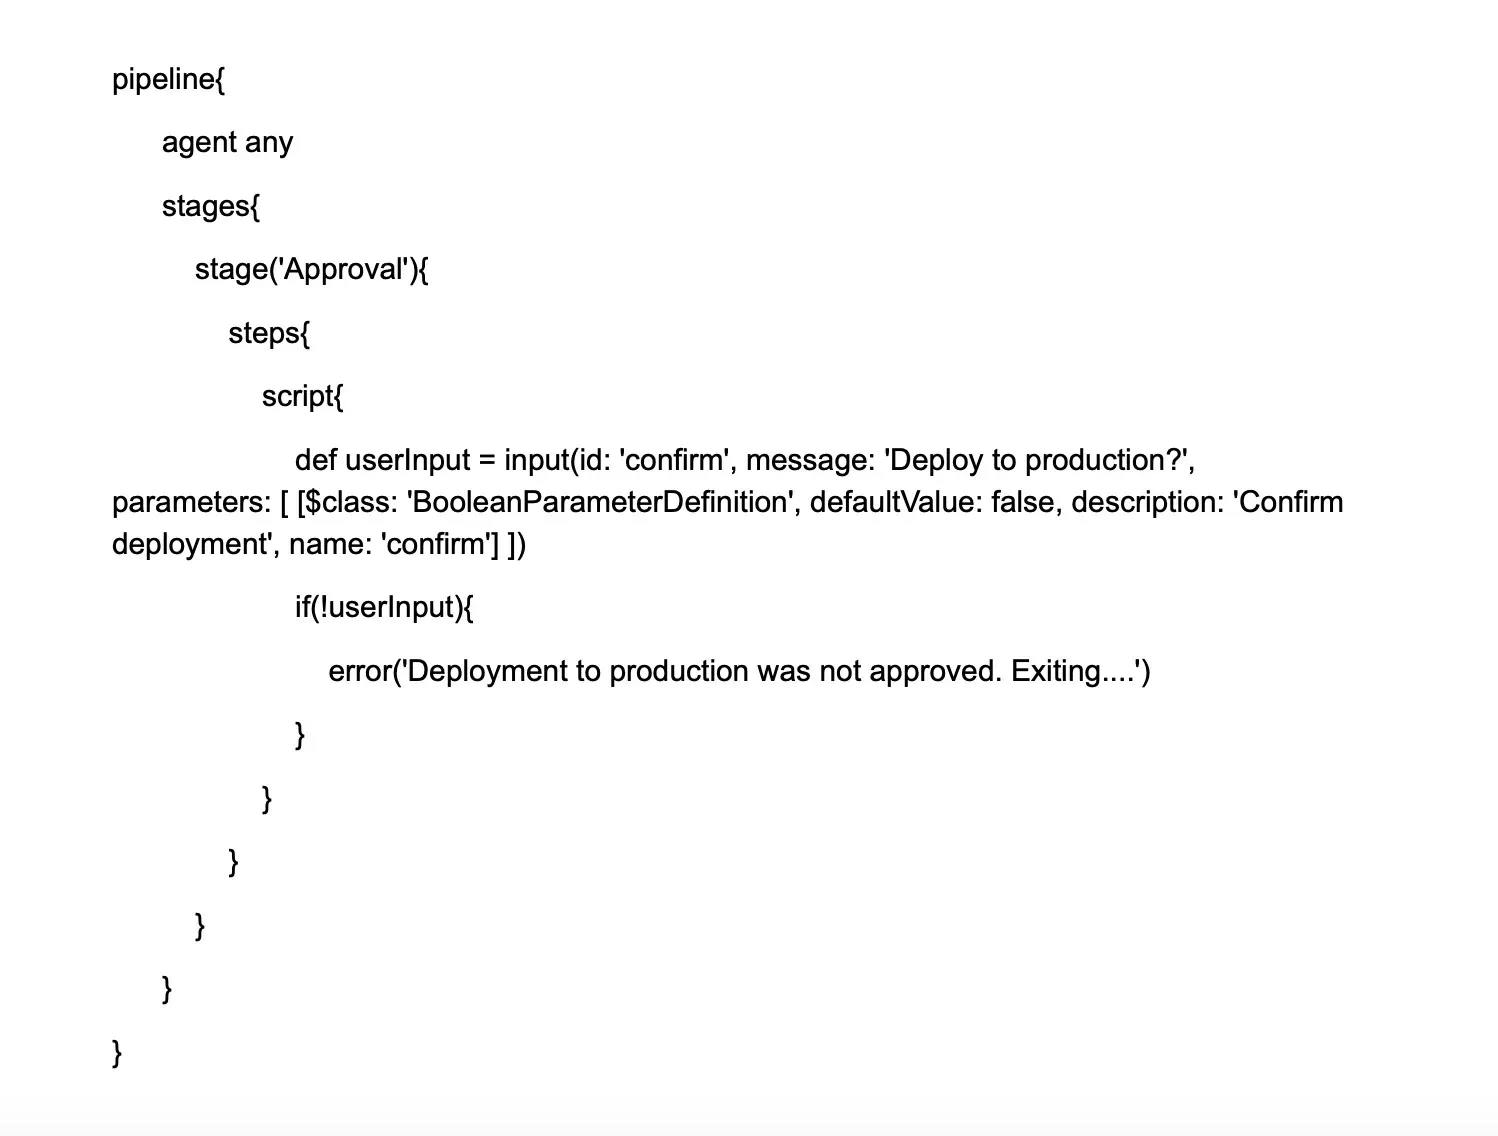
18. If in a pipeline, one job works well, but the other fails, what would be your next step?
You can simply restart the pipeline from the point it failed by using “restart from stage”.
19. Tell me how Jenkins works.
The following steps define the working of Jenkins
- Jenkins checks for changes in the repository regularly.
- With changes defined, Jenkins develops a new build.
- Next Jenkins moves stage after stage in its usual pipeline.
- If any stage fails, the Jenkins build stops. The software then informs the respective team about it.
- However, if the stage completes properly, the code implements itself in the server to begin the testing.
- After the testing phase, Jenkins shares the result with the team.
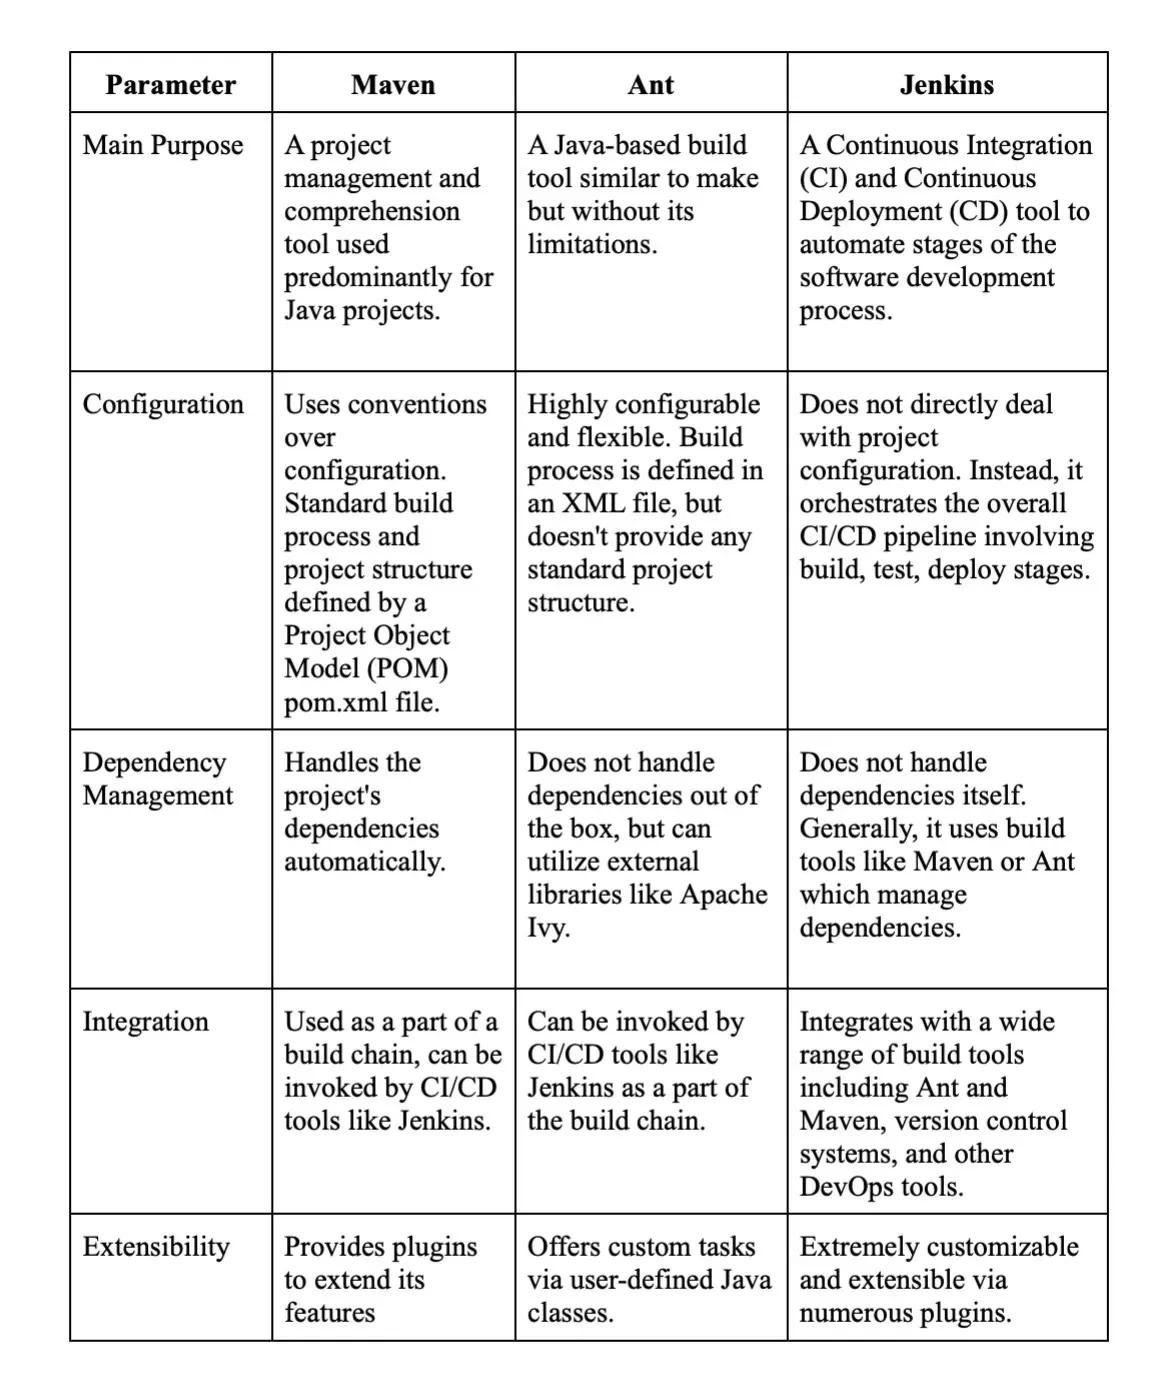
20. How are Maven, Ant, and Jenkins different?
Maven, Ant, and Jenkins are all key tools in the software build and continuous integration process but they serve distinct roles:
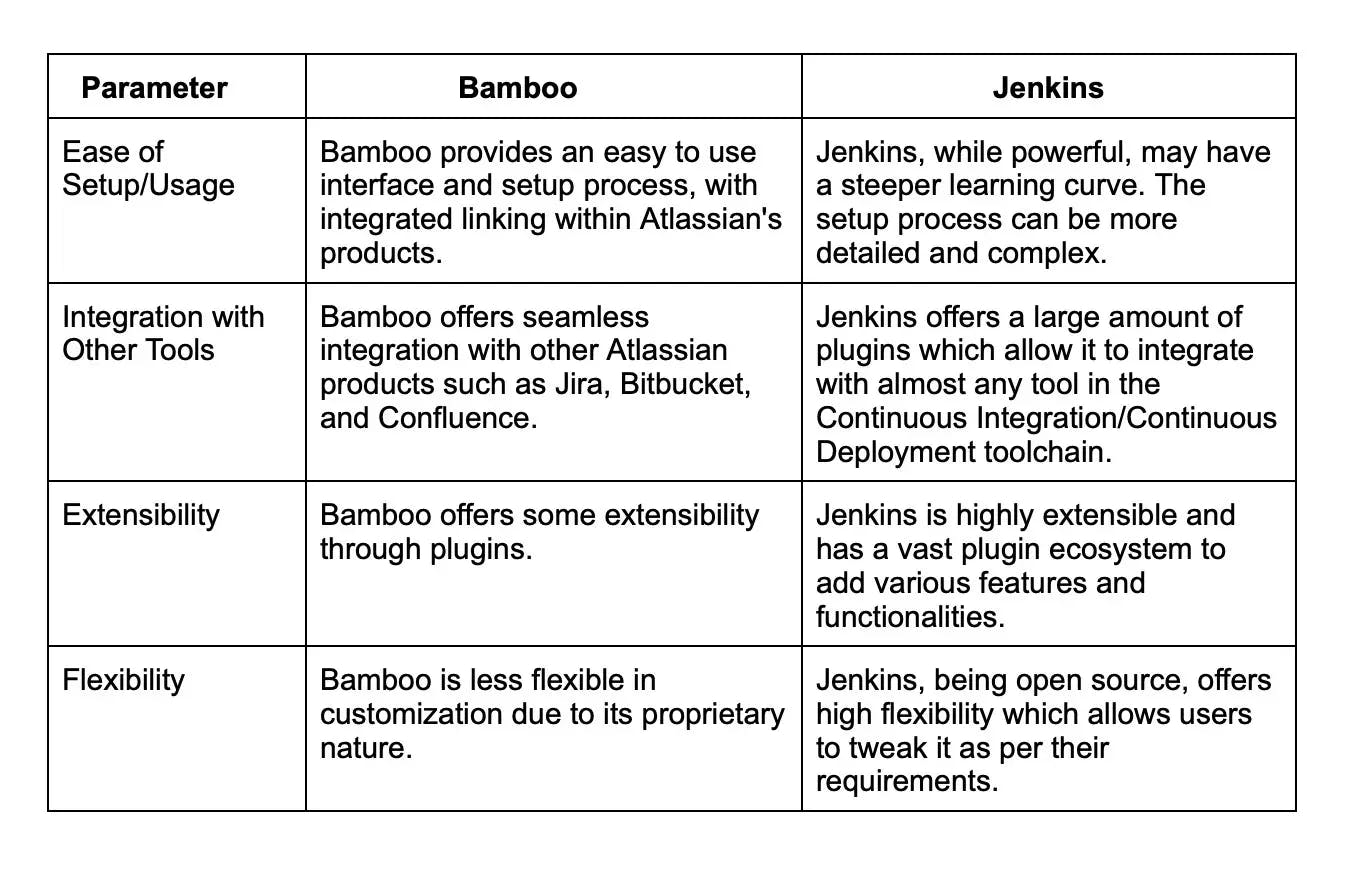
21. How are Bamboo and Jenkins different ?
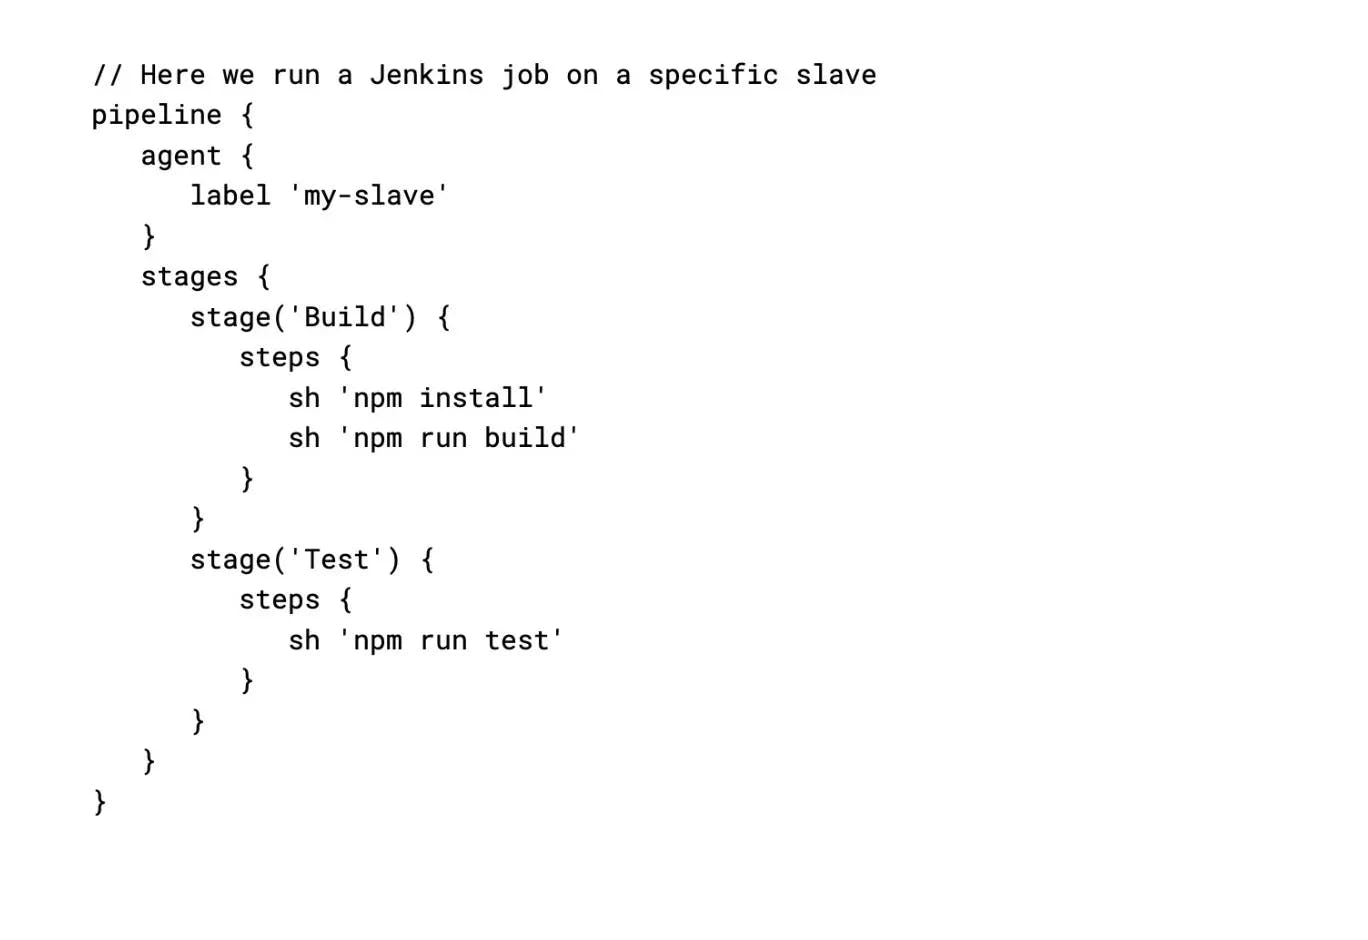
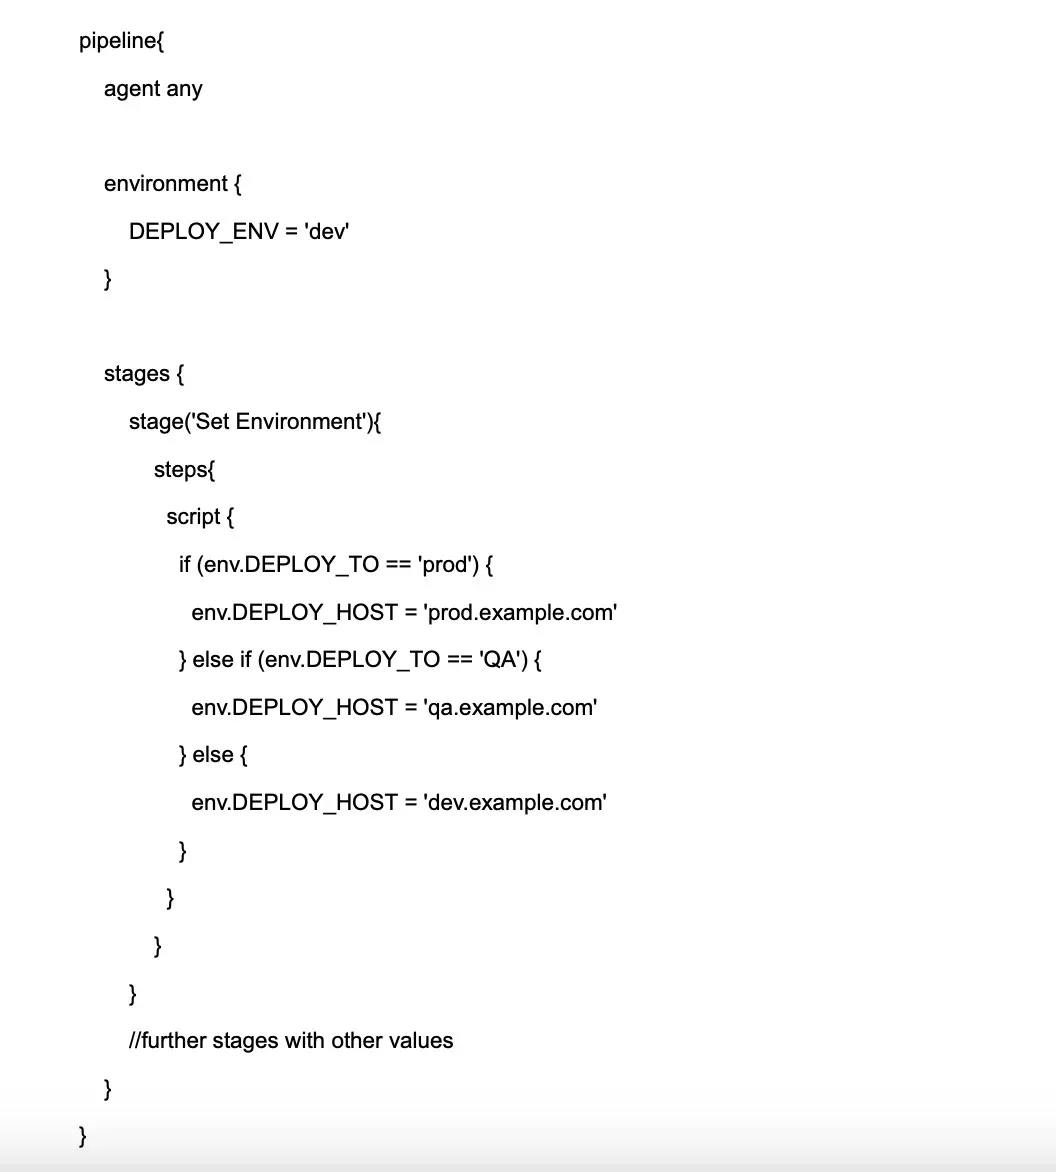
22. What is an Agent Directive in Jenkins?
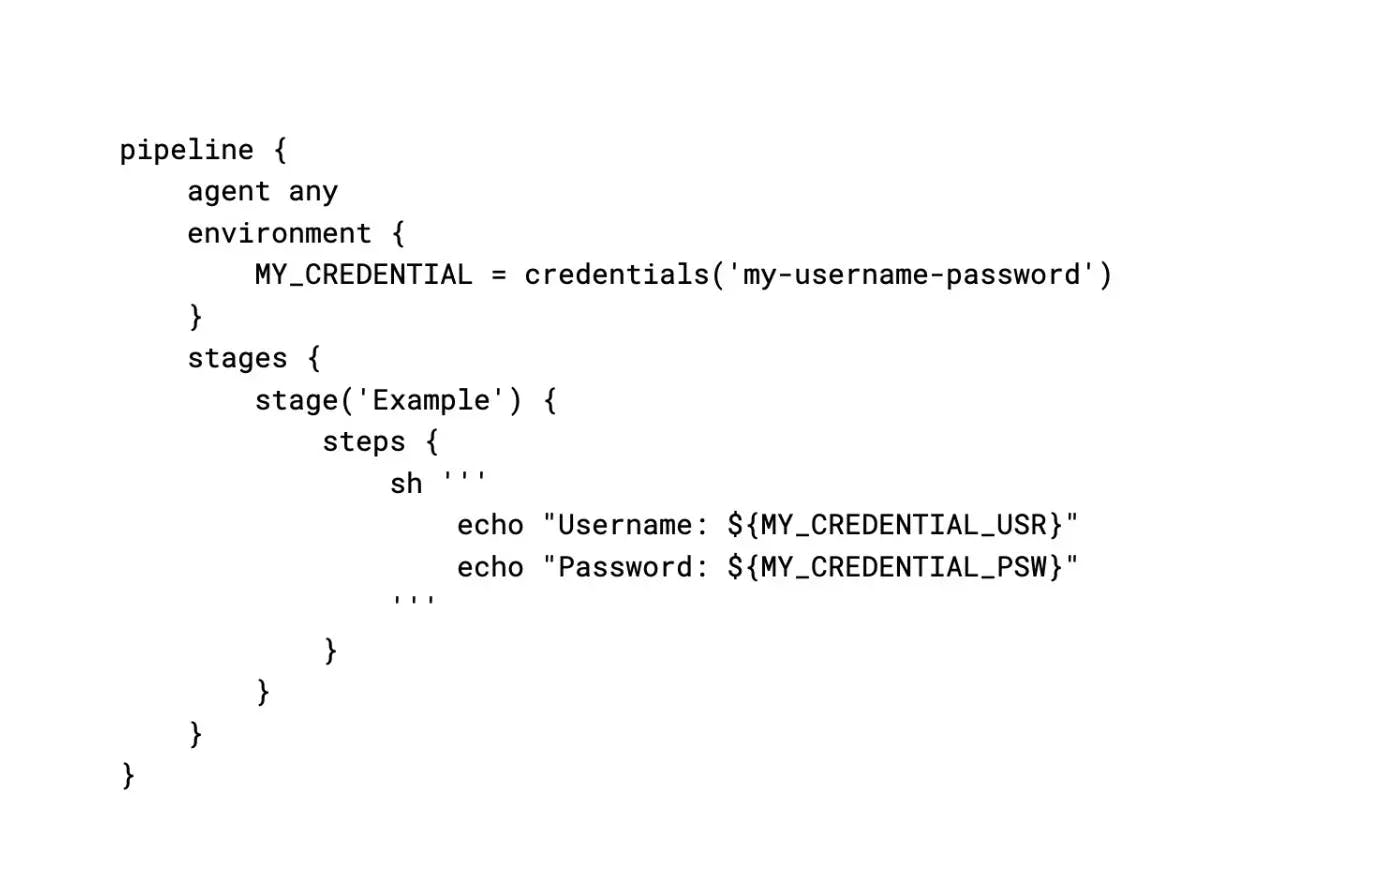
The Agent directive in Jenkins indicates where and when to execute the Pipeline or a specific stage in the Pipeline. The agent section specifies where all the stages of the Pipeline should be executed. By 'where', we are referring to the environment which could be any machine that Jenkins can access, such as a different server or a cloud-based environment.
It can be declared at the top level inside the pipeline block, or within a stage directive for executing specific stages on different agents. This directive helps in segregating the tasks across different agents, boosting performance, and it allows parallel execution.
For instance, different agent directives help Jenkins execute build, test, and deploy stages on different environments or machines. This allocation helps in improved pipeline execution as stages that do not depend on each other can be executed concurrently on different agents.
Also, each agent directive creates a separate workspace, ensuring isolation of environments, and this workspace contains all the necessary files for executing a given stage in the pipeline.
23. What is the use of Jenkins with Selenium?
Jenkins is a widely used Continuous Integration tool that allows for frequent code changes to be built, tested, and deployed. Selenium, on the other hand, is a popular framework for automated testing of web applications.
Using Jenkins with Selenium has numerous advantages:
Automated Testing: By integrating Selenium with Jenkins, you can automate your testing process. When a new change is committed to the version control system, Jenkins can automatically trigger Selenium to execute test cases on your web application. This helps in providing quick feedback on the functionality of the application.
Scheduled Testing: Jenkins allows you to schedule Selenium test cases to run at specified times. This ensures regular checks on the functionality of your application and helps to spot issues early.
Parallel Test Execution: Jenkins with Selenium Grid can run tests in parallel on different machines, thereby, reducing the testing time for large projects.
Reporting: Jenkins can gather and visualize test results data over time, and the pipeline or project status, which helps in monitoring the trends and improving testing strategies.
24. How to configure Third-party tools in Jenkins?
Configuring third-party tools in Jenkins generally involves a few common steps. Here is a more specific approach:
Install the Third-Party Software: On your Jenkins server or agent, install the specific third-party software tool that you would like to use in your Jenkins workflow.
Install the Relevant Jenkins Plugin: In many cases, for Jenkins to interact with third-party software, a specific Jenkins plugin may be required. You can search for and install these from the Jenkins UI by visiting the "Plugin Manager" under "Manage Jenkins". These plugins typically allow Jenkins to understand how to interact with each specific tool.
Configure the Third-Party Tool in Jenkins:
- Navigate to "Manage Jenkins" from the Jenkins dashboard.
- Choose “Global Tool Configuration”. Here, you will find options to configure many different tools. These options exist due to the plugins installed in step 2.
- Under the appropriate section, add a new tool. Here, you will typically provide the name of the installation, and might also specify the path to where the tool is installed on the Jenkins server or agent.
Use the Third-Party Tool: Once the tool is correctly installed and configured, you can now use it within your Jenkins pipeline or job configurations. Check the plugin documentation for exact usage instructions, as it will vary from tool to tool.
25. How can you integrate Git with Jenkins?
To integrate Git with Jenkins, you first need to make sure the necessary Git plugin is installed. Jenkins offers a Git plugin that allows you to use Git as your Source Code Management (SCM) tool, which is crucial for building projects.
Here's a step-by-step process:
Check if Git Plugin is Installed: Jenkins comes with some plugins out of the box, but Git is not one of them. So it's best to check and install if necessary. Go to the Jenkins dashboard, click on "Manage Jenkins > Manage Plugins > Installed Tab". Look for 'Git Plugin'. If it's not there, switch to the "Available" tab, search for it and install it.
Create a New Jenkins Job: On your Jenkins dashboard, click on "New Item". Enter your project name and select the appropriate job type (e.g., 'Freestyle project'). Click on "OK" to create the job.
Configure Source Code Management: On the job configuration page, navigate to the "Source Code Management" section. Select "Git" and input your repository URL in the "Repository URL" field.
Specify Branches to Build: In the "Branches to build" section, specify the branch that you want Jenkins to build. By default, it's set to "*/master", meaning it will build the master branch.
Save Configuration: After providing all the necessary info, click on "Save" to save the configuration.
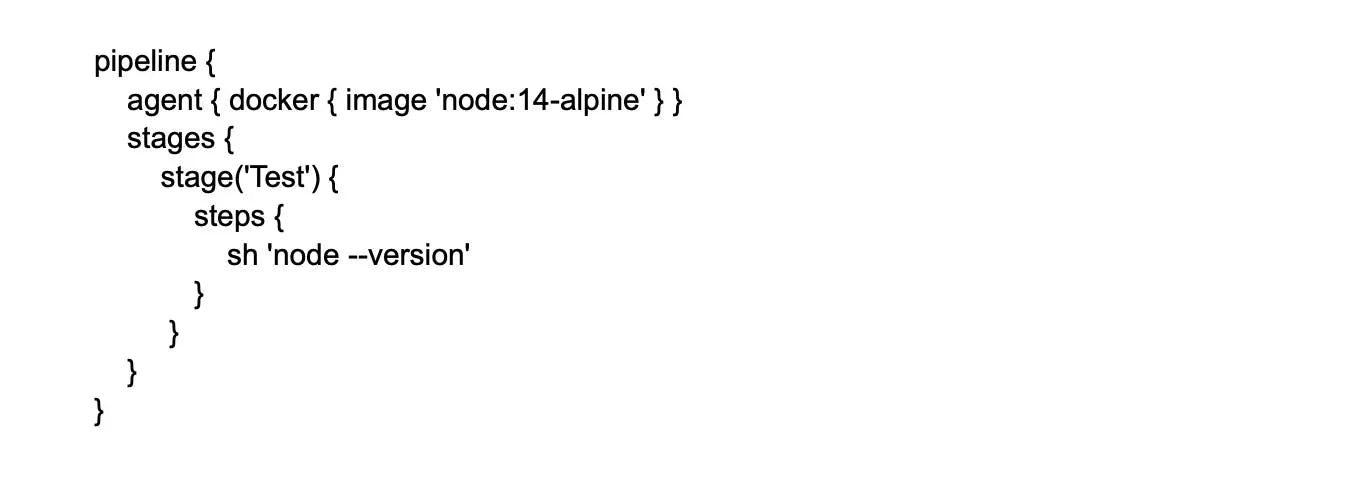
26. Explain how to integrate Kubernetes with Jenkins.
Jenkins can be integrated with Kubernetes, an open-source system for automating deployment, scaling, and management of containerized applications. A Kubernetes cluster can handle the runtime environments of CI/CD workflows.
The integration of Jenkins with Kubernetes has several advantages:
Dynamic scalability: Kubernetes can spin up Jenkins agents dynamically based on demand. This is efficient and cost-effective, as resources are only used when needed.
Isolation of environments: Each Jenkins job can run in a separate Kubernetes Pod. This prevents job interference, maintains environment consistency, and improves security.
So, how do you integrate Jenkins with Kubernetes? At a high level, here are the steps:
Install Jenkins on a Kubernetes cluster: This can be done using a Helm chart, a preconfigured package of Kubernetes resources.
Configure Kubernetes plugin in Jenkins: Install the Kubernetes plugin using the Jenkins plugin manager. You can configure it by going to 'Manage Jenkins' > 'Configure System' > 'Cloud' > 'Kubernetes' and entering your Kubernetes' API server URL and credentials, among other details.
Specify Kubernetes Pod template: The Pod template defines the containers and volumes for the Jenkins agents. You can specify the Docker image, command to run, and the workspace volume, among other options.
Use Kubernetes agents in a Pipeline: Finally, in your Jenkins Pipeline script, you can specify the agent as Kubernetes and use the defined Pod template.
27. List some default environmental variables in Jenkins.
Jenkins provides a set of default environment variables that you can use within your Jenkins jobs:
JOB_NAME: This variable holds the name of the job that is currently executing. This would be the name you gave the job when you first set it up.
NODE_NAME: This variable holds the name of the node where the build is currently running. For instance, it could be 'master' for the main Jenkins server or the name of an agent node if you're using distributed builds.
WORKSPACE: This variable points to the workspace directory where Jenkins runs the build. This is the directory containing the checked-out source code, and it's where any build steps are run by default.
BUILD_URL: This variable contains the URL of the build results. If you navigate to this URL, you can see the details and status of the current build.
JENKINS_URL: This variable provides the base URL of the Jenkins master server. If Jenkins is running on port 8080 of localhost, for instance, this value would be as follows:

28. What can you do for the broken build in the Jenkins project?
A broken build occurs when your project fails to compile or test failures occur in your Jenkins project. Here are the general steps you can follow to fix it:
Investigate the Build Failure: Anytime a Jenkins build fails, the first step should be to examine the Console Output of the failed build. This contains the log of the execution of the entire build including what steps were run, in what order, and the output or error messages from those steps.
Identify the Error: Within the console's output, search for error logs or failure messages that indicate what caused the broken build. This could be anything, ranging from compiling error, failing tests, issues with fetching from the repository, or problem with the build environment setup.
Check Recent Changes: Next, inspect any recent changes that may have led to the build break. It could be changes to the code, build script, or Jenkins configuration. Jenkins maintains an SCM ChangeLog that lists recent changes related to your source code.
Update Your Local Workspace: Once you identify the possible root cause, try to replicate the error in your local workspace. If the error can be reproduced, it's time to fix it.
Apply the Fix: Make the necessary changes to the code, configurations, or build scripts based on your findings. It could require fixing the code, adding missing dependencies, adjusting build script, or tweaking the Jenkins job configuration.
Test: Test the changes thoroughly in your local environment before committing and pushing them to the repository.
Rebuild: After your changes have been pushed, trigger a build in Jenkins manually, or let it happen automatically if you've configured Jenkins for it.
29. Differentiate between Jenkins and Hudson.

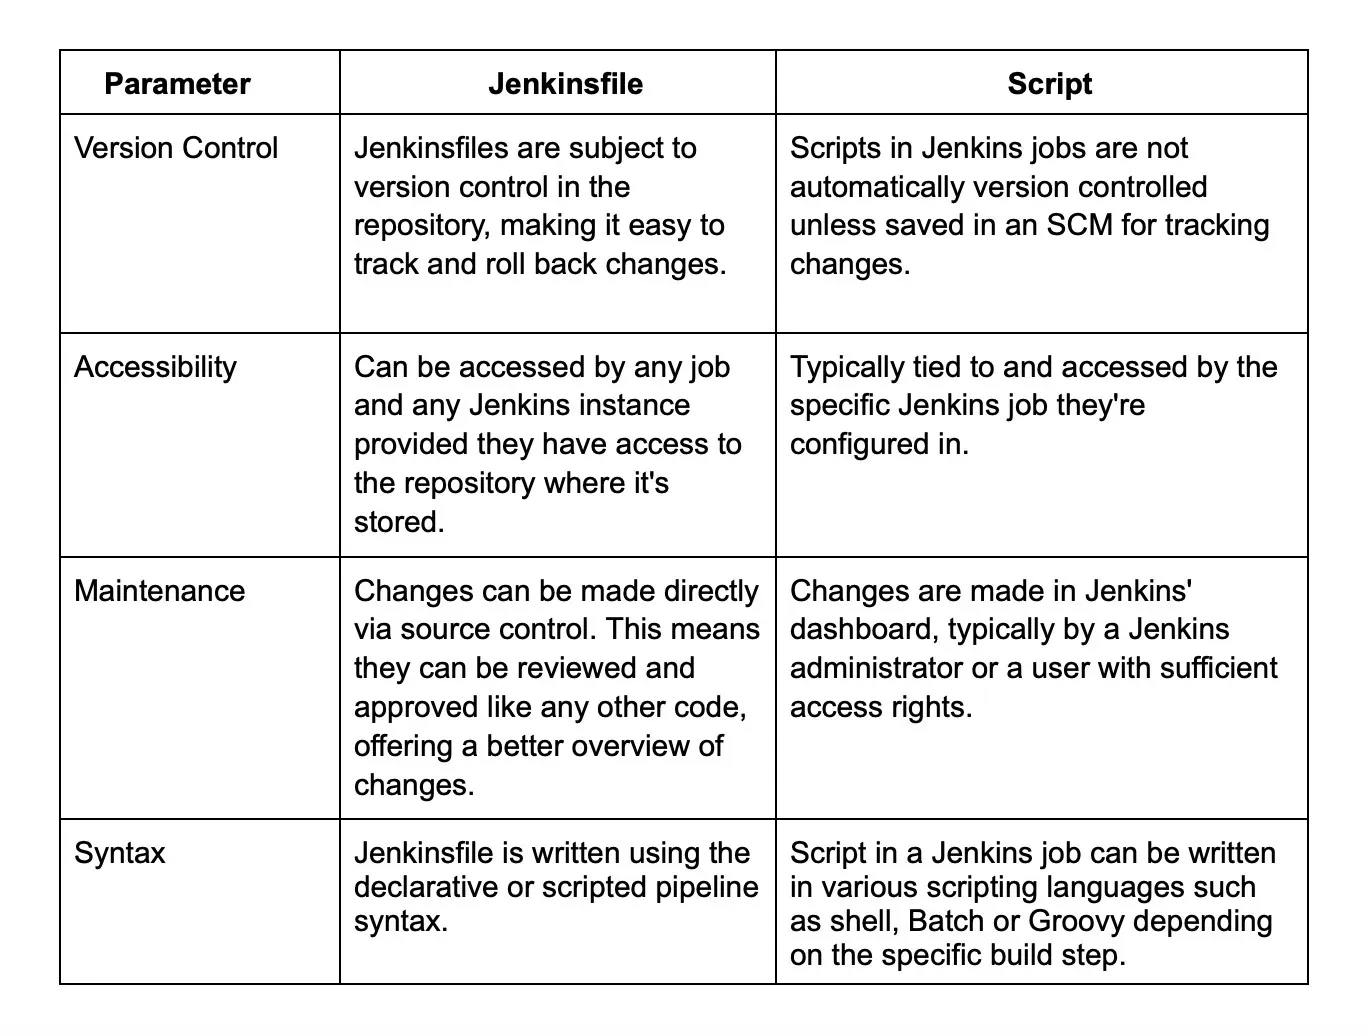
30. What is the concept of Jenkinsfile?
A Jenkinsfile is a text file that contains the definition of a Jenkins Pipeline and is checked into source control. Written in Groovy DSL, it's essentially the "blueprint" for your Jenkins Pipeline, specifying what stages should execute and what actions should happen at each stage.
31. Explain a plugin in Jenkins and its importance?
A plugin in Jenkins is essentially a software module that adds specific features and capabilities to the system. It's a way to extend Jenkins's default functionality by installing additional tools directly from the Jenkins Plugin Manager.
With over 1500 publicly available plugins, Jenkins provides a highly versatile platform suitable for meeting a wide range of CI/CD requirements. This diverse catalog of plugins is one of the main reasons Jenkins has gained immense popularity.
The importance of plugins in Jenkins lies in their capabilities to:
Project Customization: Plugins allow you to customize your CI/CD pipeline to cater to specific project needs, be it the type of project, the tools used in the project, or the processes adhered to by the team.
Integration: Plugins allow Jenkins to integrate with a multitude of development, testing, and deployment technologies, as well as communication tools. Examples include Git, Docker, Kubernetes, Azure, AWS, Slack, and more.
Added Functionality: Plugins can provide additional build steps, post-build actions, UI improvements, reporting capabilities, and more.
Ease of Installation and Management: Plugins are easy to install, update, and manage from the Jenkins UI. A feature of Jenkins allows checking the compatibility of plugins with the current Jenkins version, thereby ensuring smooth operation.
32. How can you install and configure a Slack notification plugin?
- On the Jenkins dashboard click on "Manage Jenkins".
- Now click on "Manage Plugins" and select the "Available" tab.
- Now find "Slack Notification". Install it.
- Next go to the job configuration page and add a "Post-build Action" to "Send build notifications to Slack".
- Enter the Slack credentials and select the channel to send notifications to.
33. Explain the build in Jenkins.
In Jenkins, a "build" refers to a single run of a project. This generally involves many stages: checking out code from a version control system, compiling the code, running unit tests or static code analysis, packaging the compiled code into deployable artifacts and, in some cases, deploying the application.
Each time Jenkins runs a build of a project, it will have a unique build number, and it will maintain a history of execution status, console output, and any artifacts saved or test results reported. It helps in identifying when and where a problem occurred and fixing it more effectively.
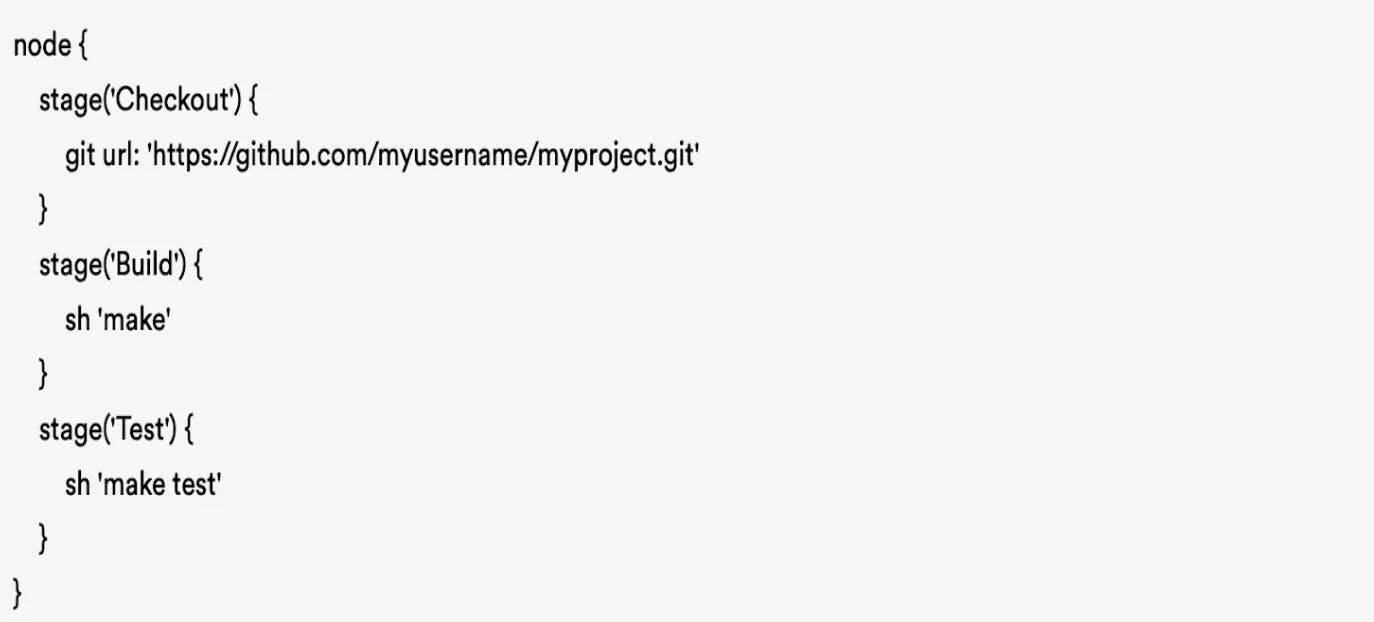
Here's an example of a build trigger using the Jenkins REST API

34. Tell me about a job in Jenkins, and how can you create one.
A Job in Jenkins is a user-defined term for a set of operations that Jenkins needs to perform, often referred to as a project. It can range from building software, running tests, deploying code, running scripts, or a combination of such tasks. Each job, when configured and run, results in a 'build', representing an execution of the job.
Steps to follow to create a job in Jenkins
- Visit the Jenkins dashboard and find "New Item".
- Type the name of the job and select the job type.
- Now configure the job by adding build steps, triggers, and post-build actions.
- Save this configuration.


Wrapping up
With the above set of questions, we have tried to offer popular 105 Jenkins interview questions that not only help recruiters gauge the right candidate but also help candidates ace the interview.
While this exhaustive list will help reduce your hiring time, you can further ease the process by taking the help of Turing. The company helps you source, vet, match, and manage the world’s best remote software developers.
Conversely, if you are a developer looking for a Jenkins job in elite US company, the Turing test is for you!
Hire Silicon Valley-caliber Jenkins developers at half the cost
Turing helps companies match with top quality remote JavaScript developers from across the world in a matter of days. Scale your engineering team with pre-vetted JavaScript developers at the push of a buttton.
Tired of interviewing candidates to find the best developers?
Hire top vetted developers within 4 days.


Leading enterprises, startups, and more have trusted Turing

Check out more interview questions
Hire remote developers
Tell us the skills you need and we'll find the best developer for you in days, not weeks.