Maximizing Your Code Reuse With Flutter Hooks
•5 min read
- Languages, frameworks, tools, and trends

In the flutter hooks tutorial, we delve into how you can install and construct an animation demo utilizing hooks in Flutter, crucial for Flutter developer jobs. Also, we can learn more about managing animation, manipulating animation, animation controllers, and listening to updates. There are two types of animations that Flutter supports which are as below:
- Physics-based animation: It will allow you to interact with an application more interactively and realistically.
- Tween animation: It is in betweening. The animation should define the start and the endpoint. It will have a start value and it reaches the end value through various values.
An animation controller is called when its value changes, the Ticker will call the tick function in each frame. After each tick, it will provide a callback function after starting it. Then, the ticker listener is the controller.
Flutter hooks
Flutter hooks have not received much acknowledgment, but it doesn’t mean it is not worthy. With the help of the flutter_hooks library, we will get a robust way to manage the lifecycle of widgets by increasing code-sharing and reducing code duplication.
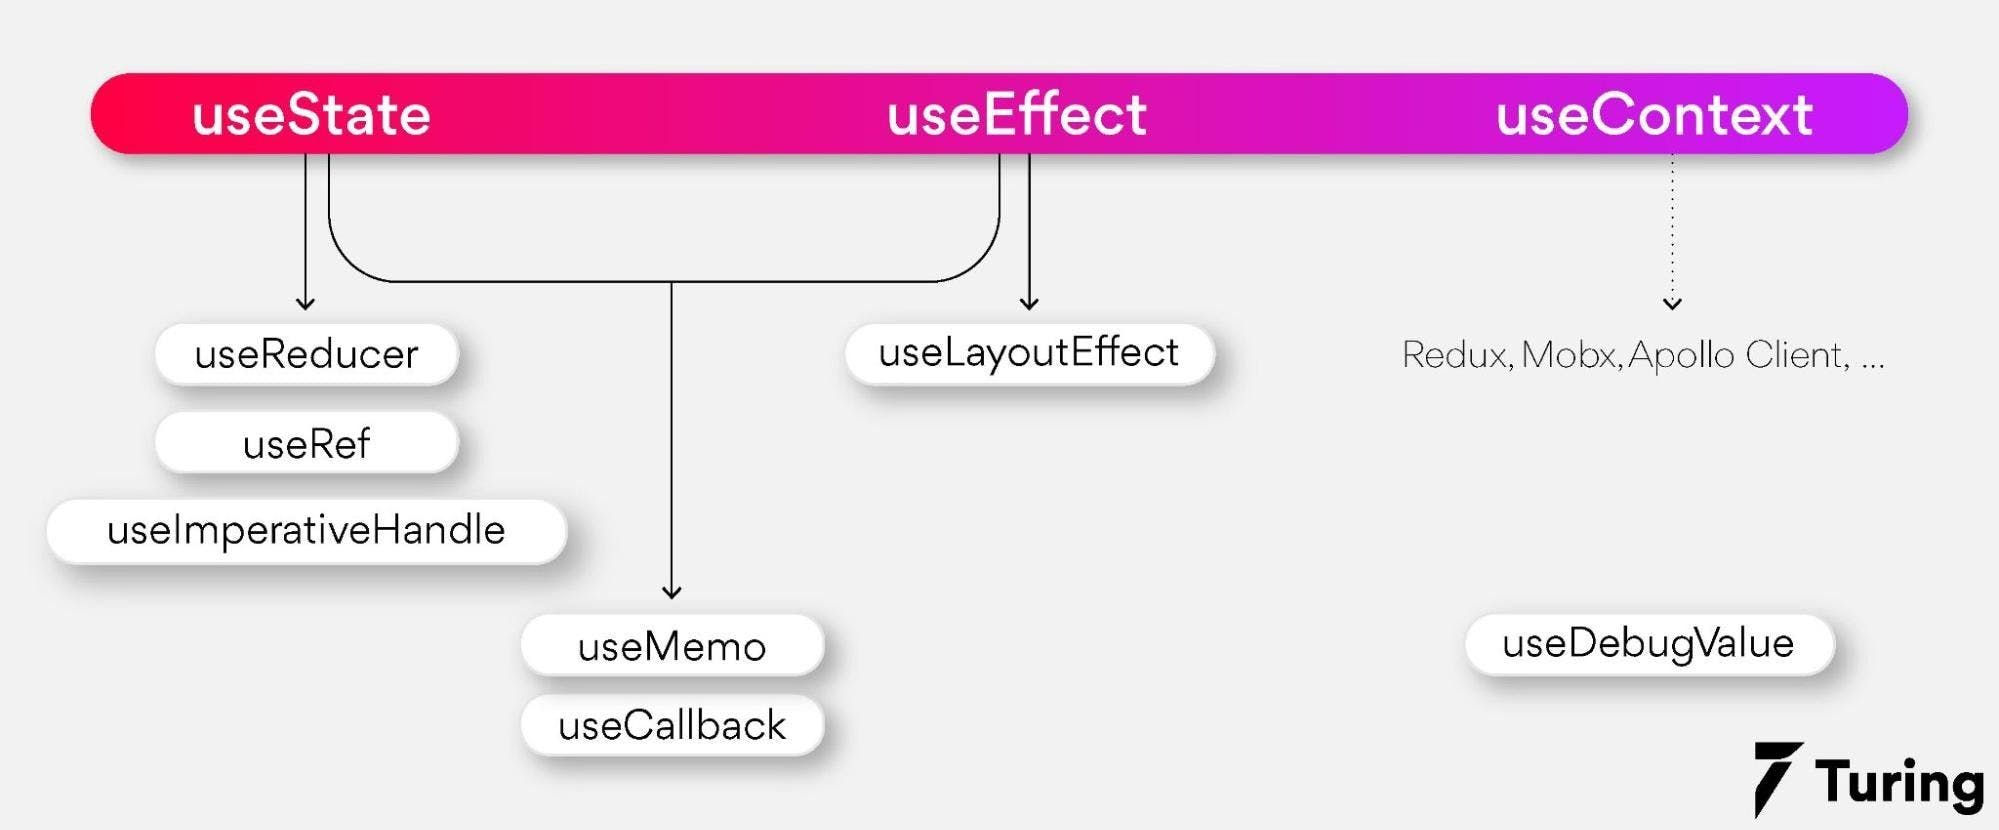
Flutter will provide in-built hooks as below:
- useState hook will manage local states in applications
- useRef hook will create an object which has one mutable property
- useValueChanged hook will watch a value and help you with summoning a callback when there is a change in the value
- useCallback hook for caching a function instance
- useEffect hook for fetching data from a server, and setting the fetch to the local server
- useContext hook will obtain the BuildContext of the building HookWeight
- useMemoized hook will memoize complicated functions to achieve optimal application performance
We will use the useEffect hook for redirecting it after some time and the useAnimationController hook for creating an instance of the AnimationController. Just like ReactJS flutter will also provide an opportunity to create your custom hooks.
Hooks
The hook is a new kind of object which manages a Widget's lifecycles. It exists for increasing the code sharing between the widgets by removing the duplicates.
Why does this package exist?
StatefulWidget will suffer from a huge problem as it will be difficult to reuse the logic of initState or dispose of it. The best thing about this is when you use hooks you don’t have to worry about initState and dispose methods in your lifecycle of widgets. Also, the package will handle them for you. But when you have used any controller before, you should know about the consequences before proceeding with it.
Examples of hooks
If we explain the above package with examples, it will be more effective. Don’t forget that this package has a lot of out-of-the-box hooks. This will help you to understand more about how common hooks work with examples.
State vs useState
HookWidget is the alternative widget to StatefulWidget. Therefore, when you don’t require the use of StatefulWidget’s boilerplate code. You can now change the StatelessWidget to HookWidget and can easily use the hooks. When you want to use the state in your hook, just make use of the useState method in the build like below:
FutureBuilder vs useFuture & useMemoized
When you need to use the useFuture method, you will need the useMemoizedmethod together with it. When you don’t use it, the flutter hook useFuture method will call the future method constantly. The useMemoized method stores the result on the first call and helps rebuild the widget useMemoized. It will return the previously created instance to solve the problem without calling the future function.
Also, use the useFuture method for handling FutureBuilder itself and provide us the picture of the same for use. You will not be able to see useStream usage as they are the same as useFuture.
TabController vs useTabController
The logic behind both is the same. When you use useTabController in place of TabController.
StatefulWidget’s lifecycle vs useEffect
The useEffect is known synchronously on each build unless keys are specified. When it is the case, the useEffect will be called again when any keys value is changed. You can use the lifecycle in the HookWidget with the help of useEffect.
The impacts of using useEffect() may be because of a stream subscription, performing HTTP requests, or opening a WebSocket connection. You can do it inside a Hook for canceling them when a widget is there.
The callback process should return a function. It should be summoned when the widget is called for. We can now cancel the subscriptions before the widget is removed from the UI and widget tree. You can also cancel polling, cancel active HTTP connections, unsubscribe a stream, clear timeouts, or cancel WebSocket connections.
AnimationController vs useAnimationController
The flutter_hooks will shine the most when you use the AnimationController. It is because AnimationController requires initState and dispose methods. Also, the controller requires SingleTickerProviderStateMixin, you should make your widget stateful. Whereas the useAnimationController will provide you all the power on it. You just need to set the duration and enjoy your coffee, as the hook will handle everything else for you.
This is one of the examples of hooks. We can complete this article by stating that with the help of flutter hooks we can reuse that AnimationController and by adding the line below.
Use custom hooks
Two ways will help you in delivering custom hooks as a custom class or as a function.
The function is the most common way of writing hooks. As the hooks are inherently composed, with the help of function you can combine other hooks for creating a customized one. Below is an example of using TabController as a function:
As the hooks are complicated, you may convert them into class. When you consider hook as a class, it will become similar to that of a State. Also, the hook’s lifecycle methods can be in harmony with the State. It will be great when you practice wrapping the call of the class hook to a method like useTabController. Below is the example for the use of useTabController:
For handling the TabController, we should use the ticker provider. The ticker provider will help you in delivering the code by using the useSingleTickerProvider hook. The useSingleTickerProvider hook will take ticker provider arguments like initialIndex and length as keys. It will ensure that the provider will be recreated when there is a change in the keys.
We use useMemoized for caching TabController. It can be done once in the lifetime of a widget. But, we should pass the tickerProvider as a key when we want to be sure if the controller will recreate at the change of tickerProvider. When you want to discard the TabController, you should highly rely on the useEffect hook. It will help to dispose of the controller when required or when a new TabController is provided. With this tutorial, you will now have an idea about how flutter hooks will help you in maximizing your code reuse.

Author
Aswini R
Aswini is an experienced technical content writer. She has a reputation for creating engaging, knowledge-rich content. An avid reader, she enjoys staying abreast of the latest tech trends.