Hamburger_menu.svg

FOR DEVELOPERS

How to Build a React Native Camera App

How To Build A React Native Camera App

Building a react native camera app from scratch is a challenging task. If you're new to react native, it can be overwhelming and confusing. You don't want to end up on GitHub, staring at big empty boxes of code as you try and figure out how to make one.

There are a lot of things that you have to learn to complete the camera app successfully. In this blog post, you'll learn about everything related to building a native camera application for iOS and Android.

Before we get started, it is important to mention that this tutorial is a step-by-step guide for developers who are relatively new to the react-native camera app.

Understanding react native before getting into camera app

Developers use react native framework to write native applications for iOS and Android that are natively rendered using JavaScript. The react framework, which was developed by Facebook, is primarily focused on mobile platforms instead of browsers.

This means that web developers use JavaScript libraries to create native-looking mobile applications. Since react allows you to write and share most of the code between platforms, you can develop Android and iOS apps simultaneously with react native.

A combination of JavaScript and XML markup called JSX also can be used to write applications using react native. As your app will use mobile UI components instead of web views, it will imitate the look and feel of any other mobile app.

Also, react native provides JavaScript interfaces for platform APIs, which allows you to access platform features like the camera and location on your phone. With the release of react native and the growing popularity of the platform, it has become easy to build a robust app.

React native offers short development times as one of its most appealing features. The framework offers many readymade components that will help you speed up the process. Compared to building the same app for iOS and Android, developers can save approximately 40% of the effort using react native.

React native has been used by big brands like Facebook, Airbnb, and Skype for many years, so its reliability becomes obvious. It's a framework that helped build and strengthen the social and service apps we know today.

React native currently supports iOS and Android, and it's expected that other platforms will be added soon.

What is a react native camera (RNCamera)?

A react native camera app uses the functionality of your iOS or Android camera and enables you to use the package of react native on top of it. This module is maintained by the react native community and provides support for:

  • Face Detection.
  • Videos.
  • Text Recognition.
  • Photographs.
  • Barcode Scanning.

Additionally, it provides some helper methods that can enable the react native application to communicate with the native system by utilizing the hardware on the device.

How to use react native camera?

Camera functionality needs to be implemented in react native apps using react native camera (RNCamera). This component helps you interact with the hardware of the OS through a few simple functions. By using these functions, you can create apps without worrying about native code. The following features are available:

  • Videos
  • Photographs
  • Face detection
  • Barcode detection

Creating your first app using RNCamera

Creating app using RNCamera.webp

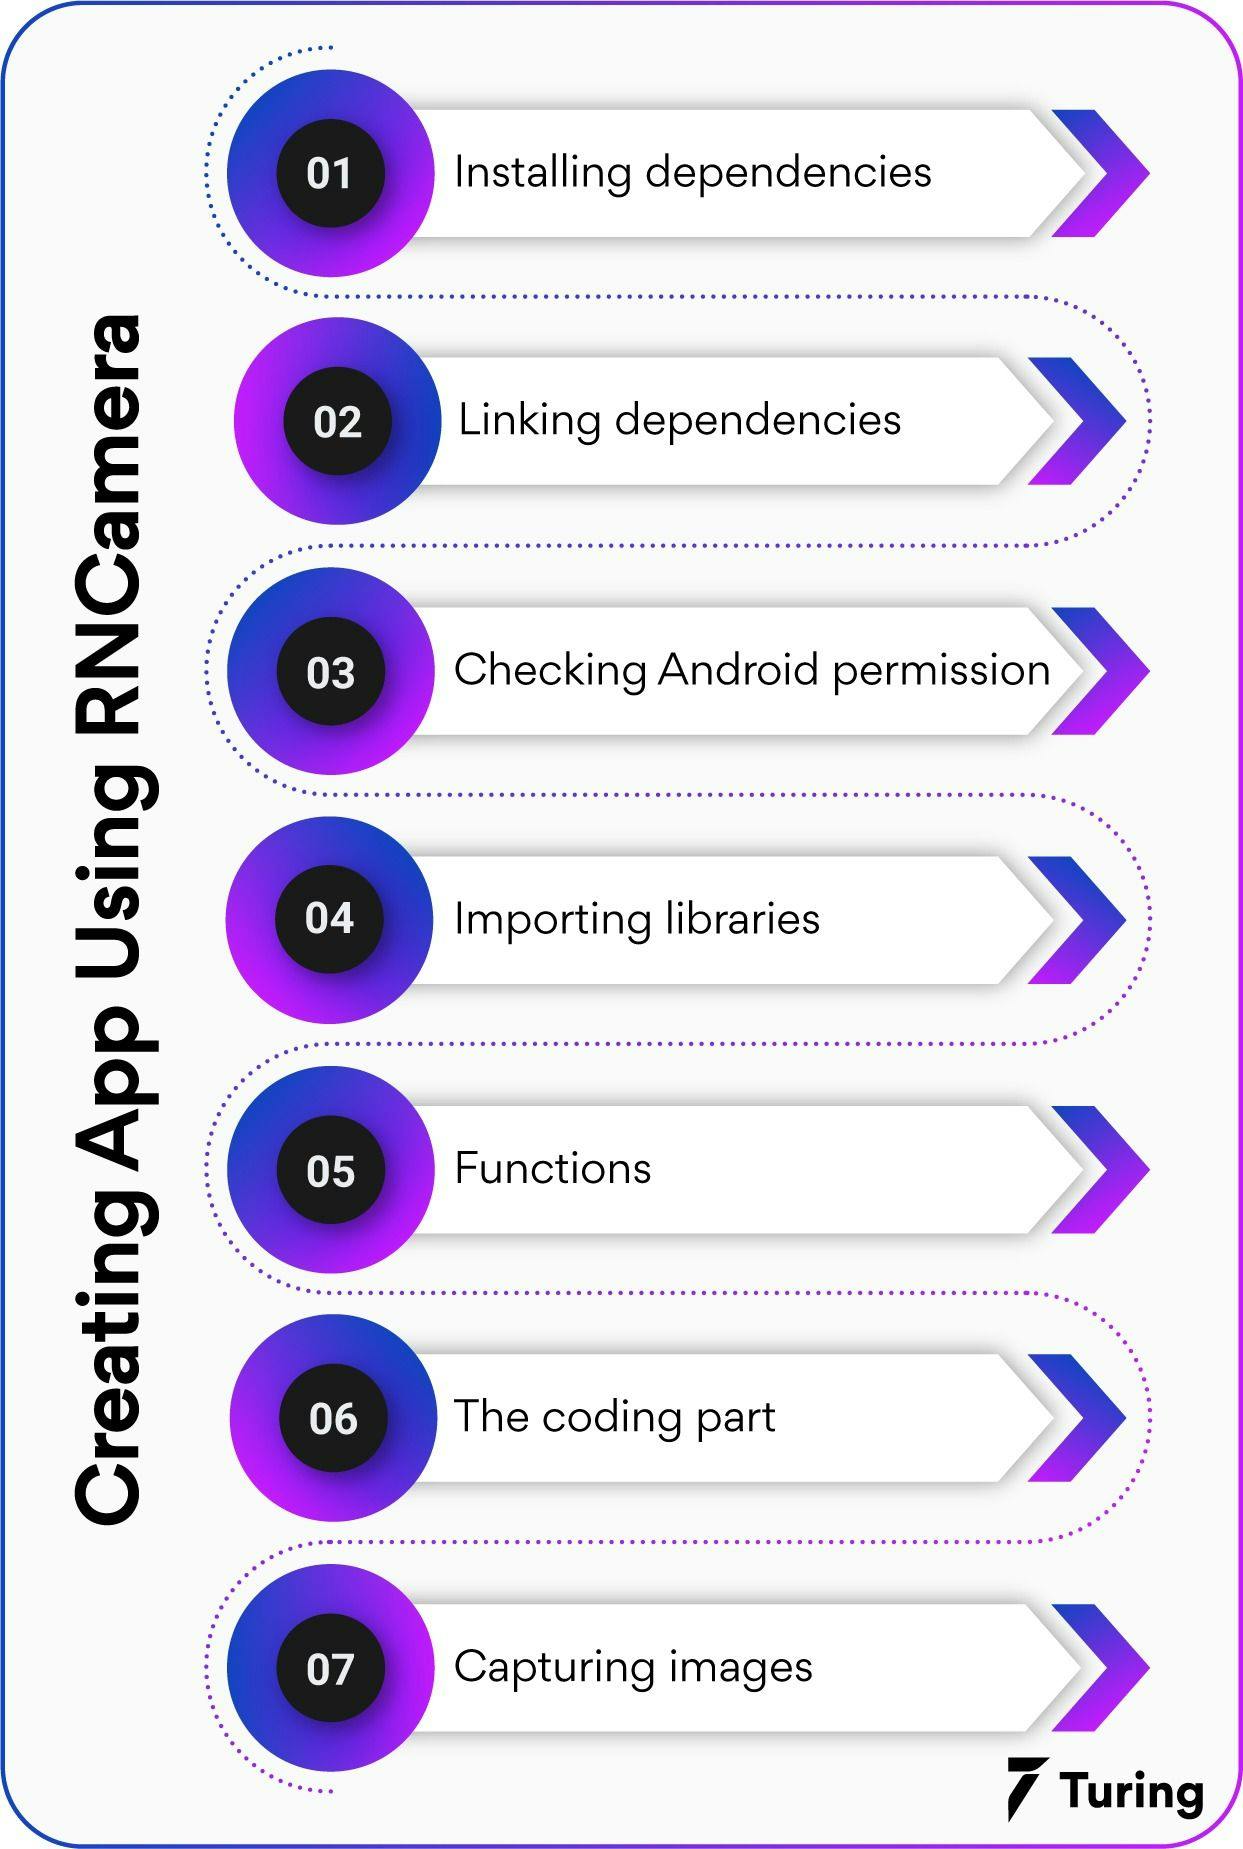
Before starting, make sure you have installed an updated react-native in your system. We will begin by creating a react native project with the command below in a terminal window.


react-native init RNCamera

Installing dependencies

It is necessary to install react-native-image-picker first. Running the following command will add the react native image picker to the project


npm install react-native-image-picker --save
or
yarn add react-native-image-picker

Linking dependencies

For Android and iOS projects, we have to link some dependencies to the react-native-image-picker library. Therefore, we need to run the following command.


react-native link react-native-image-picker

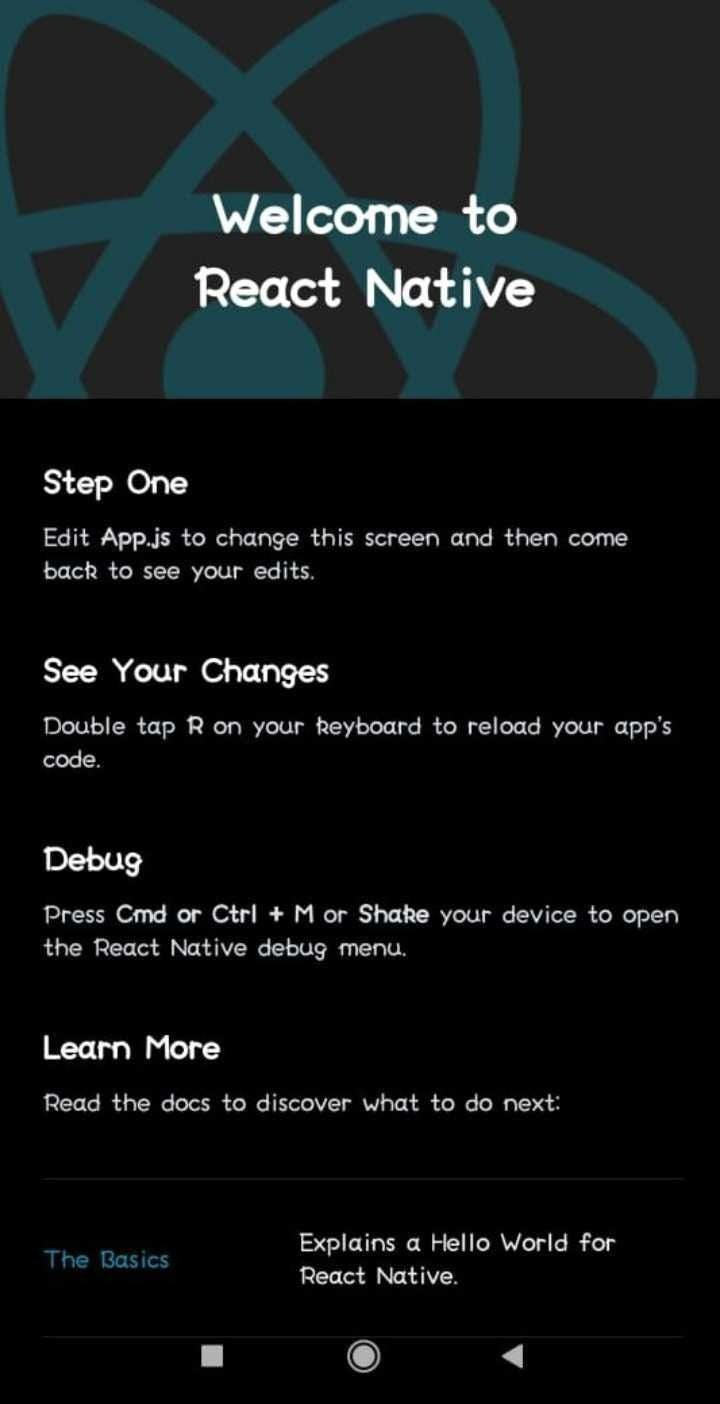
Our first react native camera example will now be deployed to our smartphone.


cd RNCamera
react-native run-android

You should see something like this on your device:

React native app.webp

Android permission: checked

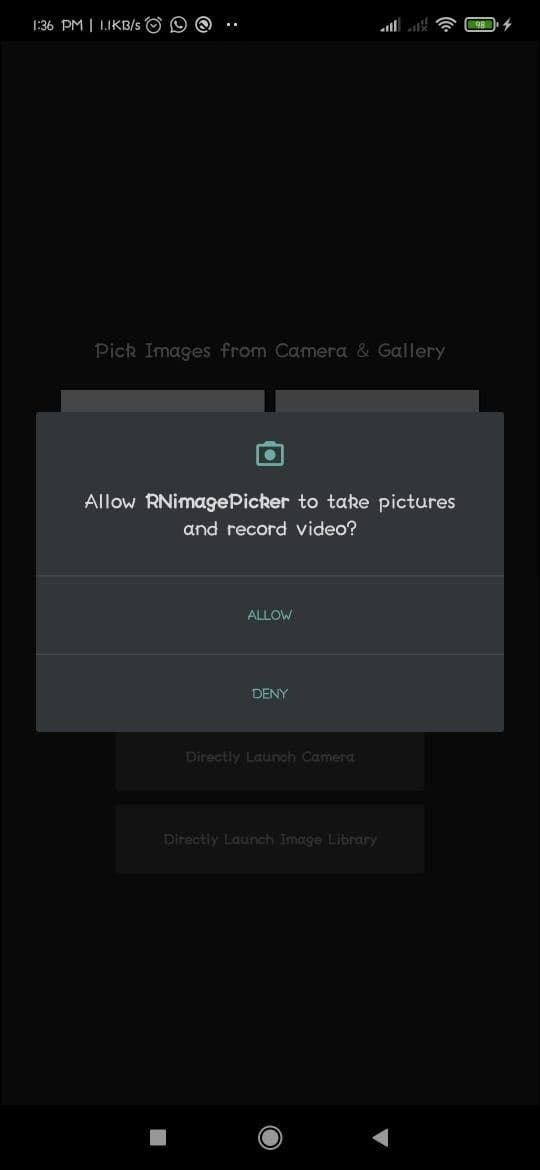
You will also need to add some permissions on Android.

Next, you will see how to grant permission to Android to use the camera and read the storage. To select an image from the gallery, we're going to use a native API camera. To access the camera and gallery, we need to give the permissions. The AndroidManifest.xml file will contain the following permissions

Path to AndroidManifest.xml

Project → android → app → src → debug → AndroidManifest.xml


<uses-permission android:name="android.permission.CAMERA"/>
<uses-permission android:name="android.permission.WRITE_EXTERNAL_STORAGE"/>

Then, open another file android/app/build.gradle and add the codes given below:


android {
 ...
 defaultConfig {
 ...
 // insert this line
 missingDimensionStrategy 'react-native-camera', 'general'
 }
}

Importing libraries

As a first step, let us attempt to test the RNCamera module. Start by adding the following import statements to App.js. No fancy stuff here. All you need to do is import the components like view, alert, and RNCamera from react-native-camera. Importing essential libraries is the prime step in every coding job. Here are the libraries that we are going to use to create the project.


import React, { Fragment, Component } from 'react';
import * as ImagePicker from "react-native-image-picker";
import {PermissionsAndroid} from 'react-native';

import {
  SafeAreaView,
  StyleSheet,
  ScrollView,
  View,
  Text,
  StatusBar,
  Image,
  Button,
  Dimensions,
  TouchableOpacity
} from 'react-native';

import {
  Header,
  LearnMoreLinks,
  Colors,
  DebugInstructions,
  ReloadInstructions,
} from 'react-native/Libraries/NewAppScreen';

Functions

Let’s divide the app code into two different sections for easy understanding. Just like one given below.

Directly launch camera

The code below implements the functionality of launching the camera directly when you click "direct launch camera". It will open the camera directly and display the clicked image on the image component.


launchCamera = () => {
    let options = {
      storageOptions: {
        skipBackup: true,
        path: 'images',
      },
    };
    ImagePicker.launchCamera(options, (response) => {
      console.log('Response = ', response);

      if (response.didCancel) {
        console.log('User cancelled image picker by pressing back button');
      } else if (response.error) {
        console.log('ImagePicker Error: ', response.error);
      } else if (response.customButton) {
        console.log('User selected custom button: ', response.customButton);
        alert(response.customButton);
      } else {
        const source = { uri: response.uri };
        console.log('response', JSON.stringify(response));
        this.setState({
          filePath: response,
          fileData: response.data,
          fileUri: response.uri
        });
      }
    });

  }

Directly launch image library

You can use the following code to directly launch the image library. A selected image will be displayed on the image component after it opens the image library.


launchImageLibrary = () => {
    let options = {
      storageOptions: {
        skipBackup: true,
        path: 'images',
      },
    };
    ImagePicker.launchImageLibrary(options, (response) => {
      console.log('Response = ', response);

      if (response.didCancel) {
        console.log('User canceled image picker by pressing back button');
      } else if (response.error) {
        console.log('ImagePicker Error: ', response.error);
      } else if (response.customButton) {
        console.log('User selected custom button: ', response.customButton);
        alert(response.customButton);
      } else {
        const source = { uri: response.uri };
        console.log('response', JSON.stringify(response));
        this.setState({
          filePath: response,
          fileData: response.data,
          fileUri: response.uri
        });
      }
    });

  }

The Coding Part

After combining above sections the entire code will look like:
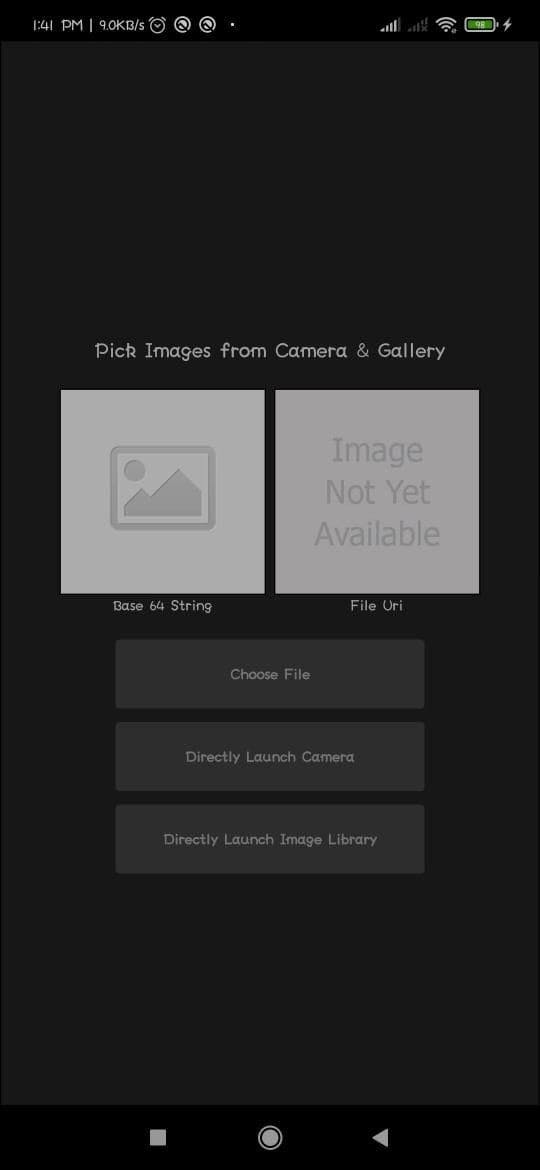

import React, { Fragment, Component } from 'react';
import * as ImagePicker from "react-native-image-picker";
import {PermissionsAndroid} from 'react-native';

import {
  SafeAreaView,
  StyleSheet,
  ScrollView,
  View,
  Text,
  StatusBar,
  Image,
  Button,
  Dimensions,
  TouchableOpacity
} from 'react-native';

import {
  Header,
  LearnMoreLinks,
  Colors,
  DebugInstructions,
  ReloadInstructions,
} from 'react-native/Libraries/NewAppScreen';

const options = {
  title: 'Select Avatar',
  customButtons: [{ name: 'fb', title: 'Choose Photo from Facebook' }],
  storageOptions: {
    skipBackup: true,
    path: 'images',
  },
};
export default class App extends Component {
  constructor(props) {
    super(props)
    this.state = {
      filepath: {
        data: '',
        uri: ''
      },
      fileData: '',
      fileUri: ''
    }
  }

  chooseImage = () => {
    let options = {
      title: 'Select Image',
      customButtons: [
        { name: 'customOptionKey', title: 'Choose Photo from Custom Option' },
      ],
      storageOptions: {
        skipBackup: true,
        path: 'images',
      },
    };
    ImagePicker.showImagePicker(options, (response) => {
      console.log('Response = ', response);

      if (response.didCancel) {
        console.log('User canceled image picker by pressing back button');
      } else if (response.error) {
        console.log('ImagePicker Error: ', response.error);
      } else if (response.customButton) {
        console.log('User selected custom button: ', response.customButton);
        alert(response.customButton);
      } else {
        const source = { uri: response.uri };

        // You can also display the image using data:
        // const source = { uri: 'data:image/jpeg;base64,' + response.data };
        // alert(JSON.stringify(response));s
        console.log('response', JSON.stringify(response));
        this.setState({
          filePath: response,
          fileData: response.data,
          fileUri: response.uri
        });
      }
    });
  }

  launchCamera = () => {
    let options = {
      storageOptions: {
        skipBackup: true,
        path: 'images',
      },
    };
    ImagePicker.launchCamera(options, (response) => {
      console.log('Response = ', response);

      if (response.didCancel) {
        console.log('User canceled image picker by pressing back button');
      } else if (response.error) {
        console.log('ImagePicker Error: ', response.error);
      } else if (response.customButton) {
        console.log('User selected custom button: ', response.customButton);
        alert(response.customButton);
      } else {
        const source = { uri: response.uri };
        console.log('response', JSON.stringify(response));
        this.setState({
          filePath: response,
          fileData: response.data,
          fileUri: response.uri
        });
      }
    });

  }

  launchImageLibrary = () => {
    let options = {
      storageOptions: {
        skipBackup: true,
        path: 'images',
      },
    };
    ImagePicker.launchImageLibrary(options, (response) => {
      console.log('Response = ', response);

      if (response.didCancel) {
        console.log('User cancelled image picker');
      } else if (response.error) {
        console.log('ImagePicker Error: ', response.error);
      } else if (response.customButton) {
        console.log('User tapped custom button: ', response.customButton);
        alert(response.customButton);
      } else {
        const source = { uri: response.uri };
        console.log('response', JSON.stringify(response));
        this.setState({
          filePath: response,
          fileData: response.data,
          fileUri: response.uri
        });
      }
    });

  }

  renderFileData() {
    if (this.state.fileData) {
      return <Image source={{ uri: 'data:image/jpeg;base64,' + this.state.fileData }}
        style={styles.images}
      />
    } else {
      return <Image source={require('./assets/dummy.png')}
        style={styles.images}
      />
    }
  }

  renderFileUri() {
    if (this.state.fileUri) {
      return <Image
        source={{ uri: this.state.fileUri }}
        style={styles.images}
      />
    } else {
      return <Image
        source={require('./assets/galeryImages.jpg')}
        style={styles.images}
      />
    }
  }
  render() {
    return (
      <Fragment>
        <StatusBar barStyle="dark-content" />
        <SafeAreaView>
          <View style={styles.body}>
            <Text style={{textAlign:'center',fontSize:20,paddingBottom:10}} >Pick Images from Camera & Gallery</Text>
            <View style={styles.ImageSections}>
              <View>
                {this.renderFileData()}
                <Text  style={{textAlign:'center'}}>Base 64 String</Text>
              </View>
              <View>
                {this.renderFileUri()}
                <Text style={{textAlign:'center'}}>File Uri</Text>
              </View>
            </View>

            <View style={styles.btnParentSection}>
              <TouchableOpacity onPress={this.chooseImage} style={styles.btnSection}  >
                <Text style={styles.btnText}>Choose File</Text>
              </TouchableOpacity>

              <TouchableOpacity onPress={this.launchCamera} style={styles.btnSection}  >
                <Text style={styles.btnText}>Directly Launch Camera</Text>
              </TouchableOpacity>

              <TouchableOpacity onPress={this.launchImageLibrary} style={styles.btnSection}  >
                <Text style={styles.btnText}>Directly Launch Image Library</Text>
              </TouchableOpacity>
            </View>

          </View>
        </SafeAreaView>
      </Fragment>
    );
  }
};

const styles = StyleSheet.create({
  scrollView: {
    backgroundColor: Colors.lighter,
  },

  body: {
    backgroundColor: Colors.white,
    justifyContent: 'center',
    borderColor: 'black',
    borderWidth: 1,
    height: Dimensions.get('screen').height - 20,
    width: Dimensions.get('screen').width
  },
  ImageSections: {
    display: 'flex',
    flexDirection: 'row',
    paddingHorizontal: 8,
    paddingVertical: 8,
    justifyContent: 'center'
  },
  images: {
    width: 150,
    height: 150,
    borderColor: 'black',
    borderWidth: 1,
    marginHorizontal: 3
  },
  btnParentSection: {
    alignItems: 'center',
    marginTop:10
  },
  btnSection: {
    width: 225,
    height: 50,
    backgroundColor: '#DCDCDC',
    alignItems: 'center',
    justifyContent: 'center',
    borderRadius: 3,
    marginBottom:10
  },
  btnText: {
    textAlign: 'center',
    color: 'gray',
    fontSize: 14,
    fontWeight:'bold'
  }
});

Capturing Image

React native module allows you to select photos/videos from both device libraries as well as directly from the camera using native user interface. Finally, here are the screens that you will see when using the image picker functionality:

Giving permission to RNImage picker.webp

Capturing image using RNCamera.webp

In this blog, we covered an idea about how you can use react native to build a camera app. We've seen that it's a framework for building hybrid mobile apps using Javascript and React. It's really easy to work with and has lots of built-in components, but sometimes it may lack the needed template for a custom app.

If you are building cross-platform apps with react native, the react-native-camera module can be a great fit to leverage the hardware of your device.

The react native camera API is an evolving piece of technology. There is certainly more that can be done with it further down the line, including taking a photo and integrating with third-party camera apps. However, this is a good starting point to build your own app.

React native apps continue to gain popularity as an alternative to native mobile applications, all thanks to great components built by react community, such as RNCamera.

FAQs

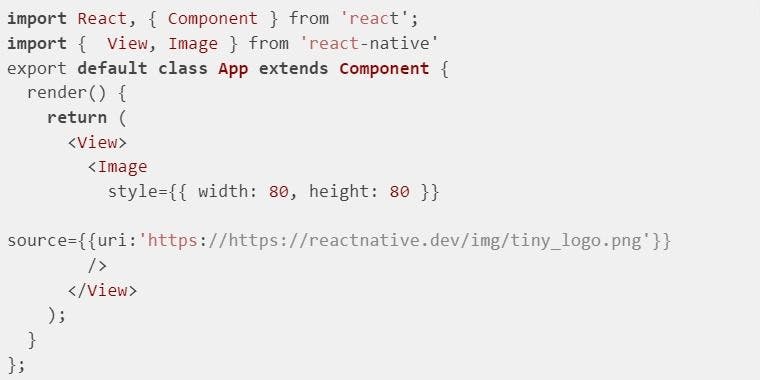
1. How do I get an image from the API in react native?

React has a component named Image. Developers use it for displaying images from different sources. It includes static images, network images and images from local disk.

Following is the example of fetching and displaying an image from API in react native.

Image display from API.webp

Code source

2. How do I add a filter to an image react native?

You can use react-native-image-filter-kit library to add image filters in react native.

You can install this library with the following command.


npm install -s react-native-image-filter-kit

Once you install it, you can use the following code to add sample filters in your app.


import React from 'react';
import {Image, SafeAreaView} from 'react-native';
import {Emboss} from 'react-native-image-filter-kit';
const App = () => (
  <>
    <SafeAreaView />
    <Image
      style={styles.image}
      source={require('./bike.png')}
      resizeMode={'contain'}
    />
    <Emboss
      image={
        <Image
          style={styles.image}
          source={require('./bike.png')}
          resizeMode={'contain'}
        />
      }
    />
  </>
);
const styles = {
  image: {
    width: 250,
    height: 250,
    marginVertical: 15,
    alignSelf: 'center',
  },
};

Code source

The react-native-image-filter-kit library has an inbuilt Emboss feature that applies filters on input images. The react-native-image-filter-kit library contains lots of inbuilt other filters.

3. Does react native cache images?

You can cache images in React Native using the react-native-fast-image library. You can use this React Native component for loading images. This FastImage component caches all loaded images to avoid extra data use.

Following bit of code will let you cache images in the app.


<FastImage
  style={{ width: 100, height: 100 }}
  source={{
    uri: 'https://unsplash.it/200/400?image=12',
    cache: FastImage.cacheControl.cacheOnly
  }}
/>

Code source

4. What is flex in react native?

To fit app layout on different screen sizes, React uses Flexbox algorithm. This Flexbox allows developer design and maintain consistency of layout on different screen sizes.

Flex from Flexbox will tell how your items will adjust in an empty space of layout.

Following example will show how flex can adjust different items in layout.


import React from "react";
import { StyleSheet, Text, View } from "react-native";

const Flex = () => {
  return (
    <View style={[styles.container, {
      // Try setting `flexDirection` to `"row"`.
      flexDirection: "column"
    }]}>
      <View style={{ flex: 1, backgroundColor: "Yello" }} />
      <View style={{ flex: 2, backgroundColor: "red" }} />
      <View style={{ flex: 3, backgroundColor: "black" }} />
    </View>
  );
};

const styles = StyleSheet.create({
  container: {
    flex: 1,
    padding: 10,
  },
});

export default Flex;

Code source

Press

Press

What’s up with Turing? Get the latest news about us here.
Blog

Blog

Know more about remote work. Checkout our blog here.
Contact

Contact

Have any questions? We’d love to hear from you.

Hire remote developers

Tell us the skills you need and we'll find the best developer for you in days, not weeks.