9 Ways to Pass Data Through Angular RouterState
•8 min read
- Languages, frameworks, tools, and trends

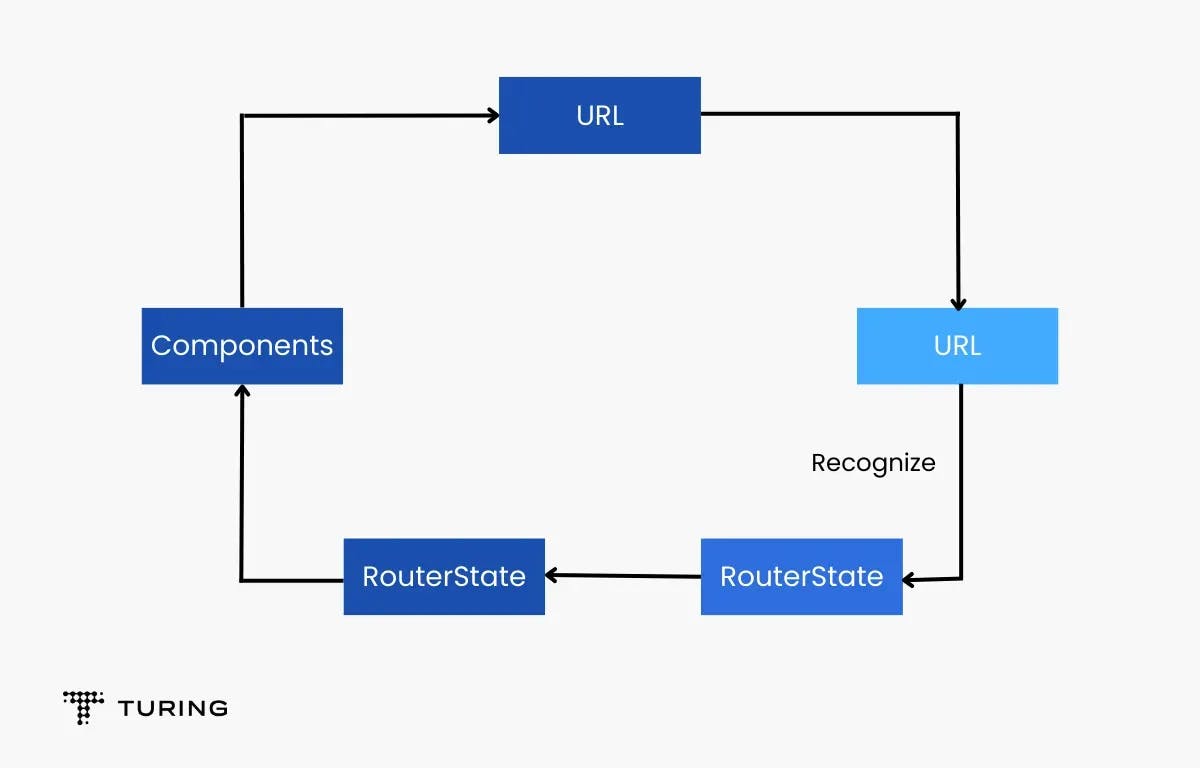
Angular RouterState is the state of the router as a tree of activated routes. It tells how the various components of an application are arranged on the screen to define what should be displayed on it. RouterState represents the state of the router as it keeps changing over time when users navigate from page to page. In this article, we will explore how routing works and how to pass data in Angular.
What is Angular Router?
The router is a crucial part of the Angular platform. It helps visitors navigate from one view to another by looking up the URL of the browser and changing the view accordingly.
You would have often experienced navigating from the home page of LinkedIn to its SignUp or Login page, for example, and finally your home feed, profile page, connections page, and so on. How do the components displayed on the page keep changing according to the page you visit?
Considering that LinkedIn’s front-end was developed using Angular, this is possible through Angular Router.
How does routing work?
Suppose you order your favorite pizza for lunch on a Sunday. You first go to the restaurant’s website, choose your pizza from the list of choices available, select the toppings, and click on the ‘Buy Order’ button. This will take you to the Payments page wherein you will be asked to enter a mode of payment, card details, address, and so on.
In this example, routing refers to going from the view of pizzas to the view for billing. Another case of routing is the navigation from the billing view to OTP (one-time-password) verification, i.e., the user authentication view.
Developers create routes to help users navigate from the first view to the second, the second to the third, and so on until the order for the pizza is successfully placed. Note that some data too must be passed from the current view to the following view. In the above scenario, the name of the pizza, list of toppings, and quantity must be passed from the pizza view to the billing view to place an order for a pizza after you pay for the same.
9 ways to pass data in Angular
Interestingly, there are numerous ways to pass such data from one view to another. In this article, we will explore how to pass data in Angular:

Source: Author
- URL or route parameters
- Query parameters using router. navigate
- Query parameters using queryParamsHandling
- Query parameters using RouterLink
- URL fragment
- Data property
- RouterLink for dynamic data
- Dynamic data using navigateByURL
- Wildcard routes
URL or route parameters
Consider a route /pizza. To fetch details of a particular pizza, the route must look like /pizza/1 or /pizza/2, where the numbers 1 and 2 refer to the unique ID of a pizza. However, this number varies depending on which pizza the user clicked on and, thus, chose to order. Such dynamic values are handled using route parameters (1 and 2 are known as URL or route parameters).
Route parameters can be passed in just two simple steps:
- Define the route
- Define the navigation
1. Define the route
The parameter is defined by adding a forward slash (/), followed by a colon (:) and a placeholder.
Consider the example below:
The above path matches all the pizzas with URLs such as /pizza/1,/pizza/2, and so on.
In case of multiple parameters, add one more /,: and placeholder.
See the example given below:
id, id1, and id2 are placeholders for parameters. They refer to the values taken by the parameters.
2. Define the navigation
Consider the URL:/pizza/:id that fetches details of a particular pizza by its unique ID. The base path (pizza) and the route parameter (id) must be provided to the routerLink directive as shown below:
‘pizza’ and ‘pizzaID’ are passed as the first parameter and second parameter, respectively, to the routerLink array. Thus, pizzaID is dynamically taken from the pizza object, pizzaObject.
Query parameters using router.navigate

Source: Author
Query parameters are those that appear after a question mark (?). The parameters and their corresponding values are separated by an equal to (=) sign. Consider the URL "http://localhost:4200/pizzas?order=popular" to display the pizzas ordered by most users.
The code to achieve the above URL is as follows:
Query parameters are set using queryParams in Router. navigate. Multiple query parameters can be passed by passing them as comma-separated parameters along with their corresponding values.
Consider the code given below:
The resultant URL will be "http://localhost:4200/pizzas?order=popular&price-range=expensive"
It will display the expensive pizzas ordered by most people.
Query parameters using queryParamsHandling
When a user navigates from one view to another, query parameters are lost. Setting queryParamsHandling to ‘preserve’ or ‘merge’ helps preserve the required query parameters.

Note: This feature is available only for Angular 4+.
For example, routing users from the pizzas page with the query parameter {order:’popular’} to the /billing page - while also preserving the query parameter - can be achieved in Angular with:
The resultant URL will be "http://localhost:4200/billing?order=popular"
As you can see from the URL, the user is taken to the billing page, yet the query parameter from the previous page (order=popular) is retained.
New query parameters can also be merged while still preserving the previous query parameter. Suppose we want to route users to the /billing page while also passing the query parameter {payment:’UPI’}, we can accomplish the same with the following code:
The resultant URL is "http://localhost:4200/billing?order=popular&payment=upi"
Note that the old parameter (order=popular) has been preserved while adding the new parameter (payment=upi).
Query parameters using RouterLink
As shown in the section on URL parameters, if the routerLink directive is used for navigation, query parameters can be used along with it as follows:
Further, ‘preserve’ or ‘merge’ can be added as another attribute to the tag by setting queryParamsHanding accordingly.
URL fragment
URL fragment or hash appears at the end of the URL. It is a link that jumps or, in other words, scrolls down to the content whose ID is the same as that in the fragment of the Angular router. It is also known as a named anchor and is an internal page reference.

Consider the URL careers. com/tech#fullstackdeveloper. It will take us to a page with details on different careers, and under tech careers, information on every specialization. The fragment (fullstackdeveloper) will scroll to the part of the page focusing on fullstackdeveloper under tech. If a user clicks on, say, cybersecurity, the URL will change to careers. com/tech#cybersecurity.
Note that the fragment changed from #fullstackdeveloper to #cybersecurity. The hash, therefore, keeps changing, depending on which tech specialization is clicked on by the visitor.
The corresponding snippet in Angular 10 is as follows:
We add routerOptions with the type ExtraOptions. ExtraOptions is the set of configuration options for a routing module provided in the forward method. Here, extra options can be defined. In our case, scrollPositionRestoration and anchorScrolling are the two extra options used. The scrollPositionRestoration option stores the scroll position and maintains it when we click on the back or forward buttons.
Data property
The Angular route data property helps pass static data to a route. It is an array of key-value pairs and is used to store read-only static data, such as page titles. Consider a route with a data property set as follows:
Here, {id:’1’, name:” Mita”} is the static data passed when the component, StaticComponent, is rendered. Observe that the key-value pairs are strings here (“Angular” and ‘1’) as they are enclosed within quotes.
RouterLink for dynamic data
Dynamic data or user-defined objects can be passed from Angular version 7.2 using the state object stored in History API. The state value can be provided using the routerLink directive or navigateByURL.

The snippet to achieve the the routerLink directive is:
Dynamic data using navigateByURL
An alternative method to pass dynamic data is by using navigateByURL as follows:
Here, the router will add a navigationId property to the state object, so you shouldn’t use a scalar value.
Wildcard routes
The double asterisk sign (**) sets up a wildcard route in Angular. Wildcard routes are essential to handle users navigating to a path not defined in the routes. In that case, the website should route them to ‘Page Not Found’ and so on. As it matches any given path, it should be defined as the last path.
Summary
In this article, we learned nine different ways to pass data through Angular routerstate including URL or Route parameters, using query strings, how to pass static data, how to pass dynamic data and even wildcard routes.
Each of these methods to pass data are useful and should be chosen depending on requirements. Note that you can pass data using a hash if you want to send data within the page, and use query parameters when you need to pass some optional parameters.
FAQs
1. How do I use Angular services to share data between components?
Through services such as routerLink directive, queryParamasHandling, navigateByURL, and router.navigate().
2. Is it a good practice to pass data using Angular?
The best practice to pass data in Angular is through input-output binding. Only if the data does not belong to the parent component should services be used to pass data in Angular.
3. What does router navigate do in Angular?
Navigating with data is achieved using the Router. navigate() method of the Router class to pass data between one component to the next.
4. What is data in route in Angular?
The Angular route data property is used to store any data related to the route in question. This data can be anything such as the user’s debit or credit card details, flavor of pizza, and quantity ordered etc., when considering the example of ordering a pizza online. The data passed from one route to another varies with applications. For instance, in a blog website, it will be the category of articles you chose to read or filters applied, such as recently published articles or most popular articles, etc.
5. What is router navigation in Angular?
Router navigation refers to Angular navigating to route, meaning, Angular navigating from one route to a different route. It is implemented using the router.navigate() method of the Router class.