Training, Testing & Deployment of a Classification Model Using Convolutional Neural Networks and Machine Learning Classifiers
•8 min read
- Languages, frameworks, tools, and trends

Prerequisites:
- Basic knowledge of Python
- Basics of Machine Learning
- Basics of Python based Frameworks such as Numpy, Pandas, Open-CV, etc
In this blog series, we will show you how to train your X-Ray Image Classifier, which can classify the X-Ray images on the basis of infection i.e whether they are Corona Positive, Pneumonia Infected, or Normal. We will train the classification model using Convolutional Neural Networks & Machine Learning Classifiers, further, we will also deploy the trained model on a web app using Django Python Framework.
We will make this series in three parts.
- Creation & Pre-Processing of the Dataset.
- Training & Testing of the model using Hyperparameter Tuning.
- Deploying the model on Django Python Web Framework.
In this tutorial, we will discuss Part-1 only.
So, Let’s get started.
Table of contents
- Introduction to Convolutional Neural Networks
- How to Create a Kaggle API Token?
- Creation of Dataset
- Steps Involved in Dataset Pre-Processing
Introduction
Let’s start with some basics to revise your concepts.
“ What is a Convolutional Neural Network? “
CNN, Convolutional Neural Networks, is a deep-learning-based algorithm that takes an image as an input and then extracts various image identities like edges, color, gradient, orientation by applying various filters or kernels. ConvNet is reducing the image size without losing important image information. They give the right prediction even if the training data is not huge. They are also less computationally expensive as compared to other algorithms. These are some reasons why we prefer ConvNets in our model.
Now, let’s see what all components are involved in the architecture of CNN:
Components of CNN
1. Input Layer - The training process starts by converting the input image from the user to an array of fixed size, for example, 224 x 224 x 3, where 224 represents the pixel value of image height and width represents the (RGB) color channels.
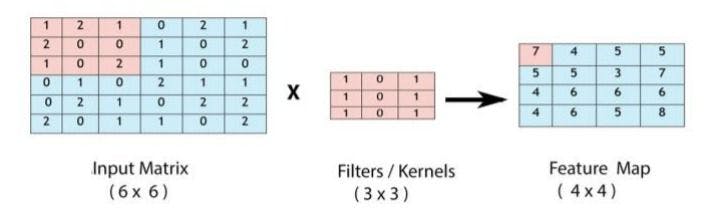
2. Convolutional Layer - Convolutional layer is applied to extract image features such as edges, color, brightness, etc. This operation is carried out by applying different types of filters or kernels as shown below in the given figure, that can automatically train themselves to find specific points in an image through several iterations. After this, a feature map is created which again passes through different layers.
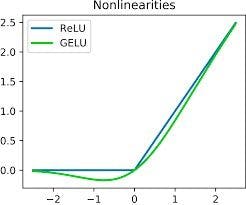
3. ReLU activation function - It stands for Rectified Linear Unit. The output of this layer is f(x) = max (0, x). This is applied to give linearity to the feature map by converting all the negative values to 0. There are also some other activation functions like sigmoid, tanh, etc. The ReLU activation function has been applied on every convolutional layer as well as every dense layer in our architecture.
The mathematical nature of RELU and its one of the variants GELU, are shown in the following figure. You can visualize this function from the given graph.
Now, here one question arises, which is also one of the famous interview questions for most of the popular Deep Learning and Data Science Interviews:
“ Why is ReLU the most commonly used activation function? “
The possible reasons for using the RELU activation function most of the time are as follows:
No vanishing gradient: The derivative of the RELU activation function is either 0 or 1, so it could not be in the range of [0,1]. As a result, the product of several derivatives would also be either 0 or 1, because of this property, the vanishing gradient problem doesn’t occur during backpropagation.
Faster training: Networks with RELU tend to show better convergence performance. Therefore, we have a much lower run time.
Sparsity: For all negative inputs, a RELU generates an output of 0. This means that fewer neurons of the network are firing. So we have sparse and efficient activations in the neural network.
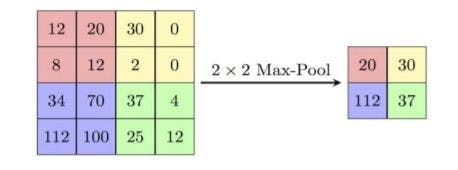
4. Max pooling layer - It extracts the maximum value pixel from a region of interest in a feature map and creates a new map with these maximum values as shown below in the given figure. It is used to decrease the complexity of the image as well as its dimensions. Max Pooling discards the noisy activations from the image without losing accuracy. There are also other pooling techniques like min pooling, average pooling. The Max pooling layer has been applied 3 times in our architecture.
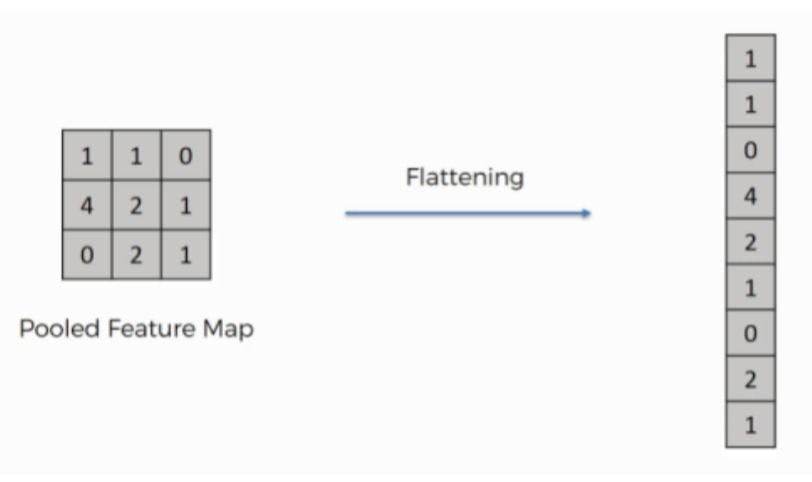
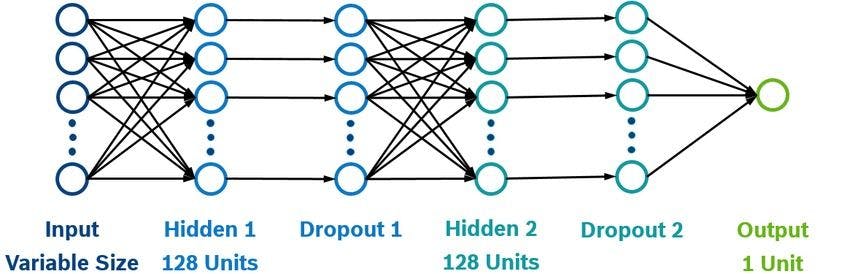
5. Flattening layer - It is applied to convert the 2D array from Convolutional layers into a single long continuous linear array. After that, this linear array is fed to the fully connected layers for the final feature extraction.
6. Dense layer - It uses the output of the flattened layer to classify the images on the basis of their labels. Basically, the features given by convolutional layers are combined by the group of dense layers to create models. The final output of the dense layer has the same number of nodes as the number of output classes.
Now, let’s move to the next thing which is more interesting and our point of interest in this blog.
Creating kaggle API token
The First and basic step is to visit the official Kaggle link. Then try to create your account and then go to Profile/Account to create your API Token. You can use that API token to directly access the dataset in Google Colab without downloading it.
To understand above all the steps which I have mentioned, you can refer to the image below.
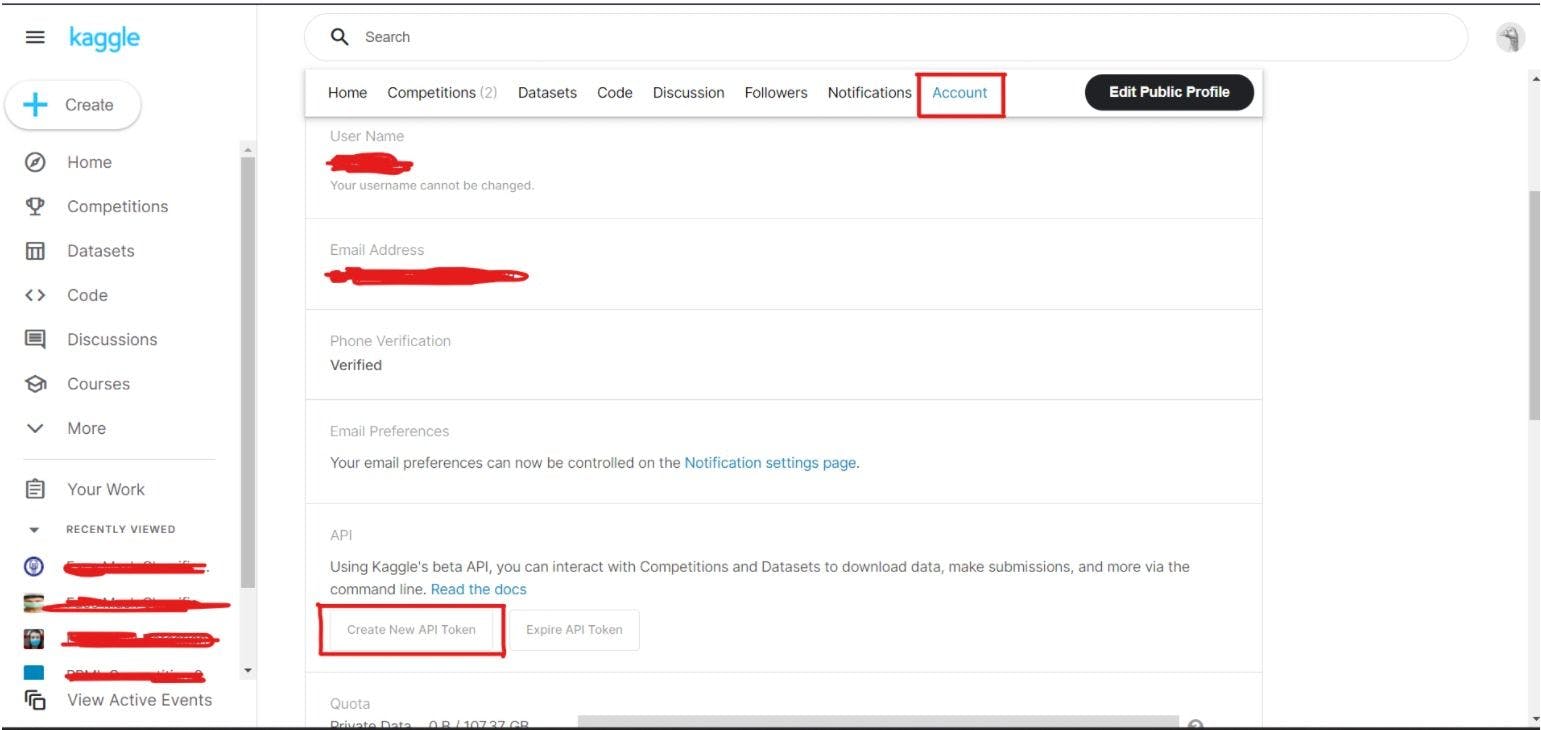
After downloading your API Token, save it on your local machine. We will later use that key in Google Colab.
Creation of dataset
Now create a new project in Google Colab. Also, choose the hardware accelerator for the GPU, this will reduce the time for training of the model.
Go to Runtime/Change Runtime Type, then select the Hardware Accelerator to GPU.
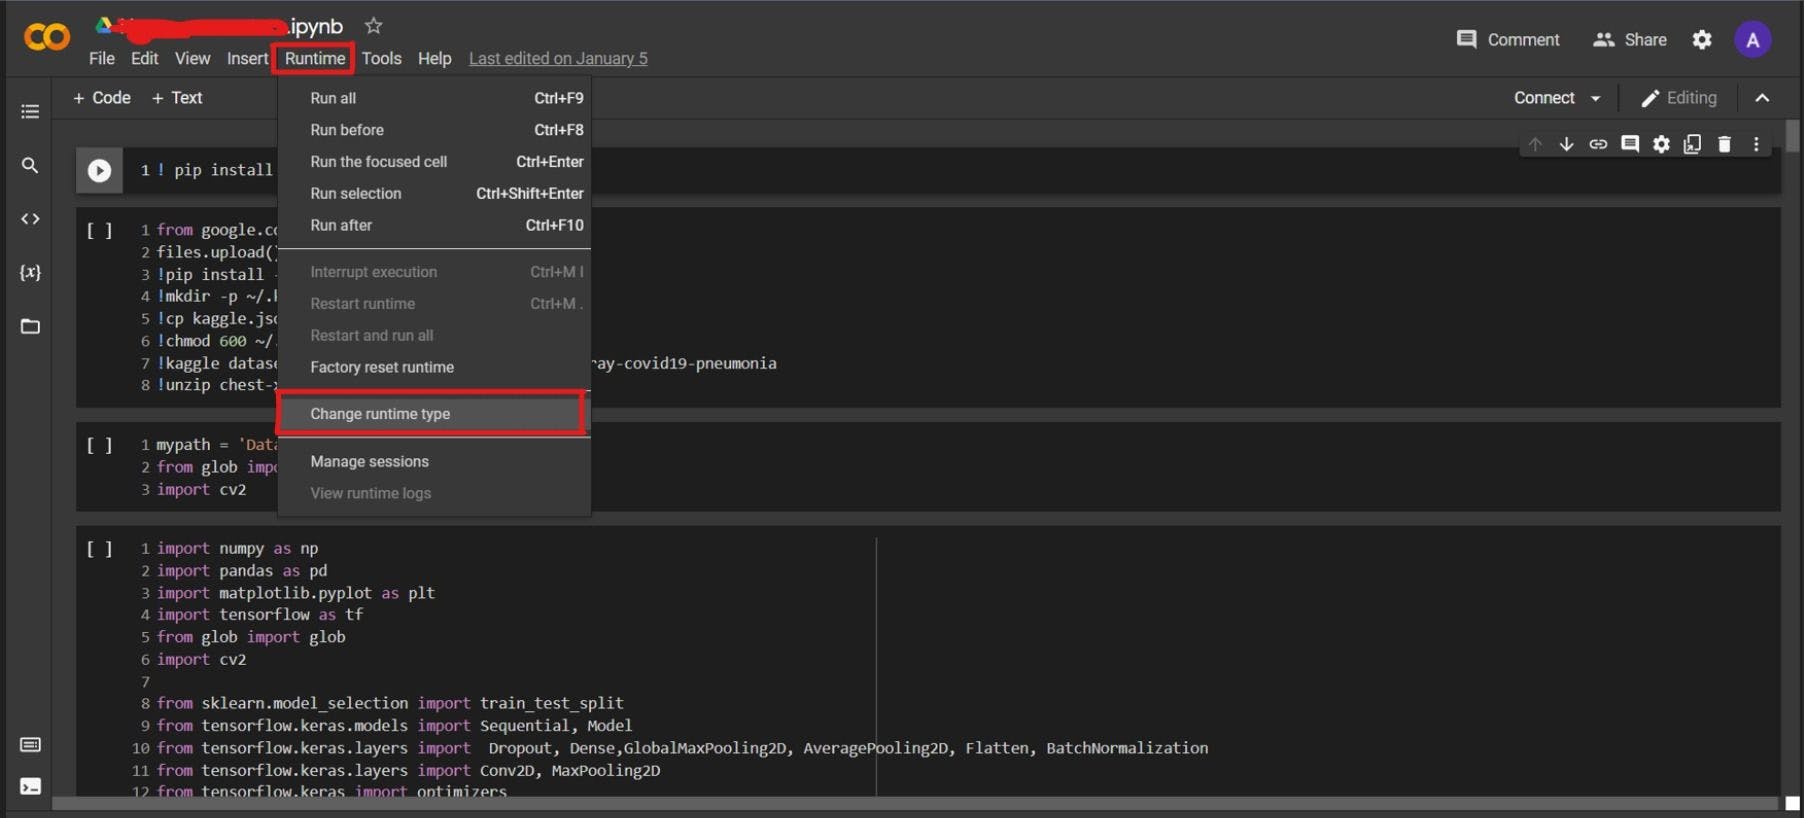
Paste the following code in your Google Colab and upload your previously downloaded Kaggle API here.
from google.colab import files
files.upload()
!pip install -q kaggle
!mkdir -p ~/.kaggle
!cp kaggle.json ~/.kaggle/
!chmod 600 ~/.kaggle/kaggle.json
!kaggle datasets download -d prashant268/chest-xray-covid19-pneumonia
!unzip chest-xray-covid19-pneumonia.zip
Now, import necessary libraries.
import numpy as np
import pandas as pd
import matplotlib.pyplot as plt
import tensorflow as tf
from glob import glob
import cv2
from sklearn.model_selection import train_test_split
from tensorflow.keras.models import Sequential, Model
from tensorflow.keras.layers import Dropout, Dense,GlobalMaxPooling2D, AveragePooling2D, Flatten, BatchNormalization
from tensorflow.keras.layers import Conv2D, MaxPooling2D
from tensorflow.keras import optimizers
from sklearn.metrics import classification_report, confusion_matrix
Now, print the number of images of all the classes in the train and test set.
mypath = 'Data/'
training_covid_images = glob(mypath +'train/' 'COVID19/' + '.jpg')
print("Training Covid Images: ", len(training_covid_images))
print("Testing Covid Images: ", len(testing_covid_images), "\n")
training_normal_images = glob(mypath +'train/' 'NORMAL/' + '.jpg')
print("Training Normal Images: ", len(training_normal_images))
print("Testing Normal Images: ", len(testing_normal_images), "\n")
training_pneumonia_images = glob(mypath +'train/' 'PNEUMONIA/' + '.jpg')
print("Training Pneumonia Images: ", len(training_pneumonia_images))
print("Testing Pneumonia Images: ", len(testing_pneumonia_images))
Output:
This output may vary, depending on the number of images you have taken.
Training Covid Images: 460
Testing Covid Images: 116
Training Normal Images: 1266
Testing Normal Images: 317
Training Pneumonia Images: 3418
Testing Pneumonia Images: 855
Here is the code for image augmentation.
gamma = np.array([0.4,0.55])
power_c = 10
avg_kernel = [3]
kernel = np.ones((3,3),np.float32)/9
lam = 3
aug_COVID19_image = []
filenames = glob(mypath +'train/' 'COVID19/' + '*.jpg')
np.random.shuffle(filenames)
for img in filenames[:300]:
img = cv2.resize(cv2.imread(img), (224,224))
aug_COVID19_image.append(img)
#power_law
for k in range(len(gamma)):
pow_law_img = np.array(power_c*np.power(img,gamma[k]))
aug_COVID19_image.append(pow_law_img)
#average mask
for i in range(len(avg_kernel)):
kernel = np.ones((avg_kernel[i],avg_kernel[i]),np.float32)/(avg_kernel[i]*avg_kernel[i])
avg_img = cv2.filter2D(img,-1,kernel)
aug_COVID19_image.append(avg_img)
#smooth filter for sharpening
smooth_img = cv2.filter2D(img,-1,kernel)
high_freq1 = img-smooth_img
sharp_img_1 = img+(lam*high_freq1)
aug_COVID19_image.append(sharp_img_1)
#canny edge filter for sharpening
canny_edge = cv2.Canny(img,50,225)
high_freq4 = np.zeros(img.shape,'uint8')
#canny edge sharpening
high_freq4[:,:,0] = canny_edge
high_freq4[:,:,1] = canny_edge
high_freq4[:,:,2] = canny_edge
sharp_img_2 = img+(lam*high_freq4)
aug_COVID19_image.append(sharp_img_2)
print("Augmented Covid Images: ", len(aug_COVID19_image))
Pre-Processing of dataset
It could be seen that all the acquired CXR images are of variable shapes and sizes, which increases the difficulty in effective classification. In order to effectively perform the classification process, image pre-processing is performed.
So, we have taken low-resolution colored images and converted all the images into a standard size of 224x224 pixels, and then normalized each pixel value between 0 to 1, to ease the calculation process.
Now, we will store all the training and testing images in an array after pre-processing them.
print("COVID TRAIN: ",len(aug_COVID19_image))
filenames = glob(mypath +'test/' 'COVID19/' + '.jpg')
np.random.shuffle(filenames)
for img in filenames[300:]:
img = cv2.resize(cv2.imread(img), (224,224))
covid_images_test.append(img)
print("COVID TEST: ",len(covid_images_test))
filenames = glob(mypath +'train/' 'PNEUMONIA/' + '.jpg')
np.random.shuffle(filenames)
PNEUMONIA_images_test = [cv2.resize(cv2.imread(img), (224,224)) for img in filenames[:400]]
print("Pneumonia Train: ",len(PNEUMONIA_images_train))
print("Pneumonia Test: ",len(PNEUMONIA_images_test))
filenames = glob(mypath +'train/' 'NORMAL/' + '.jpg')
np.random.shuffle(filenames)
normal_images_test = [cv2.resize(cv2.imread(img), (224,224)) for img in filenames[:317]]
print("Normal Train: ",len(normal_images_train))
print("Normal Test: ",len(normal_images_test))
Now, we will store all the images in a single array and mark labels for all three classes. We will use the following convection for marking the labels.
Label 0 stands for Normal.
Label 1 stands for Covid.
Label 2 stands for Pneumonia.
data_train = np.array(normal_images_train + aug_COVID19_image + PNEUMONIA_images_train).astype('float32')/255
label_train = np.array([0]*len(normal_images_train) + [1]*len(aug_COVID19_image) + [2]*len(PNEUMONIA_images_train))
print("Total Images Train: ", len(label_train))
del normal_images_train
del aug_COVID19_image
del PNEUMONIA_images_train
data_test = np.array(normal_images_test + covid_images_test + PNEUMONIA_images_test).astype('float32')/255
label_test = np.array([0]*len(normal_images_test) + [1]*len(covid_images_test) + [2]*len(PNEUMONIA_images_test))
print(data_test.shape)
print("Total Images Test: ", len(label_test))
del normal_images_test
del covid_images_test
del PNEUMONIA_images_test
By this, our dataset creation & pre-processing part is completed. We will cover the training and deployment of the model using this dataset in Part-2 and Part-3 of this series.
In Part-2 we will discuss how we can train the model using Convolutional Neural Networks and with Machine Learning Classifiers. And later in Part-3, we will show you how you can deploy this model on Django Web Framework.
This completes our today’s discussion on the topic of Convolutional Neural Networks and Dataset Creation. We hope you like our work and later we will come up with more exciting Data Science projects for your better understanding.