How to Create MySQL Connection with Node JS using Sequelize and Express
•6 min read
- Languages, frameworks, tools, and trends

Node.js is a Javascript framework that can be deployed on various internet browsers. It helps in streamlining application development into a single language. In the paradigm of NodeJS Javascript is everywhere, which makes it a welcoming platform for the software community and businesses.
A minimalist and flexible framework of node.js with the express can incorporate different features in developing mobile and web-based applications. It includes setting up middleware, defining routing tables, and dynamically rendering the HTML pages based on passing arguments into standard templates.
Larger SQL databases will be challenging to manage but with the help of sequelize, you can recover them. Sequelize is an object-relational mapper which plots an object syntax into database schemas. This can be done easily with the help of node.js and Javascript.
MySQL connection with Node JS:
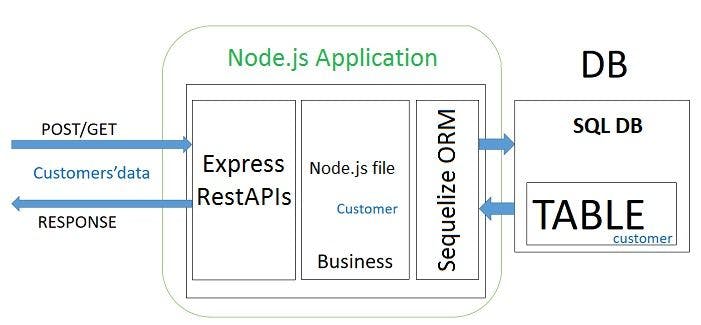
REST (Representational State Transfer) helps in determining how the API appears, while CRUD (Create, Read, Update, and Delete) is simply an acronym for how to function with stored data. Concerning REST API, CRUD is the standard form of HTTP action verbs. When you understand the API in detail you can understand the ways of utilizing node js with MySQL.
To build REST API in a node.js environment, here are the steps to follow:
- Open an Express web server
- Add the configuration data for an existing MySQL database
- Open a sequelize
- In sequelize, create a tutorial model
- Write the controller
- Define all the routes to handle each CRUD function
- Open Postman
- Test the REST CRUD API
After these steps, MySQL connection with node js is completed.
Tools required to build REST CRUD API:
Many available tools can be deployed to build the REST CRUD API effectively. Some of the most widely used tools are as below:
1. Sequelize: A sequelize is a promise-based ORM for Node.js which incorporates robust reading applications, transaction relationships, support, and loading. Sequelize enables users in managing larger SQL databases. It also makes MySQL with node.js viable.
2. Express: Express is a web application framework for node.js. It is considered a de-facto for the node.js framework, mainly because it is open-sourced, free, and minimalist.
3. MySQL: It is an RDBMS (relational database management system). MySQL is backed by the Oracle Corporation and it is available for free. Also, the source code in MySQL can be customized as per your requirements.
Pros of sequelize:
- Sequelize reduces complexity by eliminating the subtle disparities between different SQL implementations.
- It also provides a built-in middleware that allows individual customization to eliminate the errors in each field.
- Sequelize incorporates c promise-built library that allows the user to manage exceptions and unforeseen results better.
- It also questions all the complicated join functions, it helps the user learn about the ‘objects’ connect.
- Lastly, the sync database on a changed model will alter or automatically create tables as per the user’s requirements.
Cons of sequelize:
- NoSQL doesn’t support sequelize as it includes some unexplained issues when additional connections to the database are required.
- Sequelize Cloud generates complicated queries.
Creating a node.js application:
While creating a Node JS application, you need to understand the three components that come with it.
1. Importing the required modules - To load the Node JS modules, you have to import the necessary directives.
2. Creating a server - If you want to attend to your user’s request, you need to create a server.
3. Reading the request & return response - The server you have created will read the HTTP request and respond in return.
When you know these components, it becomes easier to understand the concept of node.js using MySQL. For creating a node.js app, the user has to follow these steps:
1. Creating a folder
2. Opening a json file
3. Initializing the node.js app
Name: (nodejs-Sequelize-mysql-express)
Version: (1.0.1)
Description: Node.js, Sequelize, MySQL and REST APIs with Express
Entry point: (index.js) server.js
Test command:
Git Repository:
Keywords: nodejs, Sequelize, mysql, rest, api, express
Author: Turing.com
License: (ISC)
Is it fine? (yes) yes
4. Installing the modules body-parser, express, sequelize, and mysql2
5. Running the command
6. The final package
Setting up the express.js web server:
Following are the steps to set up the node js with express web server:
1. Open the Windows Explorer.
2. Navigate to the root folder.
3. In the root folder, you can create a new server.js file.
4. Import the cors, body-parser, and the express modules
Body-parser will parse the request for the creation of the req.body object. Express will help in building the REST APIs, while cors will provide express middleware. This will offer various options to cors.
5. Create an express app
6. Use() for adding cors, and body-parser middlewares.
Origin is set as http://localhost:8081
7. Define a GET route - ensure that the route is simple and easy to access.
8. Tune into port 8080 for the incoming request.
9. Run the app with the command: node server.js
10. Open a web browser
11. Go to the “http:// localhost: 8080/”. The specified message will be displayed.
Configuring MySQL database with sequelize:
Configuring the MySQL database with sequelize is a very crucial aspect. It helps in the development and configuration. The combination of node.js and sequelize works based on the configuration. Here are the following steps to perform:
- Open Windows Explorer.
- Navigate to the application folder.
- Within the application folder, you can create a configuration folder as a db.config.js file under:
The first five parameters are mainly intended for MySQL. The pool parameter is an optional one and will be deployed in the sequelize connection pool configuration. The parameters used are explained below:
- Max - maximum number of connections that are permissible in a pool
- Min - minimum number of connections that are permissible in a pool
- Idle - maximum time in milliseconds that can be held idle before the release
- Acquire - maximum time in milliseconds which the pool seeks for making the connection, just before an error message pops up
Initializing a sequelize:
You can perform the following steps when you want to initialize a sequelize:
1. Open the Windows Explorer.
2. Navigate to the app folder.
3. Create a model folder in the app folder
4. In the model folder, create an index.js by entering the below code:
5. When you need to drop the existing tables and the database is required to be resynchronized, enter the force: true code like the below:
Defining the sequelize model:
Follow these steps to define the sequelize model:
- Open the Windows Explorer
- Navigate to the models' folder
- Create a tutorial.model.js file in the models folder using the below code:
In the MySQL database, the model mentioned above will represent a tutorial table. The columns will get generated and published automatically. After the system initializes sequelize, the user will not have to write CRUD functions.
Creating the controller:
Here is a code to create a controller:
Retrieving the objects
To retrieve the objects, you should use the below code:
You must use the req.query.title to receive the query string from the Request and you can consider using the findAll() method for the same.
Retrieving a single object:
To find a single tutorial object with an id, the below code is applicable:
Defining the routes:
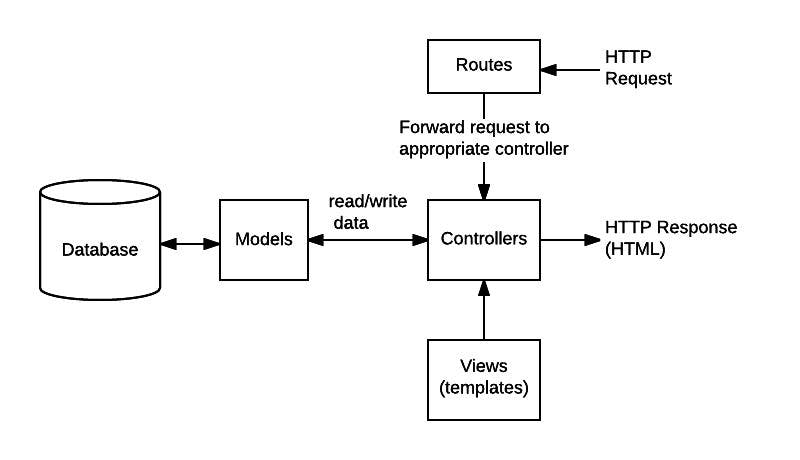
When the clients request an endpoint via an HTTP request like DELETE, GET, PUT, or POST, you can determine how the server will respond to every request. Such a response from the server is possible when you are setting up the below routes:
To create a tutorial.routes.js inside the app/routes folder, use the below code:
A controller from the /controllers/tutorial.controller.js is used in this procedure. You can also include routes in server.js by using app.listen(). To include the routes, you can use the below script:
Testing the API:
To test the APIs, here are the steps:
- Run the Node.js application
- Type in the command on ‘node server.js’. The server is running on port 8080.
The pros and cons when you connect MySQL with node.js will allow the reader to have a better understanding of the library. This will help in creating a controller, defining the routes, and testing the APIs, which are vital for a smooth software functioning perspective.