How to Build a Shopify App with Node JS: The Ultimate Guide
•7 min read
- Languages, frameworks, tools, and trends
- Skills, interviews, and jobs

To successfully start an eCommerce business, you first need to develop an efficient online store. Shopify is one of the most preferred platforms for the development of any eCommerce web application. There are many benefits of using Shopify like high-grade user experience, high-tech front-end designing, capable marketing strategies, and many more. In this article, we are going to learn how to build a Shopify app using node js. But first, let’s understand the node js and the Shopify ecosystem.
Understanding node js
Node js is an open-source JavaScript runtime framework that runs on a V8 engine and conducts code outside a web browser. It provides a reliable and effective environment for the applications without the web browser. A better compiler, that has an easy-to-use interface, can offer easy node js compatibility than the previous code versions of it.
Node JS is mainly designed for building scalable web and mobile network applications. As a user of node js, you are free from dead-locking the entire process as there are no locks available. None of the functions of node js directly performs I/O, therefore, the process is never blocked. Only when the I/O is performed using the synchronous method of the node js library, does there remains a possibility of lock. As there are no blockers for node js, creating a scalable system using node js is very reasonable.
Node js development promises better performance and responses. It will also be helpful in the creation of a Shopify application easily and efficiently.
Shopify & its ecosystem
Shopify is designed to get businesses up and running for competing against each other with a positive online presence. Each business is unique and has different requirements and specifications for the development of an application. These web applications extend their functions to the Shopify stores which lets the business customize their apps as requirements.
Here is how an application can be integrated with Shopify:
- Extend new features inside the current parts of the admin or POS.
- Connect with the Shopify APIs - mainly the admin API will allow applications to read, and write about products, customers, inventors, etc.
- Enhance the methods in which the store displays the information of attracting the customer.
There are two types of applications that are in use:
- Public applications: It is available for all businesses and can help in creating a partner dashboard.
- Custom applications: It provides a customized application that can meet the requirements of any business.
There are two more forms of applications that can be created namely embedded applications and standalone applications. Embedded applications are hosted on your infrastructure and will display directly on the admin or POS. Whereas, the standalone applications will expose their user interface and their web domain and will not have an application extension.
Shopify is the most preferred platform to create business apps as it is easy to find features and functionalities required to build an online presence. Shopify has organized features and required algorithms that help businesses to meet their requirements.
To create an app on the Shopify store include these:
- Optimize your app on the Shopify app listing page,
- Set up your app for success, and
- Leverage tools and features you want to add to the Shopify app. This will help in increasing sales,
- Test multiple times before launching,
- Finally, launch your app on the Shopify app listing page.
Let’s now understand how to build the business app with node js.
How to build a Shopify app with node.js:
Shopify is a great choice for new businesses as it offers eye-catching assets like videos, images, and descriptions making it easier to portray the business and the functionality of the app. But, there are still a few lacking features in the default features a list of Shopify. These are mainly the advanced features. Here is a step-by-step explanation of how to make your app scalable and ready using node js.
Step 1: Installing the node.js
Installation of the node js is the first thing you should keep in mind while building a new improved and customized Shopify app. If you don’t have the node js installed, then you can download or update it to the latest stable version from their official website.
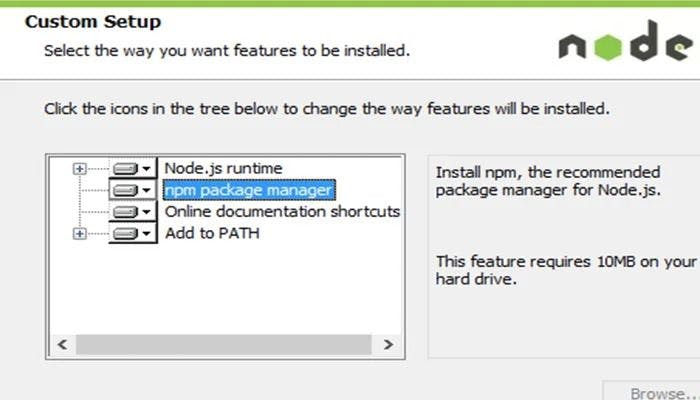
node-v: When you already have a version of node js but don’t have the required version, you can update the node js framework before moving forward.
npm update: The next important step is to prepare the system for developing a Shopify alternative. So, here is the list of the essential node packages which you should have on your PC.
- MySQL
- Crypto
- Cookie
- Body-parser
- Shopify node API
- Dotenv
- Nonce
And when you want to get the above items installed, you need to enter the following command.
npm install nodemon cookie dotenv body-parser mysql shopify-api-node crypto nonce -save
Step 2: Creating a project folder & an index.js file
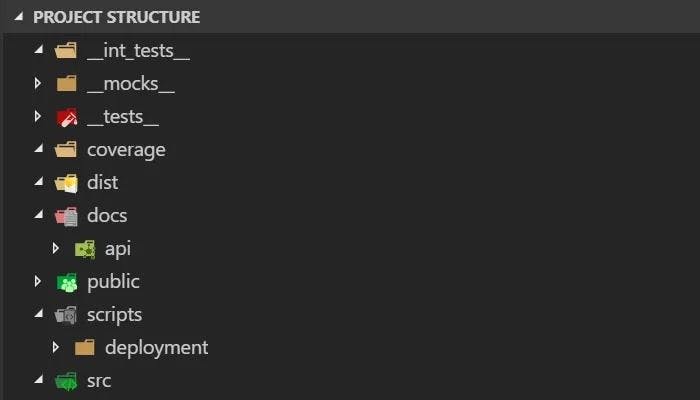
The next step for creating an index file for your app, which can be done using the command below:
npm install
The code for the index.js is as below:
Step 3: Installing ngrok to create a tunnel from the internet
The app you plan to build must make an API Call. That means, that when the app needs SSL to make the call, you will have to use ngrok. With the help of ngrok, you can point the SSL URL directly to your localhost.
The first step is to download the ngrok from its official website. That page has an executable file, which will help in the easy installation and setup of any other app. You can then run the ngrok.exe file and use the command ngrok.
Step 4: Log in to your Shopify developer account
The next step is logging in to your Shopify developer account using the app name and the URL as per step 3. Now, you will need to enter the ngrok URL on the app URL field and on the whitelisted URL. You also need to add the same with the /shopify/callback at the URL end.
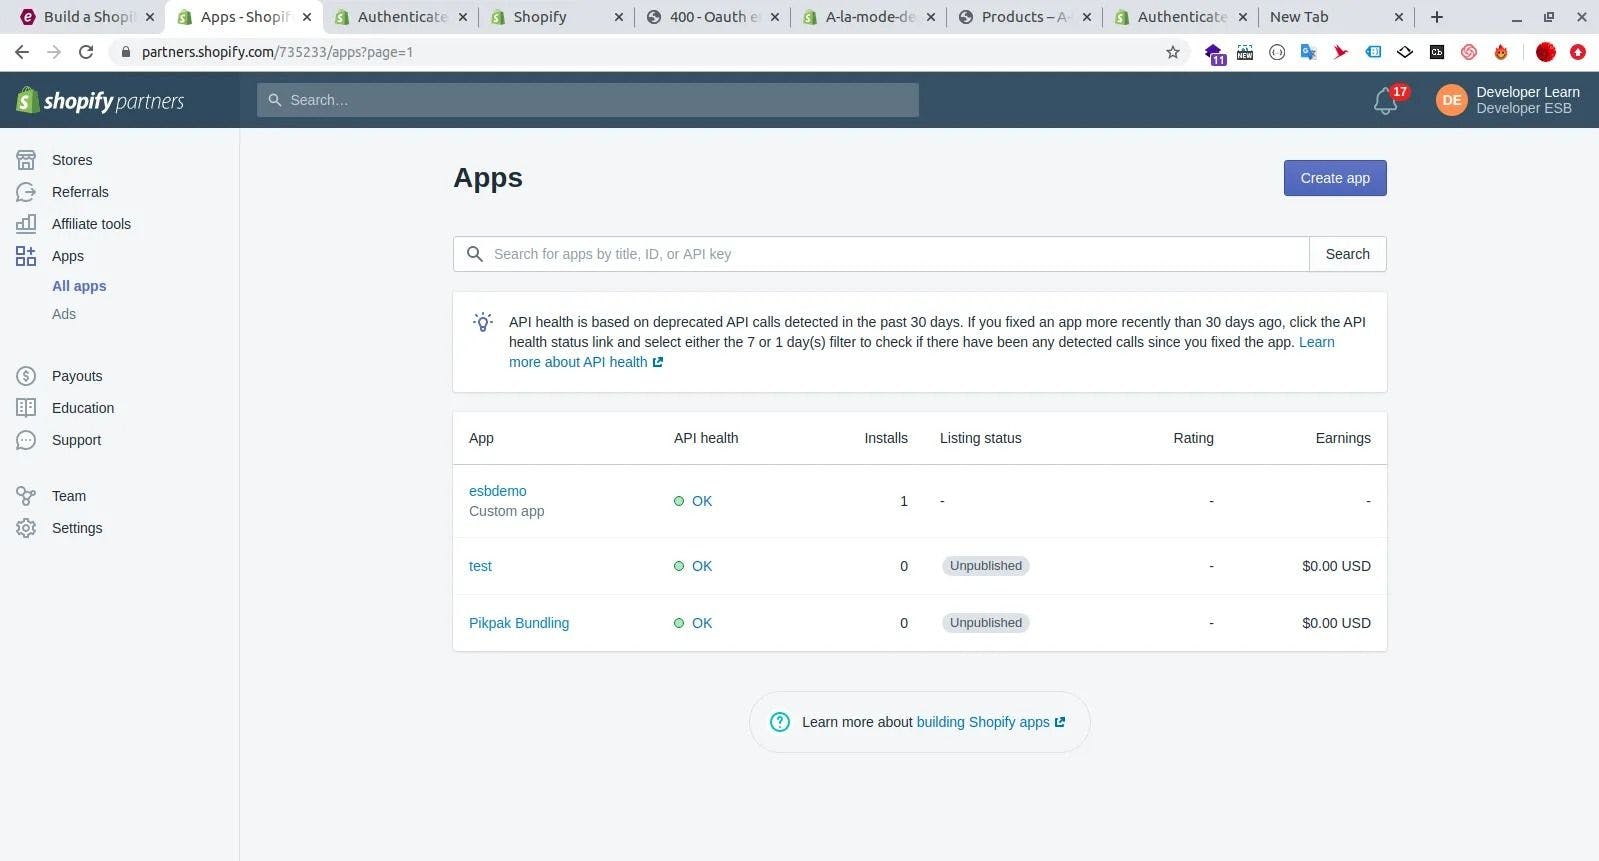
Step 5: Shopping secret key for app authentication
Next, you should shop for the secret key for your app authentication. For this, navigate to the app page, and click on the “App Setup”.
Step 6: Updating the Shopify API Key & the secret key
You will get the Shopify API Key and the Shopify secret key from the Shopify developer page along with the Shopify access token. You can also update and save it in a different place. You can update the Shopify key and the secret key in the index.js.
Step 7: Using the ngrok URL with the shop name
Here is how you can use the ngrok URL with your node shop name:
The above steps can help you build a scalable and effective app on Shopify with node js. It will meet all your requirements and provide your customers with a great UX and UI.
With the help of this information, you can create an application on Shopify that will help in showcasing your business flawlessly to your customers. Also, the great design system of Shopify that we discussed above will make it easier for you to create user interfaces. With these examples, you can easily create a Shopify app in node js and communicate with your API server.
FAQs:
1. Is NodeJS an API?
No node js is not an API. It is a framework of Javascript. However, Node-API is a toolkit that is used to develop any application. Node-API was introduced in Node 8.0. It works as a mediator between node JavaScript engine and C/C++ code.
2. How does Shopify integrate with API?
Integrating API with Shopify offers a complete and easy-to-use toolkit. You can integrate Shopify with API by putting the URL of the API in the webhook and making a request log. It will help in knowing what data Shopify has sent to you.
3. What is Shopify integration?
Shopify is an e-commerce solution that will allow you to set up an online store for selling your goods. It will let you in organizing your products, customize your storefront, accept credit card payments, and track, and respond to orders. The Shopify integration will help you in streamlining your online store and stocking up on your management requirements.
4. What platforms integrate with Shopify?
Shopify will support Integration with popular social media channels and advertising problems like Instagram, Facebook, Tumblr, Facebook, Pinterest, and Google Analytics. They will provide many apps which will cover any function you will want to add to your shop from their Shopify App Store.
5. How do I build a node app?
When you want to build a Node JS Application is by follow the below steps:
- Setting up your development environment
- Creating a project structure
- Importing the required module.
- Creating a server.
- Testing a Request and Response
6. What can you build with NodeJS?
Here are some applications you can build using Node JS:
- IoT (Internet of Things)
- Complex Single Page Applications
- Real-time Chats
- Streaming Apps
- Microservices Architecture
- Real-time Collaboration Tools