Rendering Immersive 3D Graphics Using WebGL
•10 min read
- Languages, frameworks, tools, and trends

WebGL (Web Graphics Library) is a JavaScript API that is used for rendering immersive 2D and 3D graphics within a compatible web browser without using any plug-ins. WebGL rendering is often used for building maps, environments, and other real-life objects for games but it is widely used across the web for presentations and charting the data.
WebGL streamlines the 3D graphics rendering by introducing an API that complies with the OpenGL ES 2.0 which is used in HTML5 elements. This compliance enables the API to take complete advantage of the hardware graphics acceleration provided by the device.
In this article, we will focus on the GraphQL procedures to render immersive 3D objects with lighting, textures, and more.
WebGL supports almost every modern desktop and mobile browser. The support percentage currently is slightly above 96% globally. This powerful library is a GPU-accelerated ‘rasterization engine’ that draws triangles, lines, and points in the browser. These three objects make up the foundation of the WebGL 3D model.
The amount of development code required to make any average changes is not convenient for any web developer. WebGL has been used to develop several game engines and 3D solutions.
Three.JS
A library can be the best tool and JavaScript offers the Three.JS library. Three.JS is a powerful library that fixes several issues. This library is built on the WebGL library and is an easy way to get 3D content that goes onto the web pages. It handles tons of basic functionalities including shadows, lights, scenes, environments, textures, materials, and other worldly elements.
Setting Up Three.JS
Setting up Three.JS is simple and makes use of the canvas element of HTML. All this is done through JavaScript and this can be used to create new WebGL 3D models with geometry in the 3D plane.
Below is an example code to understand how to implement the web elements in a 3D plane.
You can set up other elements such as camera, shadows, environments, and textures in a similar way.
The world of 3D graphics and animation is pretty intimidating. You should know the principles of 3D rendering or you will be stuck in a library that offers tons of things you might not know.
Even if you want to use a high-level graphics library, you need to have basic knowledge of 3D elements to use them effectively. Libraries generally have advanced features including the ShaderMaterial in Three.js. Knowing the principles of graphics enables you to effectively use such advanced features.
Our goal is to give a short introduction to all the key concepts behind 3D graphics and using WebGL rendering to implement them. You will also learn about creating, showing, and moving the 3D objects in an empty 3D space.
Let’s shed some light on how to represent different 3D models.
Designating different 3D models
The very first thing you need to understand is how these 3D models are designated. A model comprises a mesh of triangles. Every triangle is designated by 3 vertices and for every corner of the triangle. There are three most common properties of the vertices. We will learn how to make 3DX graphics, but first, let’s understand a few important concepts.
Vertex position
Vertex Position is the most intuitive property of a vertex. This is the position in 3D space which is represented by a 3D vector of coordinates. If you know the exact coordinates of the three points in 3D space you will have all the information to draw a simple triangle.
Vertex normal
Let us compare the two models. In this example below, we have considered two models that consist of the same vertex positions. Although they have the same vertex, they look different when rendered. But why do they look different?
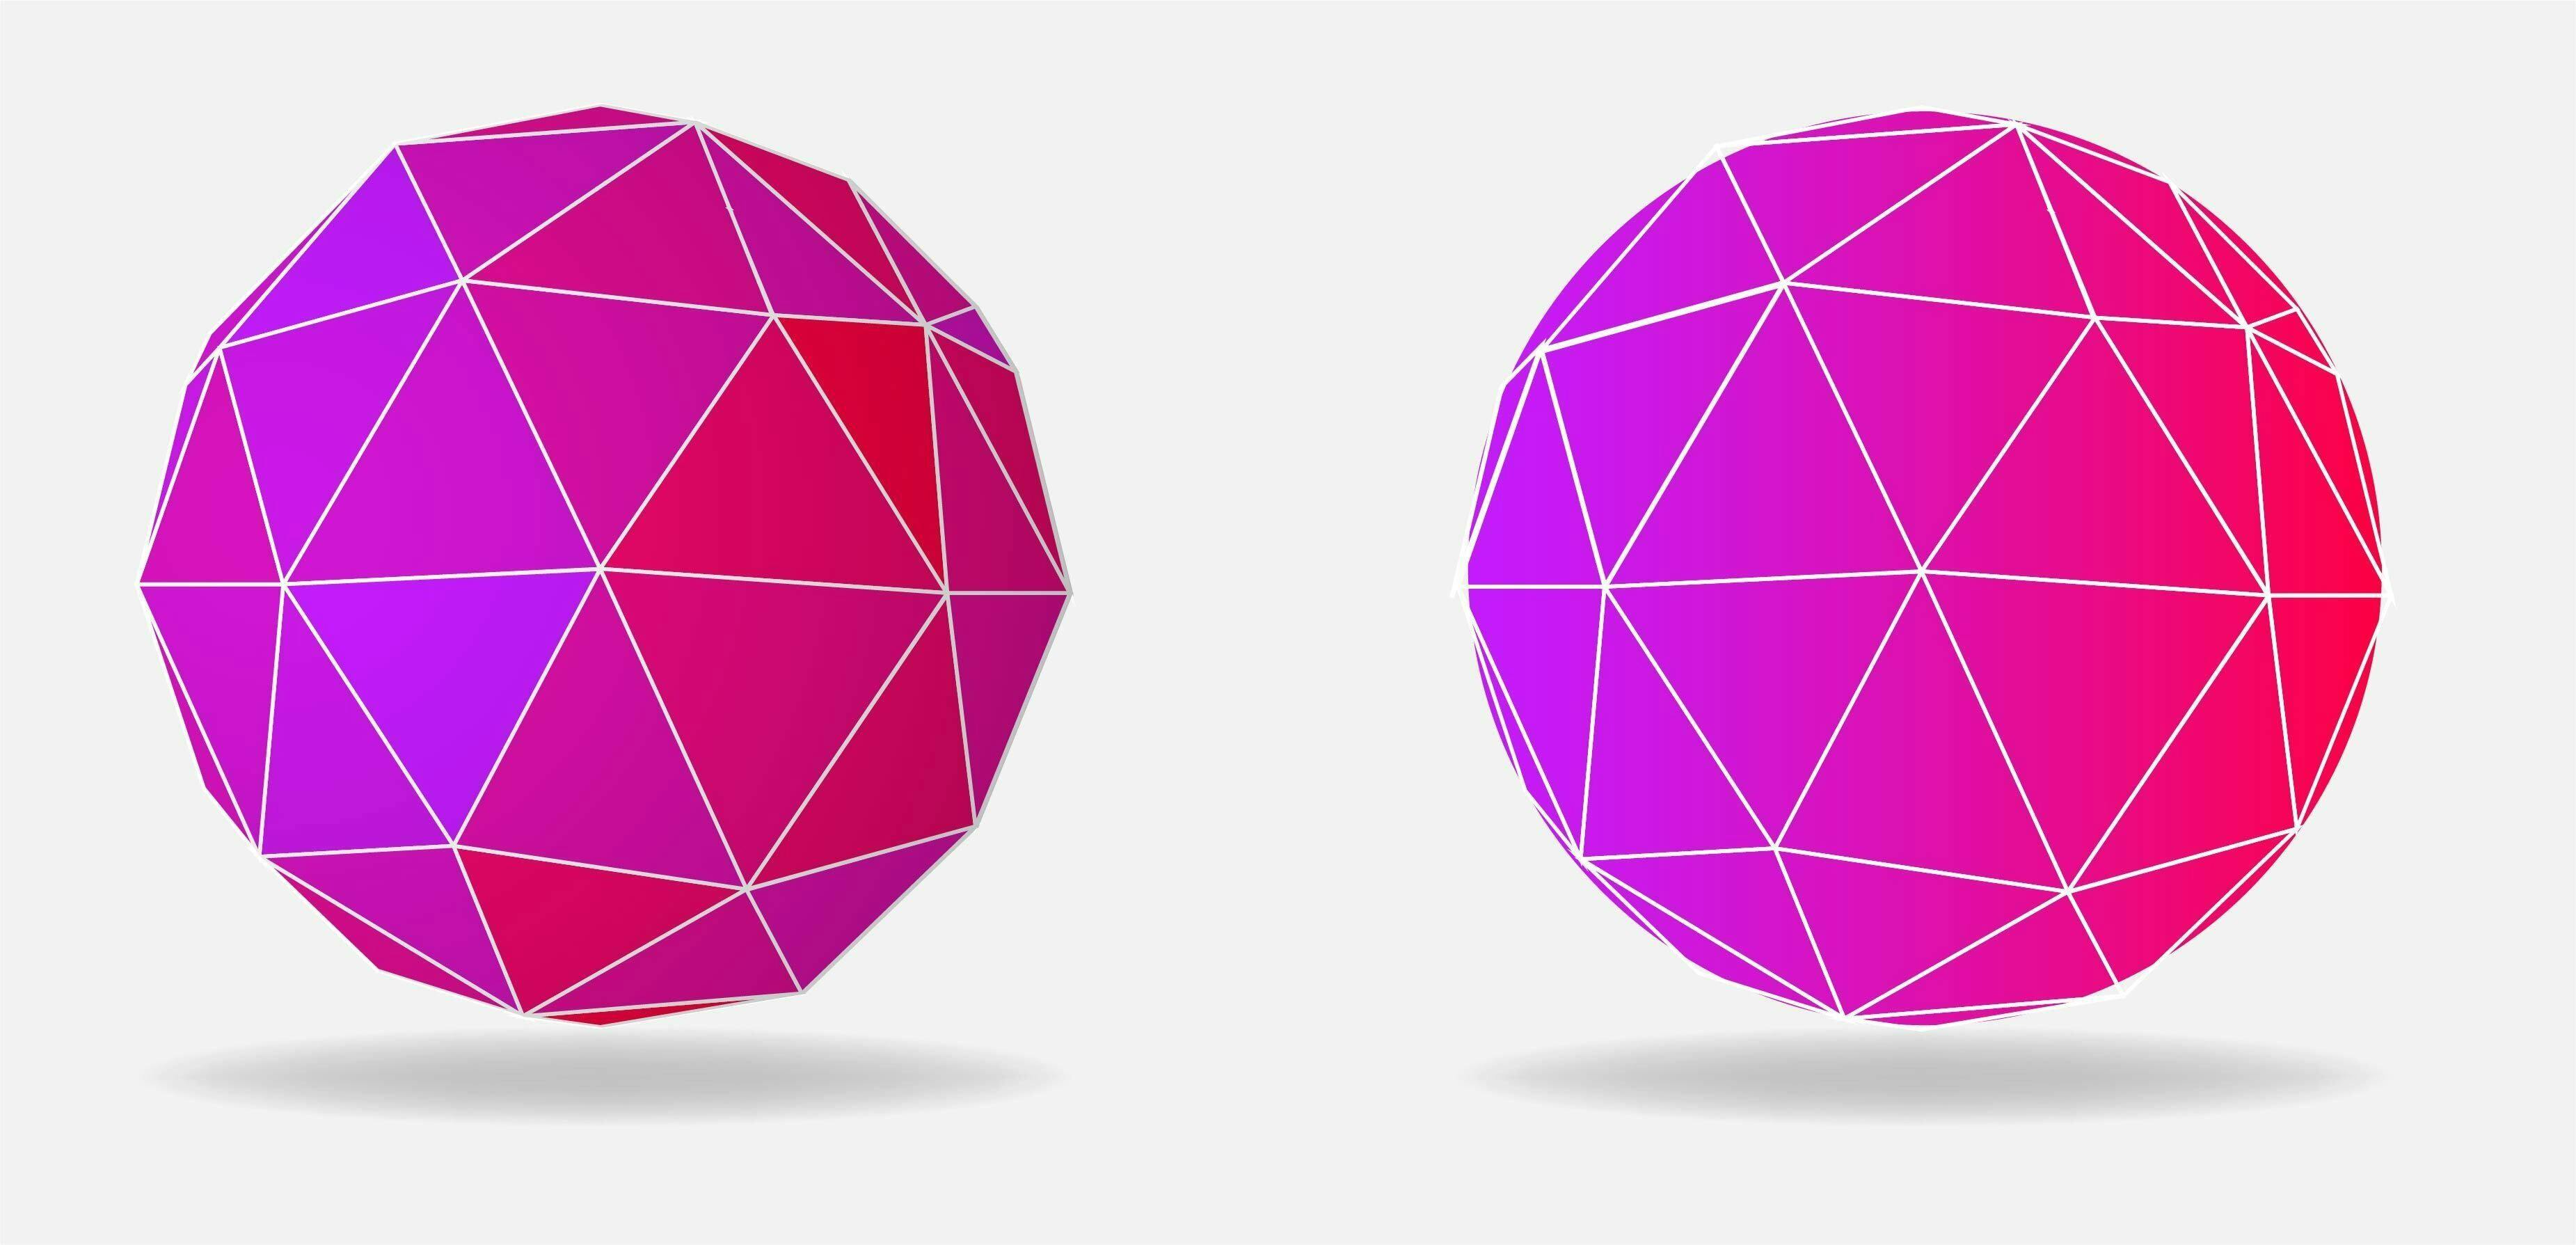
The right and left surfaces correspond to right and left balls respectively. Rather than deciding where we want to see or locate a vertex, we can define a hint on how the surface is bent in the exact position. The hint would be in the form of a specific point on the model, which is designated with a 3D vector. Let’s take an image to understand how to designate the hint with a 3D vector.
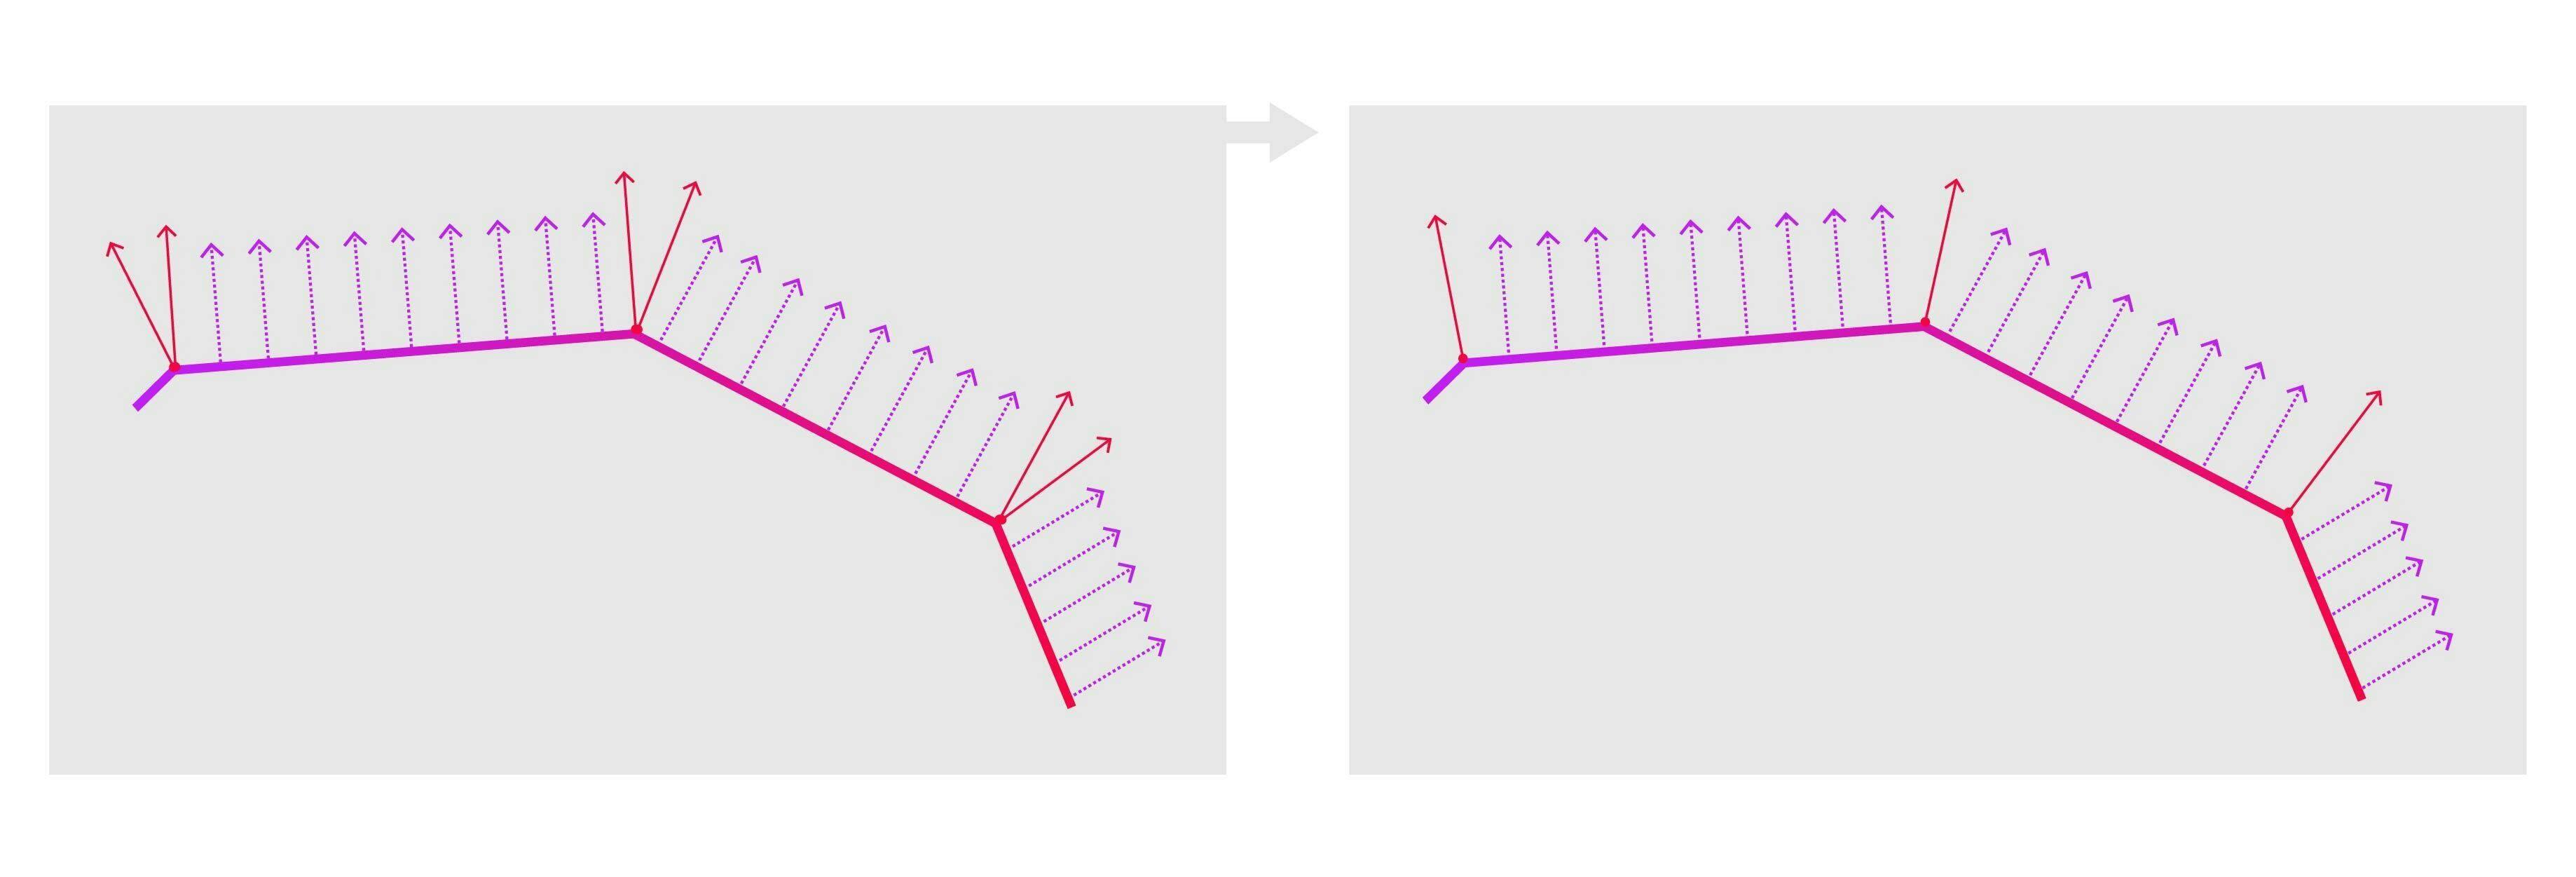
The blue arrows depict the calculations and the red ones depict the normals that are specified for all the points between the vertices. The above image shows a simple representation of a model in the 2D space, but the same can be applied in the 3D space as well.
Texture coordinates
It is also known as UV mapping, texture coordinates is the last property you should know. Texture has various areas on it that represent the images to be applied to different parts of the model. Texture coordinates bridge the gap between the triangle and texture. Using this property the renderer can easily figure out which triangle should be designated to which portion of the texture.
There are two coordinates, U and V. These coordinates are designate a place on the texture where the U coordinate represents the horizontal axis and the V coordinate represents the vertical axis. The values are specific positions within the image.
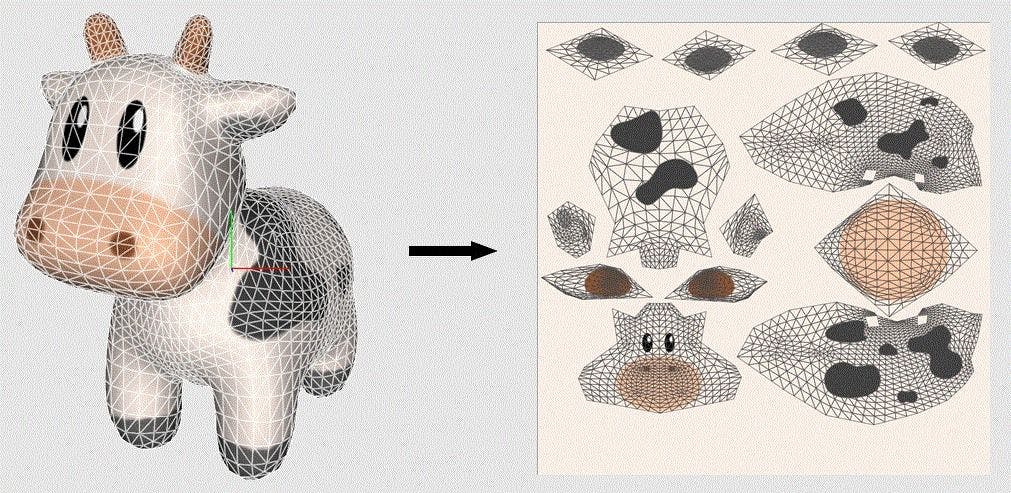
You can clearly see a demonstration of UV mapping on the image we have taken above. The 3D image was defragmented into portions small enough to be represented in a 2D space. The seams where cuts were made are marked with thick lines and the patches have been highlighted.
OBJ model loading
This is all you need to create your simple model loader. The OBJ file format is simple to understand and can be implemented to parse the code. This file lists different vertex positions in this format:
There is an optional fourth format that the renderer does not use to keep things transparent and less complex. Similarly, the vertex formats are represented as:
We have ignored the final texture coordinates that are represented by this format:
In all three cases, the respective coordinates are represented by floats.
Different groups of vertices represent the faces where each vertex is represented by the index of each property. We have implemented these formats to avoid any complexities in the loader as the other options require critical processing before they are implemented in a format according to WebGL.
3D modeling enables us to set different limitations to export a model as an OBJ file. Let’s take an example of a code that parses a string representing an OBJ file into triangles.
Drawing an object with WebGL graphics pipeline
Triangle is the simplest surface you can draw. Professionals know that the majority of elements in 3D space consist of several triangles.

The very first thing you need to understand is the way the screen is represented in WebGL. It is a 3D space that spans between ‘1’ and ‘-1’ on the x, y and z-axis. By default, the z-axis is not used but we will enable this for better understanding.
You can easily define three vertices that represent the triangle you want to have. After this process, you can input the data and send it across the GPU. Now that you have defined the vertices to the GPU, you can define what logic the GPU would use to place the vertices on the screen. As a result, the GPU performs multiplications of 4x4 matrices.
Default framebuffer
WebGL context is the most important element of the WebGL application. You can access the context with gl = canvas.getContent(‘webgl’). The canvas we used here is the DOM element of the canvas we want to use. Default framebuffer is another element that the context has.
We can describe the framebuffer as a buffer where you can draw something. The default framebuffer accumulates the pixel color on every pixel of the canvas. We then will have to define a renderer that will render the image into an HTML canvas. Here is the code for that:
Shaders
Let us write a program that runs on the graphics card. This entire process consists of two parts.
- Vertex shaders
- Fragment shaders
The vertex shader and the fragment shader are run for each vertex and each pixel that is covered by a triangle on the screen respectively.
Let’s understand these two shaders in detail and learn about their roles.
Vertex shaders
Let’s take an example of a model that goes right and left on the screen. You can update the position of each vertex and send it to the GPU. This approach takes time and is expensive too. On the other hand, you can write a program for the GPU to run for each vertex. This program can do all the operations in tandem with a powerful processor.
The vertex shader is a part of the WebGL rendering pipeline that processes the individual vertices. A single vertex shader is fetched with a single call and displays a single vertex after all the possible transformations.
Vertex shader contains three types of variables and every one of them serves a unique purpose.
- Attribute
- Uniform
- Varying
Attribute
Attributes are the inputs that hold specific properties of a vertex which are generally defined in the form of a 3-element vector. It define a vertex.
Uniform
A uniform is a different type of input that is the same for every vertex in the same WebGL rendering call. When you want to move the model around by defining a transformation matrix, you can use a uniform variable to define the situation.
Varying
These are the outputs that are passed to the fragment shader. There are multiple pixels for a single triangle of vertices, every pixel has an interpolated value for the variable depending on the position. Varying is a value that defines the surfaces between multiple vertices.
Let’s take an example where we want to create a vertex shader that receives these elements:
- A position
- Normal
- UV coordinates for each vertex
- Inverse camera position
- A projection matrix for each rendered object
You also want to have the individual pixels based on their UV coordinates and their normals. This is how our code looks.
Fragment shaders
A fragment shader occurs after the rasterization in the graphics. This shader deals with the color combination, depth, and other important elements for every pixel under consideration.
When we compare the vertex shaders and the fragment shader, there aren’t many differences between the variables of these two shaders. However, these are a few notable differences:
- There is no varying output and the attribute inputs are replaced with the varying inputs.
- Our only concerned output is gl_FragColor. The elements represent the RGBA spectrum (red, green, blue and Alpha) with the variables in the range of 0 to 1. Alpha must be kept at 1 if you are implementing transparency.
- You need to set the float precision at the start of the fragment shader. This is quite important for interpretations.
Keeping these elements in mind, you can write the code for a shader that paints the green channel based on the V position and the red channel based on the U position.
There are several sources of information for learning advanced tricks of WebGL. OpenGL is the superset of WebGL where you can find all the answers to your questions.
The uptake of 3D technologies is faster than ever and with a swift drive, WebGL brings exciting objects to life in a 3D space. It supports hardware acceleration of 3D graphics for multiple browsers. Hope this insightful article helps you ace your upcoming WebGL project.
FAQs
1. How do I create WebGL graphics?
WebGL enables the web content to use an API that is based on the OpenGL Embedded Standard 2.0. This library is used to perform 2D and 3D rendering in an HTML canvas. This powerful library consists of the control code written in JavaScript and Shader code (GLSL) which is executed on the GPU.
2. Which browsers support WebGL?
Almost every modern browser including Opera, Mozilla, Chrome, and Safari works in tandem with WebGL.
3. What is a WebGL framework?
The WebGL framework is a JavaScript API library that is based on OpenGL ES 2/0 to render 2D/3D graphics in the browser. This framework leverages the GPU to render HD graphics into HTML pages.
4. Is WebGL better than OpenGL?
WebGL is used for web browsers and other applications while OpenGL is used for building video games. OpenGL needs dedicated drivers to install the software. OpenGL is a bit complex while WebGL is easier to learn and implement. Both are better wherever needed but WebGL is easy to understand and implement.
5. Does WebGL work without GPU?
No. You cannot run WebGL on Windows without a GPU. WebGL allows the GPU to execute the graphics commands and operations in paralle with the CPU operations. WebGL improves the efficiency and parallel-processing power of the GPU. So WebGL cannot work without a GPU.
6. What should I learn before WebGL?
You should learn either Java, Objective-C, C++, or C before learning OpenGL. Learning WebGL requires knowledge of JavaScript. Apart from that, you must learn the Shading Language for OpenGL.