
CSS
Basic Interview Q&A

1. What is CSS and what is its purpose?
CSS, or Cascading Style Sheets, is a stylesheet language used for describing the look, formatting, and layout of documents written in HTML (Hypertext Markup Language) or XML (Extensible Markup Language). Its primary purpose is to separate the presentation and design of a web page from its content, making it easier to maintain, update and modify the visual appearance of a website.
The main benefits of CSS include:
- Consistency: By using a single CSS file to control the styles for multiple pages, you can create a consistent look and feel across an entire website.
- Efficiency: CSS reduces code duplication and makes it easier to manage and update styles. This leads to faster page-load times and lower bandwidth usage.
- Modularity: With CSS, you can break courses down into modules that can be easily reused, combined, and updated independently of each other.
- Accessibility: CSS helps create accessible web pages by allowing developers to apply specific styles for different types of devices or user preferences.
- Flexibility: CSS offers a wide range of styling properties and techniques that can be used to achieve various effects, catering to diverse design requirements.
2. What are the different ways to include CSS in a web page?
There are three main ways to include CSS in a web page:
- Inline CSS: Adding the style directly to an HTML element using the "style" attribute.
- Internal CSS: Placing the CSS code within the < style > tags in the < head > section of an HTML document.
- External CSS: Linking an external CSS file to the HTML document using the < link > tag in the < head > section.
3. How do you select an element with a specific class in CSS?
To select an element with a specific class in CSS, you use the dot (.) followed by the class name. For example, to select all elements with the class "example-class", the CSS selector would be ".example-class".
4. What is the box model in CSS?
The Box Model in CSS refers to the concept that organizes and structures HTML elements on a web page in the form of rectangular boxes. Every element in a page is comprised of a rectangular box, which includes content, padding, border, and margin. These components contribute collectively to the element's dimensions and positioning.
- Content: The actual text or images inside the element.
- Padding: The space between the content and the border, working as a cushion around the content.
- Border: The line enclosing the padding and content, which visually defines the boundaries of the element.
- Margin: The space surrounding the border, which helps to space out elements from each other and other sections of the page.
Together, these elements determine the total dimensions and layout of an HTML element on a web page. The Box Model is crucial for controlling the placement and appearance of content when designing a web page using Cascading Style Sheets (CSS).
5. How do you center an element horizontally in CSS?
To center an element horizontally in CSS, you can use one of the following methods:
- Set the left and right margins to "auto" and specify a width for the element.
- Use the flexbox layout by setting the parent container's "display" property to "flex" and using the "justify-content" property with a value of "center".
6. How do you change the background color of an element in CSS?
To change the background color of an element in CSS, you use the background-color property and set it to the desired color. You can use color names, hexadecimal values, RGB, or HSL values as the color value. Here's an example of how to set the background color of an element with a class name "example":
.example {
  background-color: red; /* color name */
  /* or */
  background-color: #ff0000; /* hexadecimal value */
  /* or */
  background-color: rgb(255, 0, 0); /* RGB value */
  /* or */
  background-color: hsl(0, 100%, 50%); /* HSL value */
}
Apply the class to an HTML element:
<div class="example">
  This element's background color is red.
</div>
7. What is the difference between padding and margin in CSS?
In CSS, padding and margin are properties that control the space around an element, but they serve different purposes:
- Padding: This property defines the space between the content of an element and its border. It is usually used to create extra space around the content inside an element. Padding is included within the background color or background image of the element and holds the border outside the actual content.
- Margin: This property defines the space around the outside of an element, between the element and its surrounding elements. It is used for creating space between elements, and it is transparent. Margin is situated outside the border, so if an element has a background color or image, it won't influence the margin.
8. How do you add a border to an element in CSS?
To add a border to an element in CSS, you need to set the border property, which is a shorthand for three individual properties: border-width, border-style, and border-color. You can specify all three properties in a single declaration or set them individually.
Here's an example of how to add a border using the shorthand property:
.box {
  border: 2px solid red; /* border-width, border-style, and border-color */
}
Or you can set the properties individually:
.box {
  border-width: 2px;
  border-style: solid;
  border-color: red;
}
Both of these examples will result in a red, solid border with a width of 2 pixels around an element. To apply the style, add the class to an HTML element:
<div class="box">This element has a solid red border of 2 pixels width.</div>
The border property allows you to style borders with different widths, styles (e.g., solid, dashed, dotted, etc.), and colors. You can also control the border for individual sides (top, right, bottom, and left) using specific properties like border-top, border-right, border-bottom, and border-left.
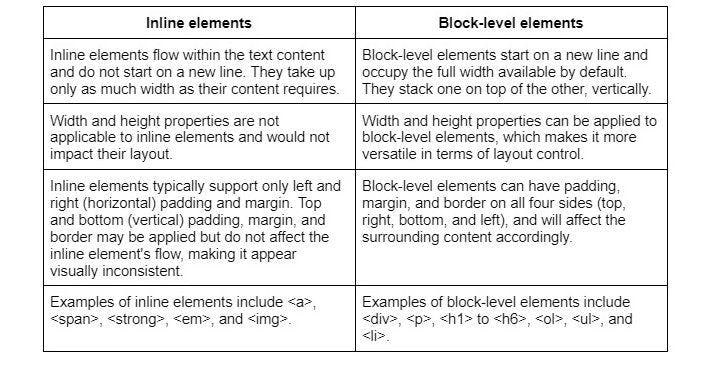
9. What is the difference between inline and block-level elements in CSS?
In CSS, elements can be categorized as either inline or block-level based on their default display behavior within the HTML document. Here are the key differences:
10. How do you apply CSS styles to only the first letter of a paragraph?
To apply CSS styles to only the first letter of a paragraph, you can use the ::first-letter pseudo-element. It allows you to target and style the first letter of a text element without altering the HTML structure. Here's an example:
p::first-letter {
  font-size: 2em;
  font-weight: bold;
  color: blue;
}
In this example, the first letter of every < p > (paragraph) element will be styled with a larger font size (2 times the normal font size), bold font-weight, and blue color.
11. What is the purpose of CSS selectors?
CSS selectors are patterns used to identify and select HTML elements to which specific styles should be applied. The main purpose of CSS selectors is to target elements on a web page based on their attributes, positions, or relationships with other elements so that you can apply styling rules to them.
12. How do you apply CSS styles inline?
To apply CSS styles inline, you can use the ‘style’ attribute directly on an HTML element. Inline styles are written as part of the element's opening tag, and the CSS properties are defined within the ‘style’ attribute. Here's an example:
<p style="font-size: 18px; color: red; font-weight: bold;">This paragraph has inline CSS styles applied to it.</p>
In this example, the ‘< p >’ element has inline styles that set the font size to 18 pixels, the color to red, and the font weight to bold.
Keeping in mind that inline styles have the highest specificity among all CSS selectors, meaning they will override any styles defined in an internal or external stylesheet unless the ‘!important’ flag is used in the other styles. However, using inline styles is generally not recommended as they can make your HTML code harder to maintain. It is better to use external or internal stylesheets when possible.
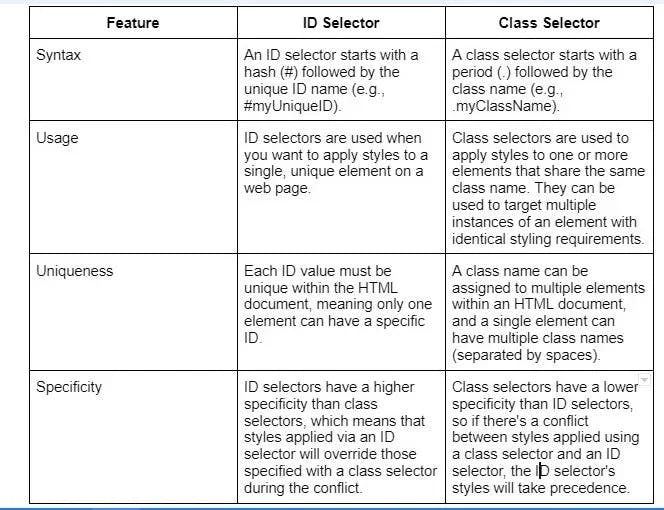
13. Explain the difference between an ID selector and a class selector in CSS.
In CSS, ID selectors and class selectors are used to apply styles to HTML elements based on their attributes, but they have different use cases and characteristics:
14. How do you change the font size of an element in CSS?
To change the font size of an element in CSS, you can use the font-size property. The font-size property can accept various units like px (pixels), em, rem, % (percentage), and more. Here's an example of how to set the font size for different elements:
/* Using pixels (absolute unit) */
p {
  font-size: 16px;
}

/* Using em (relative unit) */
h1 {
  font-size: 2em; /* 2 times the parent element's font-size */
}

/* Using rem (relative unit) */
h2 {
  font-size: 1.5rem; /* 1.5 times the font-size of the root element (<html>) */
}

/* Using percentage (relative unit) */
li {
  font-size: 110%; /* 110% of the parent element's font-size */
}
Apply the styles to the corresponding HTML elements:
<p>This paragraph has a font size of 16 pixels.</p>
<h1>This heading has a font size of 2 times the parent element's font size.</h1>
<h2>This heading has a font size of 1.5 times the root element's font size.</h2>
<li>This list item has a font size of 110% of the parent element's font size.</li>
15. What is the float property used for in CSS?
The float property in CSS is used to position an element to the left or right of its containing element, allowing other elements to wrap around it. It is commonly used for creating layouts with multiple columns or for aligning images within text.
16. How do you change the text color of an element in CSS?
To change the text color of an element in CSS, you use the color property and set it to the desired color. You can use color names, hexadecimal values, RGB, or HSL values as the color value. Here's an example of how to set the text color of an element with a class name "example":
.example {
  color: green; /* color name */
  /* or */
  color: #008000; /* hexadecimal value */
  /* or */
  color: rgb(0, 128, 0); /* RGB value */
  /* or */
  color: hsl(120, 100%, 25%); /* HSL value */
}
Apply the class to an HTML element:
<div class="example">
  The text color of this element is green.
</div>
17. What is the CSS display property used for?
The CSS display property is used to control how an element is rendered on the page. It defines the display behavior of an element - whether it should be treated as a block-level element, an inline element, or other display types like flex or grid.
18. How do you create a hyperlink style in CSS?
To create a hyperlink style in CSS, target the anchor element and apply the desired styles to the different hyperlink states - unvisited (link), visited, hover, and active. The common hyperlink states and their CSS pseudo-classes are:
- :link - targets unvisited links
- :visited - targets visited links
- :hover - targets links when being hovered by the mouse cursor
- :active - targets links when being clicked or activated by keyboard
Here's an example of creating a simple hyperlink style:
/* Unvisited link */
a:link {
  color: blue;
  text-decoration: none;
}

/* Visited link */
a:visited {
  color: purple;
}

/* Hover effect */
a:hover {
  color: red;
  text-decoration: underline;
}

/* Active link */
a:active {
  color: orange;
}
19. Explain the difference between px, %, em, and rem units in CSS.
In CSS, different units of measurement are used to define lengths, dimensions, and sizes. Some commonly used units are px, %, em, and rem. Each has its own unique characteristics:
- px (pixels): One of the most commonly used units, a px represents an absolute length or size in terms of screen pixels. 1px is equal to one dot on the screen. The actual physical size of a pixel may vary depending on screen resolution, but px provides a consistent measurement across devices and displays.
- % (percentage): Percentage values are relative to another value, such as the width or height of a parent element. As a result, they offer a more fluid and responsive approach to sizing elements.
- em: The em unit is relative to the font size of the element itself or the nearest parent element with a specified font size. 1em is equal to the current font size, so if the font-size of the document is 16px, then 1em will equal 16px.
- rem: Similar to em, the rem unit is relative to the font size. However, rem is always relative to the base (root) font size of the document, usually defined on the element. This unit provides a consistent way to scale elements based on the overall font size of the page, without being affected by the font size of parent elements.
20. How do you add a background image to an element in CSS?
To add a background image to an element in CSS, you use the background-image property. You'll need to provide the URL of the image file within the url() function as the property's value. Here's an example:
.selector {
background-image: url('path/to/image.jpg');
}
Replace .selector with the appropriate CSS selector for the element you want to apply the background image to, and replace 'path/to/image.jpg' with the actual path to the image file.
21. What is the purpose of the CSS z-index property?
The CSS z-index property is used to control the stacking order of elements on a web page. Elements with a higher z-index value will appear in front of elements with a lower value. It is commonly used to layer elements and create overlays.
22. How do you set the height and width of an element in CSS?
In CSS, you can set the height and width of an element using the height and width properties. These properties can be applied to most elements, except non-replaced inline elements and table columns.
Here's an example of how to set the height and width of an element:
.my-element {
  width: 200px;
  height: 100px;
}
In this example, the element with the class my-element has a width of 200 pixels and a height of 100 pixels. You can use different units, such as px (pixels), em, rem, % (percentage), and vw/vh (viewport units), depending on your design requirements.
23. Explain the difference between position: relative; and position: absolute;.
position: relative; and position: absolute; are both CSS positioning properties that determine how an element is positioned in a webpage. They offer different methods for controlling an element's placement:
position: relative: When an element has position: relative;, its position is calculated based on its normal position in the document flow (i.e., its static position). You can then use the top, right, bottom, and left properties to adjust the element's position relative to its original location, without affecting the placement of other elements around it.
position: absolute: When an element has position: absolute;, it is taken out of the normal document flow and positioned relative to the nearest positioned ancestor element (the nearest element with a specified position other than static). If it does not have a positioned ancestor, the element is positioned relative to the initial containing block, usually the initial viewport or document body. You can use the top, right, bottom, and left properties to set the position of the absolute element relative to its positioned ancestor.
24. How do you create a list without bullets in CSS?
To create a list without bullets in CSS, you need to target the list element(s) and set the list-style-type property to none. Typically, you will either work with unordered lists (< ul >) or ordered lists (< ol >). Here's how you can remove bullets (or numbers) from an unordered list:
ul {
  list-style-type: none;
}
This CSS rule targets all unordered lists (< ul >) in the document and removes the bullets by setting the list-style-type to none.
25. What is the purpose of the CSS opacity property?
The CSS opacity property is used to control the transparency of an element. It accepts a value between 0 (completely transparent) and 1 (fully opaque). It can be used to create subtle transparency effects or fade animations.
26. How do you align text to the center of an element in CSS?
To align text to the center of an element in CSS, you can use the text-align property with the value center. This will horizontally center the text within the specified container element. Here's an example:
CSS:
.center-text {
  text-align: center;
}
HTML:
<div class="center-text">
  This text is horizontally centered within the div.
</div>
In this example, the CSS rule targets any element with the class center-text and applies the text-align: center; styling to it. When you add the class center-text to an HTML element, the text content within that element will be horizontally centered.
27. Explain the difference between nth-child() and:nth-of-type() selectors.
Both :nth-child() and :nth-of-type() are CSS pseudo-class selectors that allow you to target specific elements based on their position in a group of siblings. However, they differ in the way they determine which elements to select.
:nth-child() selects elements based on their position in the group of all sibling elements, regardless of their type (e.g., < div >, < p >, < li >). The syntax is :nth-child(an+b), where a and b are integers and n is a counter that starts from 0.
:nth-of-type() selects elements based on their position in a group of siblings with the same element type. The syntax for :nth-of-type() is almost identical to :nth-child(): :nth-of-type(an+b).
28. How do you style all links within a specific container in CSS?
To style all links within a specific container in CSS, you can use the descendant selector. This allows you to target all the anchor elements () that are descendants of the container element, regardless of their nesting level.
Assuming that your container has a class called .container, you can apply styles to all the links within that container like this:
.container a {
  /* Your styles here */
  color: red; /* For example, change the link color to red */
}
In this example, all anchor elements (< a >) inside the .container element will have the text color set to red. You can replace .container with other selectors such as #container-id if your container is identified with an ID instead of a class.
29. What is the CSS box-shadow property used for?
The CSS box-shadow property is used to add a shadow effect to an element. It allows you to control the shadow's color, size, blur, and position. By applying a box shadow, you can give depth and dimension to elements on the page.
30. How do you create a horizontal navigation menu using CSS?
To create a horizontal navigation menu using CSS, you can follow these steps:
HTML:
First, define the HTML structure of the menu using an unordered list (< ul >) and list items (< li >). Wrap each list item in an anchor tag (< a >) to create a link:
<nav>
  <ul class="navigation-menu">
    <li><a href="#home">Home</a></li>
    <li><a href="#about">About</a></-li>
    <li><a href="#services">Services</a>li>
    <li><a href="#contact">Contact</a></-ti>
  </ul>
</nav>
CSS:
Next, apply CSS styles to convert the vertical list into a horizontal navigation menu:
/* Remove list style and padding */
.navigation-menu {
  list-style: none;
  margin: 0;
  padding: 0;
  display: flex; /* Display the list items in a row */
}

/* Style list items and links */
.navigation-menu li {
  margin: 0; /* Adjust margins as needed */
}

.navigation-menu a {
  display: block; /* Make the link fill the entire list item */
  padding: 10px; /* Add padding around the link text */
  text-decoration: none; /* Remove the default link underline */
  color: #000; /* Set link color */
}

/* Add hover effect on links */
.navigation-menu a:hover {
  background-color: #f2f2f2; /* Change the background color on link hover */
  color: #333; /* Change the link text color on hover */
}
In this example, we've created a basic horizontal navigation menu with links and a simple hover effect. You can modify the styles as needed to match your preferred design.
Wrapping up
These CSS interview questions are a valuable asset for both applicants and hiring managers. Candidates can use these questions as a guideline to adequately prepare for CSS-related interviews, ensuring they effectively exhibit their knowledge and abilities. Hiring managers, on the other hand, can employ these questions to assess candidates' CSS competency and find the top CSS developers for their teams.
If you're a hiring manager looking for top CSS developers and don't want to go down the tedious route of recruiting, and wasting resources and time, Turing has you covered. Our AI-powered talent cloud enables Silicon Valley organizations to hire top developers from across the world in just a few clicks.
Hire Silicon Valley-caliber CSS developers at half the cost
Turing helps companies match with top quality remote JavaScript developers from across the world in a matter of days. Scale your engineering team with pre-vetted JavaScript developers at the push of a buttton.
Tired of interviewing candidates to find the best developers?
Hire top vetted developers within 4 days.


Leading enterprises, startups, and more have trusted Turing

Check out more interview questions
Hire remote developers
Tell us the skills you need and we'll find the best developer for you in days, not weeks.